
If you’re looking for a quick and delicious meal, Moo Goo Gai Pan is a classic Chinese stir-fry that checks all the boxes. With tender chicken and vibrant veggies, this dish can be on your table in just 20 minutes! For another quick meal, check out Easy One-Pan Chicken Dinner (Ready In 30 Minutes).
Overview of Moo Goo Gai Pan
What is Moo Goo Gai Pan?
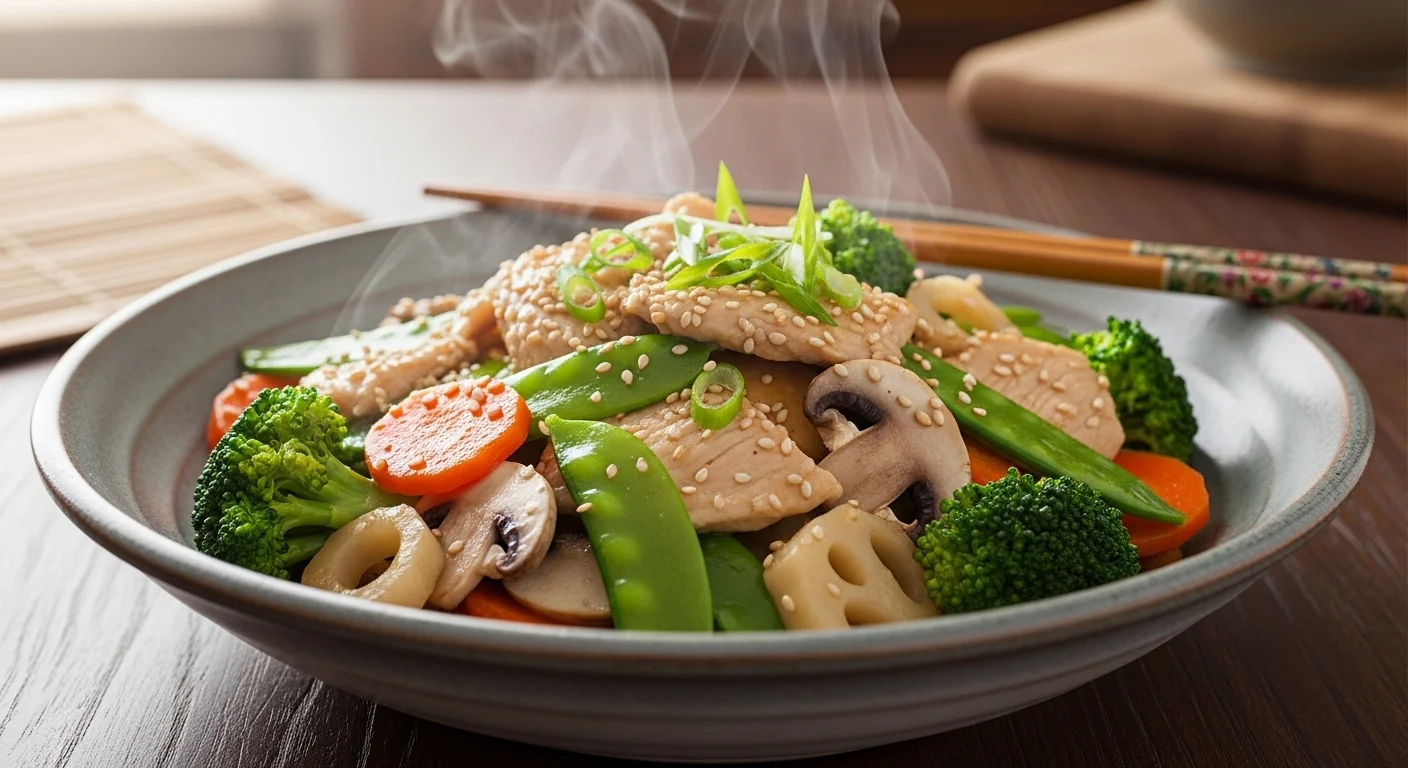
Moo Goo Gai Pan is a popular Chinese dish that features chicken stir-fried with a variety of vegetables. The name translates roughly to “mushroom and sliced chicken,” which gives you a good hint about its two primary components. Typically, the chicken is cut into thin strips, marinated, and then quickly cooked in a hot wok or skillet. The vegetables, often including mushrooms, bell peppers, and snow peas, add color, flavor, and nutrition. The dish is usually finished with a light, savory sauce that brings everything together beautifully.
History and Origins of the Dish
The origins of Moo Goo Gai Pan are often traced back to Cantonese cuisine, where stir-frying is a key cooking method. It’s thought to have been introduced to the United States by Chinese immigrants in the early 20th century. I find it fascinating how this dish has evolved over the years, adapting to local tastes while still maintaining its roots. Originally, Moo Goo Gai Pan was designed to highlight the freshness of ingredients while being light on the palate, making it a favorite among those looking for a healthier meal option. I remember the first time I tried it; I was instantly hooked by the combination of flavors and textures!
Key Ingredients
The beauty of Moo Goo Gai Pan lies in its simplicity and the quality of its ingredients. The main components include chicken, mushrooms, and a variety of vegetables. Typically, the mushrooms used are shiitake or button mushrooms, which add a rich, earthy flavor. I often experiment with seasonal vegetables, adding whatever I have on hand, like carrots or broccoli. The sauce usually consists of soy sauce, oyster sauce, and sometimes a touch of sesame oil, which gives it that signature umami kick. For me, the key to a great Moo Goo Gai Pan is ensuring that all ingredients are fresh and prepped before you start cooking.
Preparation Time and Cooking Techniques
Why 20 Minutes?
The appeal of a 20-minute Moo Goo Gai Pan is undeniable. In our fast-paced lives, sometimes we crave a home-cooked meal without the hours of prep and cooking time. I love that this dish allows me to whip up something satisfying and nutritious in under half an hour. The secret lies in efficient preparation and high heat cooking with a wok or a large skillet. When everything is prepped and ready to go, the stir-frying process itself takes just a few minutes. I usually set a timer to keep me on track, and I find that it makes the cooking experience feel fun and engaging! If you want another quick meal idea, check out Quick Chicken Katsu (Crispy & Juicy Japanese Cutlets).
Essential Cooking Equipment
To achieve the best results with Moo Goo Gai Pan, having the right equipment is key. I recommend using a wok if you have one, as its shape allows for even cooking and great heat distribution. If you don’t have a wok, a large non-stick skillet works just as well. Also, you’ll need a sharp knife for slicing the chicken and vegetables, a cutting board, and some prep bowls to keep everything organized. I’ve learned that having all my ingredients ready to go makes the cooking process smoother and way more enjoyable. Plus, it’s a great way to avoid any last-minute scrambling!
Ingredients for 20-Minute Moo Goo Gai Pan
Main Ingredients
The main ingredients for a classic Moo Goo Gai Pan are quite simple. You’ll need:
- Boneless, skinless chicken breast or thighs
- Shiitake or button mushrooms
- Garlic and ginger for flavor
I usually slice the chicken into thin strips for quick cooking, and I love the earthy taste of shiitake mushrooms, but feel free to use whatever mushrooms you prefer. I often have a mix of both in my kitchen!
Vegetables to Include
When it comes to vegetables, the more variety, the better! Typical choices include:
- Snow peas or snap peas
- Bell peppers (any color)
- Carrots, sliced thin
- Broccoli florets
I enjoy mixing and matching based on what’s fresh at the market. This not only keeps the dish exciting but also lets me use up leftovers from the fridge! I’ve found that adding a pop of color makes the dish not only more appealing but also more nutritious.
Protein Options: Chicken and Alternatives
While chicken is the star of Moo Goo Gai Pan, you can easily switch it up if you prefer. If I’m in the mood for something different, I might use shrimp, tofu, or even beef. The key is to slice the protein thinly to ensure it cooks quickly and evenly. For a vegetarian twist, I often replace the chicken with extra-firm tofu, which absorbs the flavors beautifully.
Flavor Enhancers: Sauces and Seasonings
The flavors of Moo Goo Gai Pan come from its sauces and seasonings. I typically use:
- Soy sauce for saltiness
- Oyster sauce for depth
- Sesame oil for a nutty finish
- White pepper for a subtle kick
Always remember to taste as you go! I’ve learned that adjusting the balance of flavors can really elevate the dish. Sometimes, I even toss in a splash of rice vinegar for a little tang. Every time I make it, I feel like I discover a new flavor combination that I love!
Step-by-Step Cooking Instructions
Preparing the Ingredients
To make the best Moo Goo Gai Pan, I always start by preparing all my ingredients. I find that having everything in place makes the cooking process much smoother and less stressful. First, I wash and slice the vegetables. I usually cut the bell peppers into strips, slice the carrots thinly, and ensure the broccoli florets are bite-sized. For the mushrooms, I typically slice them evenly to help them cook at the same pace as the chicken. This prep work really cuts down on the time it takes to get the dish on the table. I also like to mince some garlic and ginger to add that extra layer of flavor.
Next, I prepare the chicken. I take my boneless, skinless chicken breasts or thighs and slice them into thin, bite-sized pieces. I usually marinate the chicken in a mixture of soy sauce, a bit of oyster sauce, and a sprinkle of white pepper for about 10 minutes while I finish prepping the rest of the ingredients. This not only adds flavor but also helps keep the chicken tender during cooking. I’ve learned that marinating even for a short time can make a noticeable difference!
Cooking the Chicken
Once everything is prepped, I heat my wok or skillet over medium-high heat. I add a splash of vegetable oil, letting it get hot before I toss in the marinated chicken. The sound of the chicken sizzling is such a satisfying sound! I stir-fry the chicken for about 3 to 4 minutes until it’s cooked through. I always make sure to keep the chicken moving around the pan to ensure it cooks evenly and doesn’t stick.
A tip I’ve picked up is to avoid overcrowding the pan; if you have a lot of chicken, consider cooking it in batches. This way, it gets that perfect sear without steaming. Once the chicken is cooked, I transfer it to a plate and set it aside. I love how quick this part is – it’s really motivating to see progress so fast!
Stir-Frying the Vegetables
After the chicken is done, I add a bit more oil to the pan if needed and throw in my garlic and ginger first to get that aromatic base going. I let them sauté for about 30 seconds until they’re fragrant. Then, I toss in the vegetables, starting with the ones that take the longest to cook, like the carrots and broccoli. I stir-fry them for a couple of minutes before adding the snow peas and bell peppers. I find that this method helps ensure each vegetable retains its unique texture and flavor.
I usually cook the vegetables for about 3 to 5 minutes, stirring constantly. The goal is to keep them vibrant and crisp, not mushy. The colors in the pan are beautiful at this point, and I can’t help but get excited about how delicious everything is going to taste!
Combining Everything
Once the vegetables are tender yet crisp, I add the chicken back into the wok. Then, I pour in the remaining marinade mixed with a little extra soy sauce and oyster sauce, ensuring everything is coated nicely. I stir everything together for another minute or two, allowing the sauce to thicken slightly and meld the flavors together. This is the moment when the kitchen fills with that irresistible aroma!
I always taste as I go, adjusting the seasoning if needed. Sometimes, I add a splash of sesame oil at the end for that nutty finish that really elevates the dish. Once everything is combined and heated through, I remove it from the heat, and my Moo Goo Gai Pan is ready to serve!
Serving Suggestions
Best Accompaniments for Moo Goo Gai Pan
When it comes to serving Moo Goo Gai Pan, I love to keep it simple yet satisfying. A bowl of fluffy white rice or steamed jasmine rice is my go-to side. The rice soaks up the delicious sauce beautifully, making each bite even better. If I’m in the mood for something different, I might serve it with fried rice or even quinoa for a healthier twist.
I also like to add a side of egg rolls or spring rolls for a bit of crunch and variety. They make for a perfect appetizer and pair well with the flavors of the stir-fry. Sometimes, I’ll throw together a quick cucumber salad with a light vinaigrette to add a refreshing touch to the meal. It’s a nice contrast to the warmth of the stir-fry!
How to Plate for Presentation
Plating is where I like to have a little fun! I often use a large, shallow bowl for the rice, creating a small well in the center to mound the Moo Goo Gai Pan. I love garnishing with chopped green onions and a sprinkle of sesame seeds for a pop of color and texture. A few sprigs of fresh cilantro can also add freshness and a lovely visual element.
In my opinion, presentation makes a big difference in how a dish is received. I’ve noticed that when I take just a little extra time to arrange everything nicely, it feels more special, and everyone enjoys it all the more. So, get creative with your plating – it’s all part of the experience!
Variations of Moo Goo Gai Pan
Vegetarian and Vegan Adaptations
For those who prefer a plant-based diet, I’ve found that Moo Goo Gai Pan can easily be adapted to suit vegetarian and vegan lifestyles. Instead of chicken, I love using extra-firm tofu, which absorbs the flavors of the dish so well. It’s essential to press the tofu beforehand to remove excess moisture, allowing it to get that delightful crispy texture when stir-fried. I often marinate the tofu just like I do with chicken, using soy sauce and a bit of sesame oil, which gives it that umami flavor.
Additionally, I’ve experimented with adding more vegetables to amp up the nutrition and taste. Ingredients like bell peppers, zucchini, and baby corn can add a delightful crunch and color. I remember the first time I made a vegan version with a medley of vegetables—I was surprised at how satisfying it was! This version is just as quick to prepare and offers a hearty meal that everyone can enjoy.
Gluten-Free Options
If gluten is a concern, I’ve discovered that Moo Goo Gai Pan can easily be made gluten-free. The key is to replace the standard soy sauce with a gluten-free variety, such as tamari. I usually keep a bottle of tamari in my pantry for just this purpose. It has a similar flavor profile, ensuring that the dish still tastes fantastic without any gluten.
Also, if you like adding any sauces or marinades, make sure to double-check the labels to ensure they’re gluten-free. I’ve learned that a little vigilance can go a long way in maintaining dietary restrictions while still enjoying this delicious dish. Another trick I’ve used is to thicken the sauce with cornstarch mixed with water instead of flour for a gluten-free option. This small tweak doesn’t change the flavor but keeps the dish enjoyable for those avoiding gluten.
Tips for Perfecting Your Moo Goo Gai Pan
Choosing the Right Chicken Cut
When selecting chicken for Moo Goo Gai Pan, I’ve found that using boneless, skinless chicken thighs can add an extra layer of juiciness compared to chicken breasts. Thighs tend to be more forgiving, staying tender even if cooked for a minute or two longer. However, breasts are still quite popular, and I often alternate between the two, depending on what I have on hand. I’ve noticed that slicing the chicken thinly against the grain helps it cook evenly and remain tender.
Additionally, marinating the chicken for at least 10 to 15 minutes enhances the flavors significantly. I recommend trying different marinades, like adding a splash of rice wine or a hint of honey, to bring new dimensions to the dish. It’s amazing how a few adjustments can elevate the overall taste!
Maintaining Crispness in Vegetables
One of my favorite parts about Moo Goo Gai Pan is the vibrant, crisp veggies that add both color and crunch. To keep vegetables from turning mushy, I’ve learned a few tricks. First, I make sure not to overcook them; I usually cook them just until they’re tender yet still bright in color. Stir-frying over high heat is crucial for achieving that perfect texture.
Another tip I’ve picked up is to add the vegetables in stages, starting with the ones that take longer to cook. This method ensures that everything finishes cooking at the same time, allowing each vegetable to shine in its own right. I also like to have a bowl of ice water ready to plunge the veggies into if I’m preparing them ahead of time. This quick blanching technique locks in the colors and keeps them crisp, which makes for a more visually appealing dish!
Common Mistakes to Avoid
Overcooking Ingredients
One of the most common mistakes I see when making Moo Goo Gai Pan is overcooking the chicken and vegetables. It’s easy to get distracted, especially when everything is cooking quickly. I learned the hard way that chicken can go from perfectly tender to dry in a matter of seconds. I always keep a close eye on the cooking time, and if I’m unsure, I take a quick taste test to check for doneness. Vegetables should still have a bit of bite to them; if they’re soft and mushy, they’ve probably been in the pan too long!
Using the Wrong Type of Soy Sauce
Another mistake I’ve made in the past is using the wrong type of soy sauce. Regular soy sauce has a different flavor profile than light soy sauce or dark soy sauce, and it can greatly impact the final taste of the dish. I recommend using a light soy sauce for seasoning during cooking and saving dark soy sauce for a splash at the end if you want to deepen the color and flavor. It’s all about finding that balance to create a harmonious dish!
Frequently Asked Questions (FAQs)
Can I make Moo Goo Gai Pan ahead of time?
Yes, you can prepare Moo Goo Gai Pan ahead of time, but I suggest cooking the chicken and vegetables just before serving for the best texture and flavor. If you want to prep everything in advance, chop your ingredients and marinate your chicken, then store them separately in the fridge. When you’re ready to eat, stir-fry everything for a quick meal!
What can I substitute for mushrooms?
If you’re not a fan of mushrooms, you can easily substitute them with other vegetables like zucchini, chopped bell peppers, or even water chestnuts for a bit of crunch. The key is to ensure you have something that adds texture and flavor to the dish.
How do I store leftovers?
Leftover Moo Goo Gai Pan can be stored in an airtight container in the fridge for up to three days. When reheating, I recommend using a skillet over medium heat to help maintain the crispness of the vegetables. A splash of water or broth can help steam the dish and keep it moist. Enjoying it the next day can be just as delicious!
Frequently Asked Questions
What is Moo Goo Gai Pan?
Moo Goo Gai Pan is a popular Chinese dish that features chicken stir-fried with a variety of vegetables, primarily mushrooms. The name translates to “mushroom and sliced chicken,” highlighting its main ingredients.
How long does it take to prepare Moo Goo Gai Pan?
The dish can be prepared and cooked in just 20 minutes, making it a quick and delicious meal option.
What are the key ingredients in Moo Goo Gai Pan?
The main ingredients include boneless, skinless chicken breast or thighs, shiitake or button mushrooms, garlic, ginger, and a variety of vegetables such as snow peas, bell peppers, carrots, and broccoli.
Can I use alternatives to chicken in Moo Goo Gai Pan?
Yes, you can substitute chicken with shrimp, tofu, or beef. For a vegetarian option, extra-firm tofu works well as it absorbs the flavors of the dish.
How should I prepare the vegetables for Moo Goo Gai Pan?
Vegetables should be sliced or chopped uniformly to ensure even cooking. It’s best to add them in stages, starting with those that take longer to cook, such as carrots and broccoli.
What sauces and seasonings are typically used in Moo Goo Gai Pan?
The dish typically includes soy sauce, oyster sauce, sesame oil, and white pepper. These ingredients enhance the flavor and provide a savory taste.
How do I store leftovers of Moo Goo Gai Pan?
Leftover Moo Goo Gai Pan can be stored in an airtight container in the fridge for up to three days. When reheating, it’s recommended to use a skillet over medium heat to maintain the crispness of the vegetables.
What can I serve with Moo Goo Gai Pan?
A bowl of fluffy white rice or steamed jasmine rice is a great accompaniment. Fried rice, quinoa, egg rolls, or a cucumber salad can also complement the dish nicely.
Can Moo Goo Gai Pan be made gluten-free?
Yes, by replacing regular soy sauce with gluten-free tamari, Moo Goo Gai Pan can easily be adapted for those avoiding gluten.
What are some common mistakes to avoid when making Moo Goo Gai Pan?
Common mistakes include overcooking the chicken and vegetables, which can lead to dryness or mushiness, and using the wrong type of soy sauce, which can affect the dish’s flavor.