
High hydration sourdough is a game-changer for bakers looking to elevate their bread-making skills. The unique texture and flavor profile can transform your baking experience and delight your taste buds! If you’re interested in trying out different variations, check out Flavorful Olive Sourdough Bread (A Rustic, Crusty Loaf).
Understanding High Hydration Sourdough
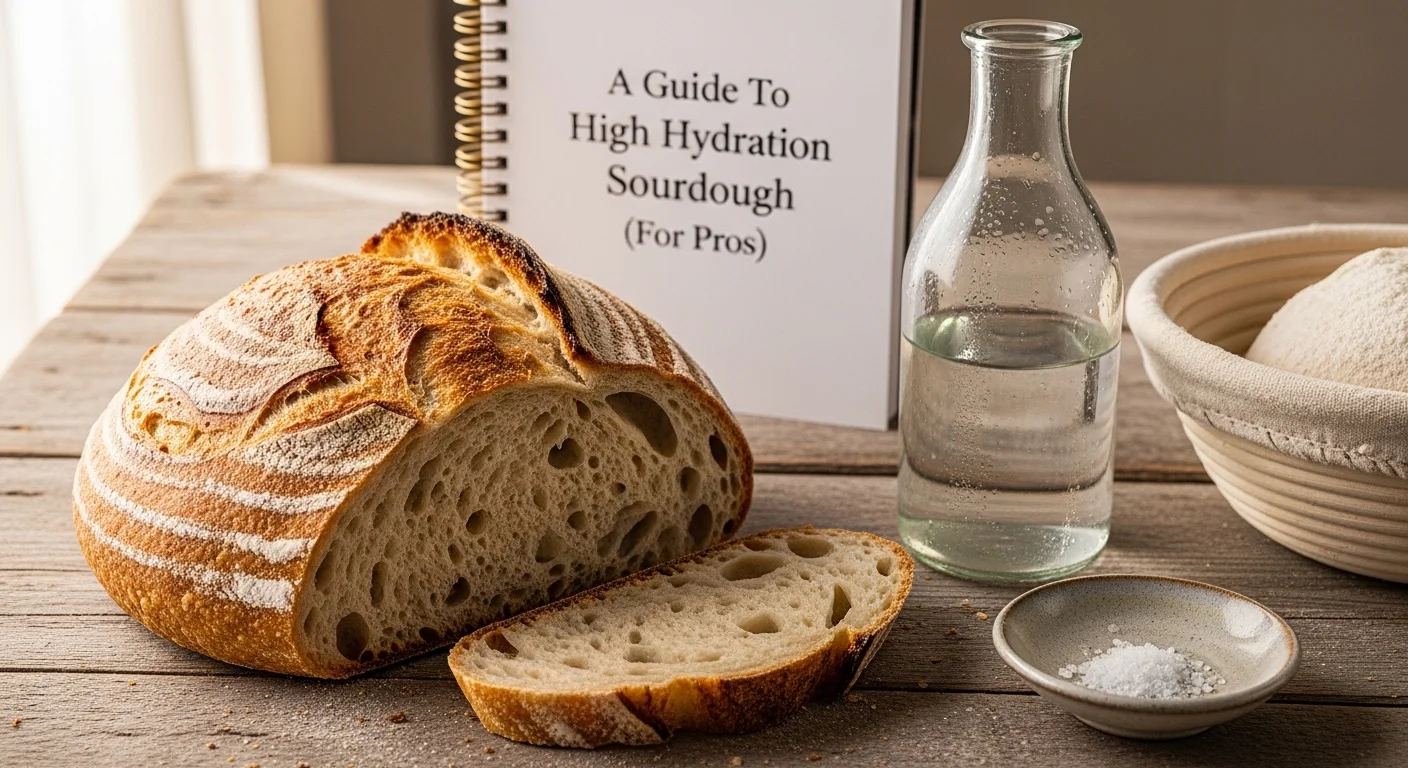
What is High Hydration Sourdough?
High hydration sourdough typically refers to bread that has a water content between 75% to 100% of the flour weight. When I first heard about high hydration dough, I was a bit intimidated. The thought of working with such wet dough seemed daunting, but I quickly learned that the rewards are worth it. The higher the hydration, the more open crumb structure and chewy texture you’re going to get, which is something I always aim for in my sourdough baking. The moisture in the dough creates a lighter and airier loaf, making it incredibly satisfying when you finally cut into it.
Importance of Hydration Levels in Sourdough
Hydration levels are crucial in determining the bread’s final texture and flavor. I’ve found that a higher hydration level allows for better gluten development, resulting in a more elastic dough. This elasticity gives the bread its characteristic rise and airy pockets, which are so pleasing to the eye and taste. I often share this with fellow bakers: if you want a crusty, artisan-style bread, the hydration levels you choose will definitely play a significant role.
Another aspect to consider is how hydration influences fermentation. The wetter the dough, the more active the yeast can be. I remember my first attempt at high hydration sourdough; I was amazed at how quickly the dough fermented compared to lower hydration loaves. It felt like my starter was just bursting with energy!
Comparison with Low and Medium Hydration Sourdough
In my experience, low hydration sourdough (below 65%) tends to produce denser loaves with a tighter crumb. While these breads can be delicious, they don’t deliver the same lightness and flavor complexity that high hydration loaves do. I often find myself reaching for low hydration recipes when I want something sturdy, like a sandwich loaf. However, if I’m in the mood for a crusty artisan bread, high hydration is my go-to.
Medium hydration (65% to 75%) is where things start to get interesting. These loaves strike a balance between the two extremes. I’ve had great success with medium hydration, especially when I want a loaf that is somewhat manageable but still offers a good rise and a decent crumb structure. I think of it as the transitional phase for bakers wanting to explore high hydration without diving in headfirst.
Ultimately, experimenting with different hydration levels has made my baking more dynamic. It’s fascinating to see how a simple adjustment in water can create such a contrast in the end result. Every baker should try their hand at different hydration levels, as it adds a level of discovery that keeps the passion alive!
Key Ingredients for High Hydration Sourdough
Flour Types and Their Impact
The type of flour you choose is incredibly important when making high hydration sourdough. I’ve discovered that not all flours perform the same way at high hydration. For example, bread flour, which has a higher protein content, tends to absorb more water and helps in gluten development. I often use a mix of all-purpose and bread flour for my high hydration loaves, as it creates a nice balance of texture and structure.
Whole wheat flour can also be useful, but I keep in mind that it absorbs more water than white flour. When I’ve experimented with incorporating whole wheat flour, I’ve had to adjust my water ratios accordingly. The nuttiness and complexity it adds can really elevate the final loaf, so it’s worth the extra thought!
Water Quality and Temperature Considerations
Water quality is something I didn’t consider until I started noticing differences in my loaves. Using filtered or bottled water can improve the flavor of your bread, especially if your tap water has a strong taste or odor. I’ve noticed a significant difference in the taste of my bread when I switched to filtered water, and I’d recommend this to anyone serious about their sourdough baking.
Temperature is another factor to think about. Warmer water can kickstart fermentation, which is beneficial, especially in cooler environments. I often start with water around 85°F to 90°F. Keeping an eye on the temperature of your dough during the bulk fermentation stage is essential to achieving the right flavor and texture.
Understanding Sourdough Starters
Your sourdough starter is the heart of your bread-making process. I’ve learned that the strength and health of your starter can greatly affect your high hydration bread. A well-fed starter with a good balance of yeast and bacteria will produce a better rise and flavor. I make sure to feed my starter regularly, especially before I plan to bake. Using a mature starter is key for success, as it provides the necessary leavening power for high hydration doughs. If you’re unsure about your starter, a float test can help you determine if it’s ready for baking.
Overall, understanding the key ingredients and their roles in high hydration sourdough has made me a more confident baker. Each component, from the flour to the water, plays a vital part in creating that perfect loaf, and it’s so rewarding to see how they all come together in the end!
Techniques for Making High Hydration Sourdough
Autolyse Method
The autolyse method has become one of my favorite techniques for making high hydration sourdough. It’s a simple process that involves mixing the flour and water together and letting them rest before adding the starter and salt. I remember the first time I tried it; I was amazed at how much easier it was to knead the dough afterward. This rest period allows the flour to fully hydrate, which helps develop gluten structure naturally without excessive kneading. I usually let my mixture sit for about 30 minutes to an hour, but I’ve found that longer rests can lead to even better results. During this time, I can tidy up my kitchen or prepare my other ingredients, making it a win-win!
Stretch and Fold Technique
When I first learned about the stretch and fold technique, it was like a light bulb went off for me. Instead of traditional kneading, this technique allows you to build strength in high hydration dough without making a sticky mess. I usually perform this technique during the bulk fermentation stage. I gently lift one side of the dough and stretch it upwards before folding it over itself. Then I rotate the bowl and repeat this process. I do this every 30 minutes for about 2 to 3 hours. It’s fascinating to see how the dough transforms during this time, becoming more elastic and cohesive, which ultimately leads to a better rise in the oven. Plus, it feels so rewarding to see the dough evolving right in front of my eyes!
Bulk Fermentation Strategies
Bulk fermentation is a crucial stage, especially for high hydration dough. I’ve learned that timing can vary based on the temperature in my kitchen and the strength of my starter. On cooler days, I’ve noticed that my dough takes longer to rise, while warmer temps can speed up the process. I usually keep an eye on my dough rather than strictly adhering to a timer. It’s all about looking for that dough to roughly double in size and feel airy and light. One trick I’ve picked up is to perform a poke test: I gently poke the dough, and if it springs back slowly, it’s a sign that it’s ready for the next phase. This has really helped me tune in to my dough’s needs!
Shaping High Hydration Dough
Shaping high hydration dough can be a bit tricky, but over time, I’ve developed a few techniques that work for me. I typically use a bench scraper to help manage the stickiness. When I turn the dough out onto a floured surface, I try to handle it gently to avoid deflating all the lovely air bubbles I’ve worked hard to build. I often start by shaping it into a loose round and letting it rest for about 20 minutes. This short rest allows the gluten to relax, making it easier to shape. After the bench rest, I shape it into a tighter round or oval, depending on whether I’m baking a boule or batard that day. I use a light dusting of flour on the outside to help with handling, and I’ve found that practicing this has made me feel much more confident in my shaping skills!
Common Challenges and Solutions
Dealing with Sticky Dough
One of the biggest challenges I faced when I started working with high hydration dough was the stickiness. At first, I panicked when the dough would stick to my hands and the work surface. I learned that instead of adding too much extra flour, which could alter the dough’s structure, I could use a technique called “wet hands.” By keeping my hands slightly damp, I was able to handle the dough without it sticking. I also discovered that using a bench scraper was incredibly helpful for managing sticky situations. With these tricks, I’ve come to embrace the stickiness as a sign of the dough’s hydration level, rather than something to fear!
Avoiding Over-Fermentation
Over-fermentation is another common pitfall I’ve encountered. There have been times when I’ve been distracted or busy, and I’ve let my dough go too far in the bulk fermentation stage. The yeast becomes too active, and the dough can collapse or lose its structure. To avoid this, I’ve started setting alarms and reminders for myself, especially on busy baking days. I also keep a close eye on my dough, looking for those visual cues of readiness. When I see it nicely risen and airy, I know it’s time to shape and bake. Learning to trust my instincts and know my dough has been a game-changer.
Managing Oven Spring and Scoring
Oven spring is such an exciting part of baking high hydration sourdough, but I’ve had my share of mishaps. I remember my first few loaves erupted in all the wrong places, leading to some rather interesting shapes! I learned that proper scoring is essential for directing where the dough expands in the oven. I’ve grown to love using a sharp lame for this purpose. The angle and depth of the cut can really influence the final result. I aim for a deep, decisive slash to encourage an even rise. It’s taken practice, but getting the scoring right has made a significant difference in both the look and texture of my bread!
Advanced Tips for Experienced Bakers
Using Different Flour Blends
Once I became comfortable with high hydration sourdough, I started experimenting with different flour blends. This was a game-changer for me! Mixing various flours not only introduces unique flavors but also affects the texture of the bread. For instance, I found that incorporating rye flour can create a lovely depth of flavor and a denser crumb. Rye has its own hydration properties, so I’ve learned to adjust my water accordingly when using it. I’ve even mixed in some spelt flour on occasion, which adds a delightful nuttiness and slight sweetness to the bread.
Another blend I’ve enjoyed is combining bread flour with some semolina flour. Semolina adds a wonderful golden color and a slightly different texture that enhances the crust. I feel that experimenting with flour blends has not only broadened my baking skills but also made each loaf a delightful surprise. It’s like discovering new layers of flavor with every bake!
Mastering the Baguette Shape
When I decided to tackle high hydration baguettes, I was both excited and nervous. The baguette shape is iconic, and it was something I always wanted to master. I found that working with high hydration dough for baguettes requires a different approach, especially in shaping. Instead of the traditional approach, I learned to use a technique called “pre-shaping.” I gently shaped the dough into a loose rectangle, letting it rest for about 20 minutes before final shaping.
During the final shaping, I was careful not to deflate the dough too much. I would fold the sides into the middle and then roll it tightly. Using a light dusting of flour helped prevent sticking, and I practiced getting the length right. The first few attempts were a little wonky, but with each bake, I noticed improvement. The oven spring was incredible, and seeing those baguettes puff up beautifully in the oven is such a rewarding sight. I often serve them fresh with a bit of butter or cheese, and they’re always a hit with family and friends!
Experimenting with Add-ins (Nuts, Seeds, etc.)
Adding ingredients to high hydration sourdough has opened up a whole new world for me. I love incorporating nuts, seeds, and even dried fruits into my loaves. My favorite addition is walnuts. When I fold them into my dough during the bulk fermentation stage, they provide a delightful crunch and a rich, earthy flavor that pairs wonderfully with the sourdough tang.
I’ve also enjoyed adding seeds like sunflower or sesame seeds, which not only enhance the flavor but also give the crust a lovely texture. I’ve found that toasting them lightly before adding them to the dough boosts their flavor even more. When I’ve experimented with dried fruits, like figs or cranberries, they add a sweet contrast to the sourness of the bread, which I think is just delightful.
Every time I play with add-ins, it’s like creating a new recipe altogether. I encourage everyone to get creative and find combinations that excite their taste buds. Just remember to adjust the hydration slightly if you’re adding a lot of dry ingredients, as they can absorb moisture!
Understanding the Science Behind High Hydration Sourdough
Hydration and Gluten Development
Understanding the science behind high hydration sourdough has deepened my appreciation for the craft. One of the most fascinating aspects is how hydration affects gluten development. With higher water content, I’ve found that gluten proteins can align more effectively, creating a stronger network. This is essential for achieving that airy crumb structure we all strive for in high hydration loaves.
Through my experiments, I discovered that a dough with 80% hydration allows for more extensibility, meaning it can stretch more easily without tearing. This flexibility is crucial for shaping and rising. I often think of gluten like a web; the more hydrated the dough, the stronger and more resilient that web becomes. It’s incredible to see how something so simple as water can make such a profound difference in the final product.
Yeast Activity and Flavor Development
Another intriguing aspect is the correlation between hydration levels and yeast activity. High hydration dough tends to ferment more quickly, which I noticed during my first few bakes. The increased availability of moisture allows yeast cells to thrive, leading to more vigorous fermentation and the development of complex flavors. I’ve learned that this is why high hydration breads often have a more pronounced sourness and depth of flavor.
While it’s tempting to rush the process because of this active yeast, I’ve come to appreciate the nuances of allowing the dough to ferment slowly. This slow fermentation enhances the flavor even further. I often set aside longer fermentation times, especially when I’m making a loaf that I plan to eat with a good cheese or charcuterie board. The flavors that develop are simply unmatched!
The Role of Acidity in Sourdough
The acidity in sourdough is something that has fascinated me as well. I’ve learned that the pH of the dough affects not only flavor but also texture. Higher hydration levels can lead to more lactic acid production, which contributes to that signature sour flavor. I find that I can manipulate the acidity by adjusting fermentation times and temperatures, which gives me more control over the final taste.
For example, when I want a milder flavor, I aim for a shorter bulk fermentation at a warmer temperature. Conversely, if I’m in the mood for a tangy loaf, I’ll extend the fermentation time and keep the dough at a cooler temperature. It’s fascinating how these small adjustments can lead to such different results. Experimenting with acidity has made my baking even more enjoyable, as I’m constantly learning and adapting my techniques!
Frequently Asked Questions
What is high hydration sourdough?
High hydration sourdough typically refers to bread that has a water content between 75% to 100% of the flour weight, resulting in a lighter, airier loaf with an open crumb structure and chewy texture.
Why are hydration levels important in sourdough?
Hydration levels are crucial as they determine the bread’s final texture and flavor. Higher hydration allows for better gluten development, resulting in a more elastic dough that creates a characteristic rise and airy pockets.
How does low hydration sourdough differ from high hydration sourdough?
Low hydration sourdough (below 65%) tends to produce denser loaves with a tighter crumb, while high hydration loaves offer lightness and flavor complexity. Low hydration is often chosen for sturdier breads, like sandwich loaves.
What types of flour are best for high hydration sourdough?
For high hydration sourdough, bread flour is preferred due to its higher protein content, which aids in gluten development. A mix of all-purpose and bread flour can create a good balance, while whole wheat flour requires adjustments in water ratios.
How does water quality affect sourdough baking?
Using filtered or bottled water can improve the flavor of bread, especially if tap water has a strong taste or odor. The temperature of the water is also important, as warmer water can kickstart fermentation.
What is the autolyse method?
The autolyse method involves mixing flour and water together and letting them rest before adding the starter and salt. This rest period allows the flour to hydrate and helps develop gluten structure naturally.
What techniques can help manage sticky high hydration dough?
To manage sticky dough, using “wet hands” keeps the dough from sticking, and utilizing a bench scraper can help during handling. Embracing the stickiness as a sign of hydration is also beneficial.
How can over-fermentation be avoided in sourdough baking?
To avoid over-fermentation, bakers can set alarms and reminders, and closely monitor the dough for visual cues of readiness, such as a nicely risen and airy appearance.
What is the significance of scoring in high hydration sourdough?
Scoring is essential for directing how the dough expands in the oven. Proper scoring with a sharp lame influences the final result, encouraging an even rise and better texture.
How does hydration affect gluten development in sourdough?
Higher hydration allows gluten proteins to align more effectively, creating a stronger network essential for achieving an airy crumb structure. More hydrated dough also offers greater extensibility, allowing it to stretch without tearing.