
Crumpets are a delightful, warm treat that can brighten any day. If you’re looking for a gluten-free version that boasts those perfect little holes, you’ve come to the right place!
Understanding Crumpets: A Brief Overview
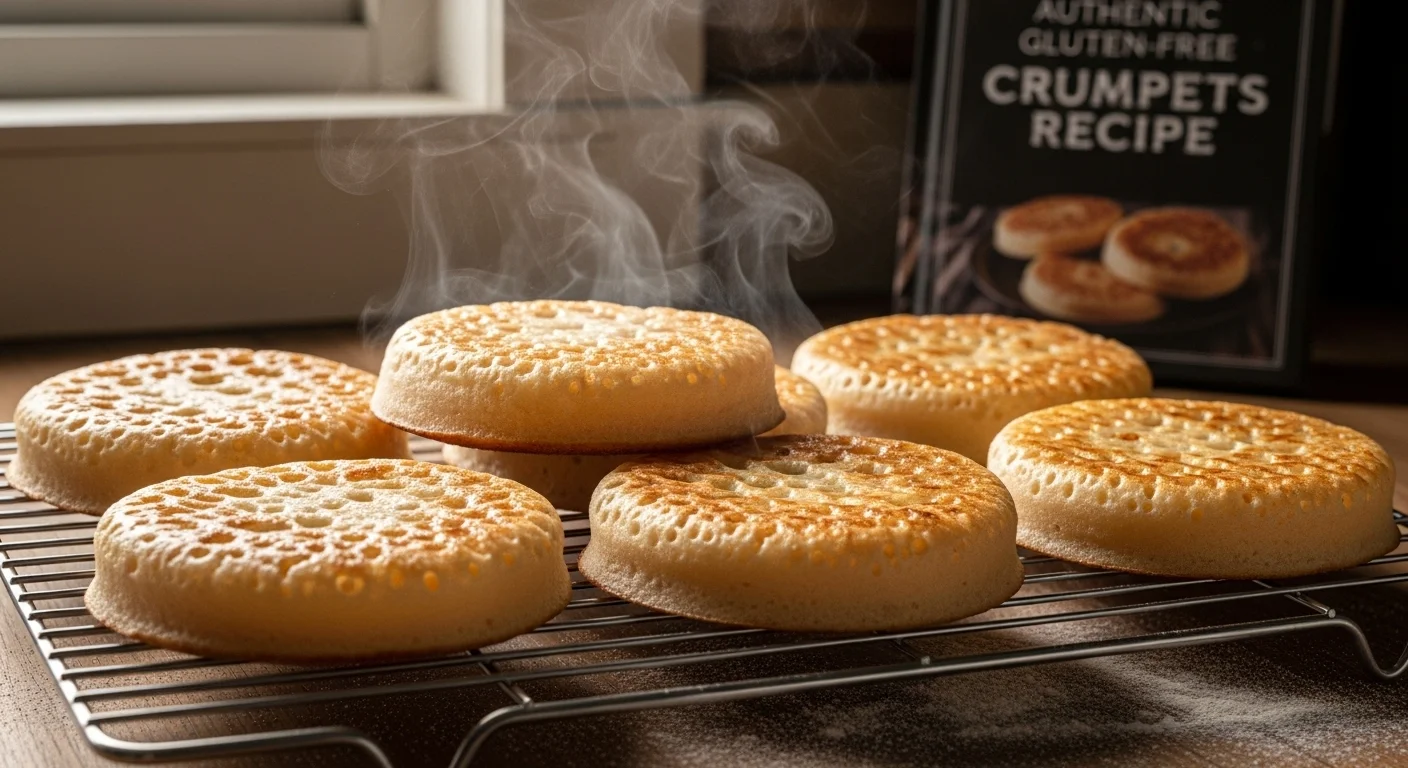
What Are Crumpets?
Crumpets are soft, spongy treats that have a unique texture and are best known for their characteristic holes. Traditionally British, they are often enjoyed toasted with butter and jam. When I first tried crumpets, I was amazed by their ability to hold toppings and absorb flavors, making each bite a delightful experience. The moment you toast a crumpet, it transforms into a warm canvas, ready to soak up your favorite spreads. If you enjoy culinary trends, check out the fastest chicken pasta trend I’ve ever tried!
History and Origin of Crumpets
The history of crumpets is rich and fascinating. They are believed to have originated in the United Kingdom, dating back to the 17th century. Initially, they were made on a griddle, similar to pancakes, and the name “crumpet” likely comes from the Old French word “crompet,” meaning “to crumble.” I love imagining how people enjoyed these little delights centuries ago, gathering around a warm hearth and sharing stories over freshly toasted crumpets. They became a staple in British tea time, bringing people together over a simple yet delicious treat.
Difference Between Crumpets and Other Pancakes
Many people often confuse crumpets with pancakes, but they are quite different. Pancakes are typically thicker and fluffier, while crumpets have a unique texture with holes on the surface. This allows them to absorb butter and toppings in a way that pancakes cannot. When I first made crumpets, I was surprised at how much more versatile they felt. You can enjoy crumpets for breakfast, as a snack, or even as a part of a fancy brunch spread. Their texture and flavor set them apart, making them a delightful addition to any meal. If you’re looking for more culinary inspiration, check out these top 10 Japanese appetizers dishes to try!
Essential Ingredients for Gluten-Free Crumpets
Gluten-Free Flour Types
Choosing the right flour is crucial for gluten-free crumpets. My go-to flour blend includes a combination of rice flour, tapioca flour, and a bit of almond flour. This mixture not only mimics the texture of traditional crumpets but also helps achieve those perfect holes. I recommend experimenting with different gluten-free flour brands to find the one that works best for you. Each blend can bring its unique flavor and texture to the final product, and it’s part of the fun of making crumpets at home!
Yeast vs. Baking Powder: What to Use?
When it comes to leavening agents, I’ve found that yeast is the way to go for authentic crumpets. It allows for that classic rise and creates the airy texture we love. However, I’ve experimented with baking powder in a pinch, and while it can produce a decent crumpet, the yeast truly makes a difference. The fermentation process gives crumpets their distinctive holes and flavor, making it worth the extra wait for the dough to rise.
Importance of Milk and Water Ratios
Getting the ratios of milk and water right is essential for the batter consistency. In my experience, a mix of warm milk and water works best. This combination creates a smooth batter that pours easily into the crumpet rings. I usually do a 2:1 ratio of milk to water, but feel free to adjust based on your desired thickness. If the batter is too thick, it won’t cook evenly or create those beautiful holes, and if it’s too thin, the crumpets won’t hold their shape.
Additional Flavor Enhancers (e.g., Salt, Sugar)
While crumpets are wonderful on their own, adding a pinch of salt and a bit of sugar can enhance their flavor significantly. I like to include a teaspoon of sugar in my batter to balance the saltiness, especially when I’m planning to top them with savory spreads. It’s all about achieving a well-rounded taste that complements whatever toppings you choose. Trust me; this little adjustment can elevate your crumpets from good to amazing!
Equipment Needed for Making Crumpets
Choosing the Right Cookware
When it comes to making crumpets, the right cookware can make all the difference. I’ve experimented with various pans, and I’ve found that a non-stick skillet works best for me. It ensures even cooking and helps prevent sticking, which can be a hassle when you’re trying to flip or remove those delicate crumpets. I also recommend using a heavy-bottomed pan because it distributes heat evenly, making it easier to achieve that perfect golden-brown color. If you have a griddle, that can also work wonderfully, especially if you’re making several crumpets at once!
Using Crumpet Rings or Molds
Crumpet rings are essential for creating the iconic shape and holes. I usually opt for metal crumpet rings, which I find provide the best results. They allow the batter to rise perfectly and hold their shape during cooking. If you don’t have crumpet rings on hand, you can use round cookie cutters or even muffin tin cups in a pinch. Just be sure to grease them well before pouring in the batter to avoid any sticking. There’s something so satisfying about lifting the rings off and revealing those beautifully formed crumpets!
Recommended Cooking Utensils
Aside from the cookware and rings, having a few good utensils will enhance your crumpet-making experience. I always keep a silicone spatula nearby; it’s perfect for gently lifting and flipping the crumpets without damaging them. A ladle is also really handy for pouring the batter into the rings. Measuring cups are a must to ensure the correct ratios of flour, liquid, and other ingredients. It’s these simple tools that can streamline the process and make it enjoyable. I remember the first time I made crumpets, I was scrambling to find the right tools, and it turned a fun experience into a bit of chaos!
Step-by-Step Guide to Making Authentic Gluten-Free Crumpets
Preparing the Batter
Now that you have your equipment ready, let’s dive into the fun part: making the batter! I usually start by mixing my dry ingredients in one bowl—gluten-free flour, salt, sugar, and yeast. In a separate bowl, I combine warm milk and water, gradually adding it to the dry mixture. I like to whisk it until I get a smooth batter that’s not too thick but still holds its shape. This part can be a little messy, but it’s all part of the process! Once I’ve got my batter ready, I let it rest for about 10 minutes. This short wait really helps improve the texture and flavor.
Fermentation Process for Perfect Holes
The fermentation process is where the magic happens! After letting the batter rest, I usually cover the bowl with a kitchen towel and let it sit in a warm place for about an hour. During this time, I can feel the excitement building because I know those holes are going to appear! It’s truly fascinating to see how the yeast works, creating bubbles in the batter. When it’s ready, the batter should be a bit thicker than pancake batter but still pourable. I often do a little test by pouring a small amount into a ring on the skillet to check the consistency.
Cooking Technique for Crumpets
Cooking crumpets is a bit of an art. I preheat my skillet on medium-low heat, making sure it’s warm but not too hot. If it’s too hot, the crumpets will burn before they fully cook through. I pour the batter into the rings, filling them about halfway. I love watching the batter sizzle as it hits the pan! I cover them with a lid to help trap the heat, which ensures they cook evenly and develop those lovely holes. After about 5 to 7 minutes, I peek under the lid to check for that classic bubbly surface. It’s such a rewarding sight!
Tips for Achieving the Perfect Texture
Achieving the perfect crumpet texture can be tricky, but with some practice, I’ve learned a few tips that really help. First, patience is key; don’t rush the cooking process. If you notice that the tops of the crumpets are still wet after a few minutes, it’s okay to lower the heat and let them cook a bit longer. Also, I recommend flipping them to crisp up the underside for about a minute, but this is optional. Once they’re done, I like to remove them from the rings and let them cool slightly before toasting them again. Nothing beats the smell of freshly made crumpets filling the kitchen!
Common Mistakes to Avoid When Making Crumpets
Using the Wrong Flour
One of the biggest mistakes I made when I first attempted gluten-free crumpets was using the wrong type of flour. Not all gluten-free flours are created equal, and some can yield a dense, unappealing texture. For me, it was a game-changer to realize that a blend of flours works best. I remember trying just rice flour once, and the crumpets turned out flat and sad. The combination of rice flour, tapioca flour, and almond flour really makes a difference, giving the crumpets that light, airy texture we all crave. Don’t hesitate to experiment, but always keep in mind the importance of the right flour blend!
Incorrect Cooking Temperature
Another error I frequently encountered was not managing the cooking temperature properly. It can be tempting to crank up the heat to speed things along, but this often results in burnt exteriors and raw interiors. I learned the hard way that medium-low heat is the sweet spot for cooking crumpets. When the skillet is at the right temperature, you’ll notice the batter gently sizzle and rise without scorching. It’s all about patience; turning the heat down and allowing the crumpets to cook slowly truly enhances their texture and ensures those signature holes form beautifully.
Overmixing the Batter
I’ve got to admit that I was guilty of overmixing the batter early on in my crumpet-making adventures. I thought that mixing until completely smooth was the way to go. However, I quickly discovered that overmixing can destroy the air bubbles created during fermentation, which are crucial for that fluffy texture. Now, I mix just until the ingredients are combined, leaving a few lumps in the batter. It’s one of those little tricks that can really elevate the final product. Remember, a little bit of texture is okay!
Serving Suggestions and Toppings for Crumpets
Classic Toppings (Butter, Jam, Honey)
When it comes to crumpets, I believe that keeping it simple is often the best approach. There’s nothing quite like slathering a warm crumpet with a generous pat of butter. Watching it melt into those little holes is a sensory delight! Personally, I enjoy adding a spoonful of raspberry jam on top, which adds a sweet-tart balance that complements the buttery goodness perfectly. If you’re feeling adventurous, drizzling a bit of honey brings a lovely floral sweetness to the mix. These classic toppings never fail to deliver comfort and satisfaction!
Savory Options (Cheese, Avocado)
For those who prefer savory flavors, crumpets offer a fantastic base for a variety of toppings. I’ve had some delightful experiences with melted cheese on top of a hot crumpet—it’s like a warm, gooey hug. My favorite is sharp cheddar, but I’ve also enjoyed cream cheese with a sprinkle of herbs. Avocado toast is another great option; simply mash up some ripe avocado, season with salt and pepper, and spread it on your crumpet for a creamy, nutritious treat. The combination of textures and flavors is simply divine!
Pairing Crumpets with Beverages
Finding the right beverage to enjoy with crumpets can elevate your experience even further. I love a warm cup of tea, especially Earl Grey or English Breakfast, which pairs beautifully with the buttery richness of crumpets. If I’m in the mood for something different, a light coffee or even a creamy hot chocolate can be a delightful pairing. I’ve found that the beverage you choose can complement the toppings; for instance, a fruity tea might pair well with jam, while a robust coffee would work nicely with cheese. It’s fun to experiment and find the combinations that make my taste buds dance!
Storing and Reheating Leftover Crumpets
Best Practices for Storing Crumpets
After all the effort that goes into making crumpets, I want to make sure they last! I usually let my crumpets cool completely before storing them. Once cooled, I stack them with a piece of parchment paper in between each one to prevent sticking, then place them in an airtight container. They can last in the fridge for about a week, but I find that they’re best enjoyed fresh. If I’ve made a big batch, I often freeze some as well. Just wrap them tightly in plastic wrap and then place them in a freezer bag. They can be pulled out for a quick breakfast anytime!
How to Reheat Crumpets Without Losing Texture
Reheating crumpets can be a bit tricky, as I want to maintain that lovely texture. I’ve learned that the toaster works wonders—just pop them in until they’re warm and crispy again. If I’m feeling a bit indulgent, I might even put them under the broiler for a minute or two to get that perfect golden color. Microwaving is an option, but I find that it can make them a bit soggy, so I tend to avoid that method. For me, the toaster method is the best way to revive leftover crumpets; it brings them back to life beautifully and allows me to enjoy them all over again!
Frequently Asked Questions (FAQs) about Gluten-Free Crumpets
Can I Make Crumpets Vegan?
Absolutely! I’ve found that making vegan crumpets is quite simple. Instead of using regular milk, you can substitute it with any plant-based milk, like almond, soy, or oat milk. As for the butter, just skip it or opt for a vegan butter alternative when serving. The yeast and flour remain the same, and you’ll still achieve that delightful texture and those signature holes. It’s amazing how versatile crumpets can be, and I love that they can cater to different dietary needs without compromising on taste!
How Do I Know When Crumpets Are Done Cooking?
Knowing when crumpets are cooked perfectly can be a bit tricky, but I’ve learned a few tricks over time. The tops of the crumpets should be bubbly and dry, with a slight firmness when you gently press them. If the surface still looks wet or gooey, they need a little more time. I usually check them at the 5-minute mark and then keep an eye on them. If you’re unsure, you can always lift one out to peek at the underside; it should be golden brown. This little check can save you from undercooked crumpets!
What Are Some Alternative Flours for Crumpets?
While I love my go-to blend of rice, tapioca, and almond flour, there are several other options you can explore! I’ve tried using sorghum flour, which adds a lovely flavor and works well with the yeast. Another option is oat flour, which can give a nice texture. Just remember, when substituting flours, it’s important to maintain a balance of gluten-free flours to achieve the best results. My advice is to experiment with different combinations until you find one that suits your taste! For more delicious recipes, check out these 5 must-make Middle Eastern recipes for summer!
Final Thoughts
Making gluten-free crumpets has been such a rewarding journey for me. From experimenting with different flour blends to discovering the perfect toppings, it’s all about finding what brings joy to your table. I love how crumpets can adapt to any occasion, whether it’s a simple breakfast or a fancy brunch with friends. I encourage you to dive into the world of crumpet-making and share your creations. Remember, the best part about cooking is enjoying the process and savoring the flavors. So gather your ingredients, invite a friend, and get ready to create some warm, crispy, holey goodness that you can call your own!
Frequently Asked Questions
What are crumpets?
Crumpets are soft, spongy treats known for their unique texture and characteristic holes. They are traditionally British and are often enjoyed toasted with butter and jam.
What is the history of crumpets?
Crumpets are believed to have originated in the United Kingdom in the 17th century. They were initially made on a griddle and the name likely comes from the Old French word “crompet,” meaning “to crumble.”
What flour is recommended for gluten-free crumpets?
A combination of rice flour, tapioca flour, and a bit of almond flour is recommended for gluten-free crumpets. This blend mimics the texture of traditional crumpets and helps achieve the perfect holes.
Should I use yeast or baking powder for crumpets?
Yeast is recommended for authentic crumpets as it allows for a classic rise and creates the airy texture desired. While baking powder can be used in a pinch, yeast produces better results.
What is the ideal milk and water ratio for crumpet batter?
A 2:1 ratio of warm milk to water is suggested for crumpet batter to create a smooth consistency that pours easily into the crumpet rings.
What equipment do I need to make crumpets?
A non-stick skillet or heavy-bottomed pan, metal crumpet rings, a silicone spatula, measuring cups, and a ladle are recommended for making crumpets.
How do I know when crumpets are done cooking?
Crumpets are done when the tops are bubbly and dry, and they feel slightly firm when gently pressed. The underside should be golden brown.
What are some classic toppings for crumpets?
Classic toppings for crumpets include butter, jam, and honey. These add sweetness and complement the buttery flavor of the crumpets.
How should I store leftover crumpets?
Leftover crumpets should be cooled completely, stacked with parchment paper in between, and stored in an airtight container in the fridge for up to a week or frozen for longer storage.
Can I make crumpets vegan?
Yes, crumpets can be made vegan by substituting regular milk with plant-based milk and using a vegan butter alternative when serving. The yeast and flour remain the same.