
Making beautiful gluten-free challah bread is a delightful journey that can transform your kitchen into a haven of warmth and flavor. With a few simple ingredients, we can create a braided loaf that everyone will love. Read Interesting article: 18 Favorite Recipes for Your High Holiday Meals
Understanding Gluten-Free Challah Bread
What is Challah Bread?
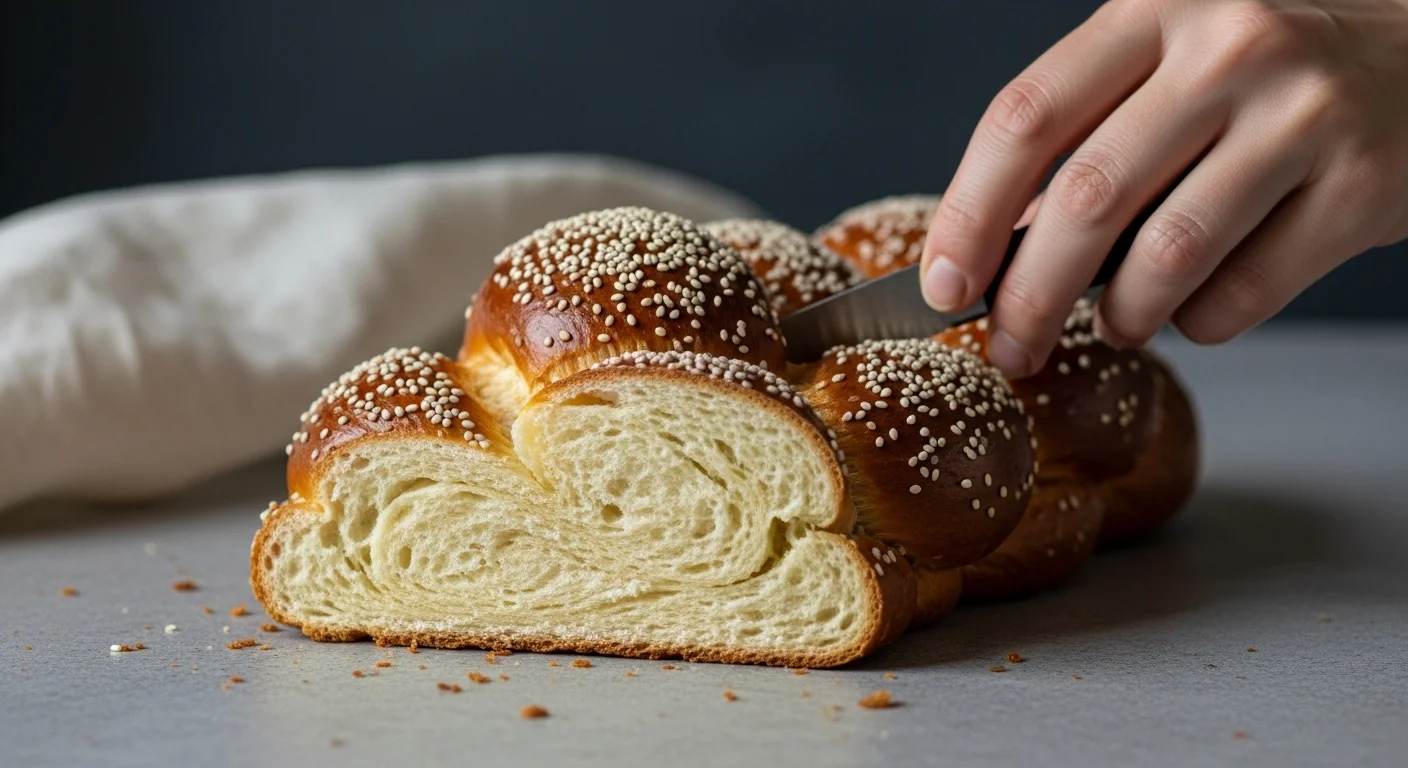
Challah bread is a traditional Jewish bread, often enjoyed during Shabbat and holidays. Its unique braided shape and rich, slightly sweet flavor give it a special place at the table. I remember the first time I tried challah; it was soft, slightly chewy, and so inviting. The way it pulls apart and the beautiful golden crust made it feel like a special treat every time. The texture and taste are truly comforting, making it a staple in many households, including my own.
Traditional Ingredients vs. Gluten-Free Alternatives
Traditional challah is typically made with all-purpose wheat flour, sugar, salt, yeast, eggs, and a bit of oil. However, when adapting this recipe for gluten-free diets, I found it helpful to explore alternatives that maintain the spirit of challah while catering to those who cannot consume gluten. Popular gluten-free flours include almond flour, brown rice flour, and a gluten-free all-purpose blend. Each option brings its own unique flavor and texture, allowing us to create a delicious loaf that rivals its gluten-filled counterpart.
When it comes to binding, gluten-free bread needs a little help since the absence of gluten affects its structure. I often use xanthan gum or psyllium husk because they mimic the elasticity that gluten provides. They help create that wonderful chewy texture we all love in bread.
Health Benefits of Gluten-Free Bread
One of the things I appreciate about gluten-free bread is how it can cater to various dietary needs and preferences. For those with celiac disease or gluten sensitivity, gluten-free bread can be a safe and enjoyable option. From my experience, many people find that they feel lighter and less bloated after switching to gluten-free options. Additionally, gluten-free flours often come with their own health benefits, such as being lower in carbs, higher in protein, or offering unique nutrients. For instance, almond flour is rich in healthy fats and vitamins, while brown rice flour provides fiber. It’s exciting to discover how these ingredients can enhance both the flavor and nutritional profile of our beloved challah.
Essential Ingredients for Gluten-Free Challah
Gluten-Free Flour Options
When I first started experimenting with gluten-free challah, choosing the right flour was my first challenge. I discovered several gluten-free flour blends on the market that worked well, but I also enjoyed mixing my own. For instance, combining almond flour with tapioca flour creates a lovely, soft texture. I also found that brown rice flour adds a nice chewiness that reminds me of traditional bread. Each time I bake, I like to play around with different flour combinations to see what I can achieve.
Binding Agents: Xanthan Gum vs. Psyllium Husk
Xanthan gum was my go-to binding agent for a long time; it creates a structure that helps the dough hold together. However, I later experimented with psyllium husk, which I found to give a wonderful elasticity and moisture to the bread. I learned that using psyllium husk not only helps with binding but also provides a healthier option since it’s high in fiber. It’s fascinating how these little additions can completely change the texture of the bread. I think trying both and seeing what works best for your own taste is a great approach.
Sweeteners: Honey, Sugar, and Alternatives
Challah traditionally has a hint of sweetness, which can come from honey or sugar. Personally, I love using honey because it adds a natural sweetness and pairs beautifully with the other flavors in the bread. However, I’ve also experimented with coconut sugar and agave syrup, which work well too. For those looking for sugar-free options, stevia or monk fruit sweeteners can be great alternatives. The sweetness is essential for that characteristic challah flavor, so I recommend tasting the dough as you go to find your perfect balance.
Eggs and Their Role in Texture
Eggs are a crucial ingredient in challah, providing richness and contributing to the beautiful golden color of the crust. I often use large eggs, as their proteins help create a tender crumb and a lovely rise. If you’re looking for egg substitutes, I’ve found that flax eggs (a mixture of ground flaxseed and water) can work in a pinch, though they might change the texture slightly. In my experience, sticking with eggs leads to the best results, especially when trying to achieve that soft, fluffy interior.
Additional Flavoring Ingredients
Beyond the basics, adding flavoring ingredients can elevate your gluten-free challah. I enjoy incorporating a touch of vanilla extract, which enhances the sweetness and aroma. Sometimes, I’ll add a sprinkle of cinnamon or even some citrus zest for a fresh twist. Seeds like sesame or poppy can also be sprinkled on top before baking, providing a delightful crunch and extra flavor. I love experimenting with these additions, making each loaf unique and special for my family.
Step-by-Step Recipe for Beautiful Gluten-Free Challah
Preparing the Dough
When it comes to preparing the dough for gluten-free challah, I find it’s crucial to take my time. I usually start by combining my chosen gluten-free flour blend, xanthan gum, or psyllium husk in a large mixing bowl. I’ve learned that mixing the dry ingredients first ensures they are evenly distributed, which is essential for a consistent texture. Then, I add in the sweeteners, like honey or coconut sugar, and a pinch of salt. For me, this step builds a solid flavor foundation.
Next, I warm some water, not too hot but just warm enough to activate the yeast. Once the water is ready, I sprinkle in the yeast and let it bloom for about 5-10 minutes. I love watching the yeast bubble and froth; it feels like a little magic moment in the kitchen! After that, I mix in the eggs and oil. Then, I pour the wet ingredients into the dry mixture, stirring until everything comes together into a sticky dough. It may feel different from traditional dough, but that’s perfectly normal!
How to Properly Knead Gluten-Free Dough
Kneading gluten-free dough is a different experience for me compared to traditional dough. I’ve learned that instead of kneading it in the usual way, I gently mix and fold the dough. Using a spatula or my hands, I work the dough until it’s smooth and all the ingredients are well incorporated. Sometimes, I find it helpful to wet my hands slightly to prevent sticking. It’s important to be gentle yet thorough, ensuring the binding agents do their job without overworking the dough.
Shaping the Braided Loaf
Shaping the challah is one of my favorite parts! Once the dough has risen—about an hour or until it doubles in size—I gently deflate it and turn it out onto a lightly floured surface. I divide the dough into three equal pieces, which is what I typically use for a classic braid. It’s fun to roll each piece into a long rope. I aim for about 12-14 inches in length. The dough is a bit softer than traditional bread, so I take my time to shape it without tearing.
Once I have my three ropes, I pinch them together at the top. I start braiding, alternating the outer strands over the middle one. I find that this method creates a beautiful braid, and I always make sure to tuck in the ends at the bottom to keep everything neat. It’s essential to take my time here; I want each loaf to look as good as it tastes!
Proofing the Dough: Tips for Best Results
Proofing is another crucial step. I usually place the braided loaf on a parchment-lined baking sheet and cover it with a kitchen towel. I let it rise again for about 30-45 minutes. This helps the dough develop that lovely airy quality. I’ve discovered that creating a warm environment can help; sometimes, I’ll turn my oven on for a few minutes and then turn it off, creating a cozy spot for the dough to rise. Watching it puff up makes me so excited for baking!
Baking the Challah: Temperature and Timing
When it’s time to bake, I preheat my oven to 350°F (175°C). Before sliding the loaf in, I like to brush the top with an egg wash, which gives it that gorgeous golden color. I’ve learned that baking time can vary, but usually, my challah bakes for about 30-35 minutes. I keep an eye on it towards the end; I want that perfect golden brown crust. The aroma wafting through my kitchen during this time is simply divine! When it’s done, I always let it cool on a wire rack, although the smell makes it tempting to cut into it right away.
Variations of Gluten-Free Challah
Sweet Variations: Chocolate Chip and Raisin Challah
Once I got the hang of the basic gluten-free challah recipe, I started experimenting with fun variations. One of my family’s favorites is chocolate chip challah. Just before braiding, I fold in a generous amount of dairy-free chocolate chips, and the result is a deliciously rich treat. Another delightful twist is incorporating raisins or even dried cranberries. The sweetness from the dried fruit complements the bread beautifully, making it feel like a special dessert. Read Interesting article: Blueberry French Toast Casserole: Effortless & Fruity Perfection
Savory Variations: Herb and Garlic Challah
For a savory option, I’ve enjoyed making herb and garlic challah. I whisk in minced garlic and a mix of fresh herbs, like rosemary or thyme, into the dough. This creates a fantastic flavor that pairs well with soups or as a side to a main dish. I often serve this version during family dinners, and it never fails to impress.
Other Flavor Combinations to Try
I love to get creative with different flavor combinations! Sometimes, I’ll add a hint of orange zest for a refreshing note or sprinkle in some cinnamon for a warm, cozy feel. I’ve found that experimenting with flavors makes each loaf a new adventure. The possibilities are endless, and I encourage you to try different ingredients to find your favorite variations!
Common Challenges and Solutions
Dealing with Dry or Crumbly Textures
One of the most common challenges I faced when making gluten-free challah was dealing with dry or crumbly textures. I remember the first couple of loaves I baked turned out more like bricks than bread. It was frustrating! Through trial and error, I learned that adjusting the moisture content is key. Adding a bit more oil or an extra egg can really help create a softer, more pliable dough. I’ve also found that letting the dough rest longer can improve hydration. If I notice the dough feeling particularly dry, I’ll add a splash of water or milk, mixing it in slowly until I achieve that desired consistency.
How to Achieve a Golden Brown Crust
Getting that perfect golden brown crust was another hurdle I had to overcome. Initially, my loaves would come out of the oven looking pale and uninviting. To tackle this, I started brushing the top of the challah with an egg wash before baking. The egg wash not only gives it that beautiful shine but also helps achieve that lovely golden hue. I often experiment with different egg washes, sometimes mixing in a bit of water or milk, depending on what I have on hand. Timing is also crucial; keeping an eye on the bread during the last few minutes of baking has made a huge difference. I’ve learned to trust my instincts when it comes to pulling it out of the oven just as it turns that perfect shade of brown.
Preventing Dough from Sticking
When I first started, I often found myself wrestling with dough that wanted to stick to everything. It was messy! I realized that using a lightly floured surface made a difference, but I also discovered that wetting my hands slightly while shaping the dough helped a ton. It’s a bit counterintuitive because you think the dough should be dry, but the moisture keeps it from sticking to my fingers. I also recommend using parchment paper for transferring the dough; it can be a real lifesaver. Additionally, letting the dough rest before shaping can help it relax and become easier to work with, reducing the stickiness.
Storing and Freezing Gluten-Free Challah
Best Practices for Storing Fresh Challah
After all the effort put into creating a beautiful loaf of gluten-free challah, learning how to store it properly became a priority for me. I’ve discovered that the best practice is to let the bread cool completely before wrapping it up. If I don’t, condensation can form and make the bread soggy, which is the last thing I want! I typically wrap the cooled challah in plastic wrap or place it in an airtight container to keep it fresh. It’s also worth noting that gluten-free bread tends to dry out faster than traditional bread, so I like to enjoy it within a couple of days.
How to Freeze and Thaw Challah Bread
If I find I’ve baked more challah than my family can eat in a few days, freezing is my go-to option. I learned that slicing the bread before freezing helps immensely; it allows me to grab just what I need without having to defrost the entire loaf. I wrap each slice in plastic wrap, then place them in a freezer bag. This way, they stay protected from freezer burn. When I’m ready to enjoy a slice, I simply take it out and let it thaw at room temperature for a little while or pop it in the toaster for a quick warm-up. It’s such a convenient way to enjoy homemade challah anytime!
Serving Suggestions and Pairings
Traditional Toppings for Challah
When it comes to serving our gluten-free challah, I love sticking to tradition while adding my own twist. Butter and honey are classic toppings that never disappoint. I remember my grandmother always slathering butter on warm challah, and it brings back such fond memories. For a bit of elegance, a sprinkle of flaky sea salt over the butter can elevate the flavor. I’ve also enjoyed experimenting with jams or preserves, particularly apricot or raspberry, which add a delightful sweetness that pairs beautifully with the bread’s rich flavor.
Pairing with Dishes for Special Occasions
During family gatherings or special occasions, I love serving challah alongside hearty soups or stews. The bread becomes the perfect vehicle for soaking up all that flavor. I often make a rich matzo ball soup for Passover, and the challah is a must-have on the side. I’ve also paired it with roasted meats or even used it for sandwiches; the slightly sweet flavor complements savory fillings so well. I think it’s fantastic how versatile gluten-free challah can be, transitioning from a side dish to a delightful dessert.
Creative Uses for Leftover Challah
No loaf should go to waste! I often find creative ways to use leftover challah. One of my family’s favorite ways is to make challah French toast. I simply slice the bread, dip it in a mixture of eggs and milk, and cook it on the griddle. The result is a deliciously fluffy breakfast that feels indulgent yet is incredibly simple to prepare. I’ve also made bread pudding with leftover challah; the sweetness and texture work beautifully in that dish. I can’t stress enough how much I enjoy finding new ways to use up any extra bread!
Tips for Perfecting Your Gluten-Free Challah
Tools and Equipment Needed
As I dove deeper into gluten-free baking, I realized having the right tools made a world of difference. A sturdy stand mixer is invaluable when it comes to mixing the dough, especially since gluten-free mixtures can be stickier. I also love using a dough scraper; it helps me manage the dough without making a mess. And don’t forget about a good quality oven thermometer! I’ve learned that ovens can often be off by a few degrees, and knowing the exact temperature is crucial for achieving that perfect bake.
Importance of Measuring Ingredients Accurately
When it comes to baking gluten-free, I cannot stress enough how vital it is to measure ingredients accurately. I’ve learned the hard way that even a slight imbalance can affect the texture and flavor of the finished loaf. I always use a kitchen scale for measuring flour and other dry ingredients, as it provides a more precise measurement than cups. It’s a small adjustment that has made a significant difference in my baking experience.
Experimenting with Flours for Different Textures
Finally, I’ve found that experimenting with different flours can lead to exciting results. While I have my go-to blends, trying out new combinations has become a fun adventure. I’ve discovered that mixing in a bit of oat flour creates a lovely nutty flavor, while coconut flour adds a unique sweetness. Each flour has its own properties, and figuring out how they interact is part of the joy of gluten-free baking. I encourage you to take the plunge and see what textures and flavors you can create!
Frequently Asked Questions
What is challah bread?
Challah bread is a traditional Jewish bread, often enjoyed during Shabbat and holidays. It has a unique braided shape and a rich, slightly sweet flavor, making it a special treat in many households.
What ingredients are used in gluten-free challah bread?
Gluten-free challah can be made with gluten-free flours such as almond flour, brown rice flour, and gluten-free all-purpose blends. Other essential ingredients include sweeteners like honey or sugar, eggs, binding agents like xanthan gum or psyllium husk, and oil.
How does gluten-free challah differ from traditional challah?
Traditional challah is made with all-purpose wheat flour, while gluten-free challah uses alternatives like almond or brown rice flour. The absence of gluten requires the use of binding agents to achieve a similar texture to traditional bread.
What are the health benefits of gluten-free bread?
Gluten-free bread caters to those with celiac disease or gluten sensitivity, allowing them to enjoy bread without discomfort. Many gluten-free flours are lower in carbs and higher in protein, and some offer unique nutrients, enhancing both flavor and nutrition.
What binding agents can be used in gluten-free challah?
Xanthan gum and psyllium husk are popular binding agents for gluten-free challah. Xanthan gum helps create structure, while psyllium husk adds elasticity and moisture, offering a healthier option due to its high fiber content.
How should gluten-free challah dough be kneaded?
Gluten-free dough should be gently mixed and folded rather than kneaded in the traditional way. Using a spatula or hands, the dough should be worked until smooth, with wet hands to prevent sticking.
What are some variations of gluten-free challah?
Sweet variations include chocolate chip and raisin challah, while savory options can incorporate herbs and garlic. Experimenting with flavors like orange zest or cinnamon can also create unique variations.
What are the best practices for storing gluten-free challah?
To store gluten-free challah, let it cool completely before wrapping it in plastic wrap or placing it in an airtight container. Gluten-free bread tends to dry out faster, so it’s best to enjoy it within a couple of days.
How can leftover challah be used creatively?
Leftover challah can be used to make French toast or bread pudding. Slicing the bread before freezing allows for easy thawing and helps reduce waste.
What tools are essential for making gluten-free challah?
Essential tools include a sturdy stand mixer for mixing the dough, a dough scraper for managing the dough, and a good quality oven thermometer to ensure accurate baking temperatures.