
Making gluten-free flatbread at home doesn’t have to be complicated or intimidating. With just five simple ingredients and no yeast, you can whip up a delicious and versatile flatbread that everyone will love! For a different take on gluten-free bread, check out The Best Gluten-Free Naan Bread (Soft, Bubbly, & Chewy).
Understanding Gluten-Free Flatbread
What is Gluten-Free Flatbread?
Gluten-free flatbread is a type of unleavened bread that is made without any gluten-containing grains, such as wheat, barley, or rye. Instead, it uses alternative flours and ingredients that provide a similar texture and taste. I remember the first time I tried gluten-free flatbread; I was amazed at how easy it was to make and how delicious it turned out. It’s a fantastic option for those with gluten sensitivities or celiac disease, but it’s also a great choice for anyone looking to mix things up in their diet.
Benefits of Gluten-Free Diets
There are several benefits to adopting a gluten-free diet. For those with celiac disease or gluten intolerance, avoiding gluten is essential for maintaining good health. I’ve seen friends experience relief from digestive issues and increased energy levels once they eliminated gluten from their diets. Even for those without gluten sensitivities, eating gluten-free can introduce a variety of new ingredients and flavors into meals, which can be exciting and nourishing. Plus, gluten-free foods can sometimes be lower in calories and higher in nutrients, depending on the ingredients used.
Common Ingredients in Gluten-Free Baking
When it comes to gluten-free baking, the ingredients can look different from traditional recipes. Instead of wheat flour, we often use a mix of gluten-free flours like almond flour, coconut flour, or brown rice flour. Additionally, ingredients like xanthan gum or psyllium husk may be used to mimic the elasticity that gluten provides. From my experience, experimenting with different flours can lead to discovering unique flavors and textures that can enhance your baking. It’s all about finding what works best for you and your taste preferences. If you’re interested in trying out something unique, consider making Unique Teff Flour Brownies (Rich & Earthy Flavor).
Key Ingredients for Easy Gluten-Free Flatbread
Essential Ingredients Overview
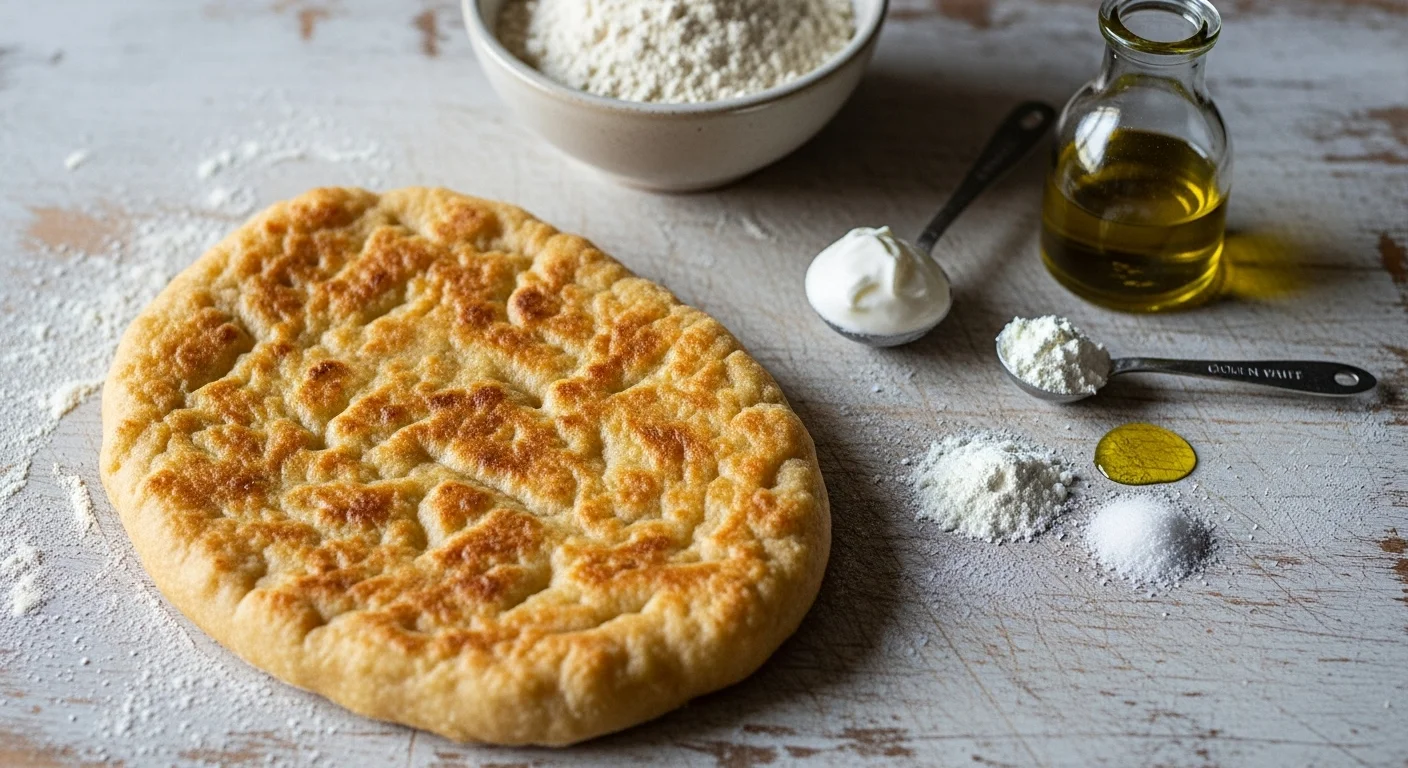
Creating easy gluten-free flatbread requires just five key ingredients: gluten-free flour, water, olive oil, salt, and a binding agent like xanthan gum. Each of these components plays a crucial role in achieving the right texture and flavor. I love the simplicity of this recipe because it doesn’t require a long list of ingredients or complicated techniques; anyone can do it!
Gluten-Free Flour Options
Choosing the right gluten-free flour is essential for making your flatbread. I’ve tried several flours, and I often recommend a gluten-free all-purpose flour blend that includes xanthan gum, as it can simplify the process. If you prefer a nutty flavor, almond flour can be a fantastic option, though it may lead to a slightly denser flatbread. Coconut flour is another alternative, but it absorbs a lot of moisture, so it requires adjustments in the recipe. It took me a bit to find my favorite flour, but I finally settled on a blend that gives me the light and fluffy texture I crave.
Role of Water in Flatbread
Water is essential for bringing the dough together. It hydrates the flour and activates the binding agents, allowing the ingredients to combine smoothly. I usually start with a little water and gradually add more until I reach the desired consistency. It’s important to get this balance right; too much water can make the dough sticky and challenging to work with, while too little can lead to a dry flatbread. I learned this the hard way during my first attempts!
Using Olive Oil for Flavor and Texture
Olive oil is another important ingredient that adds flavor and moisture to the flatbread. I love using a good quality olive oil not only for its health benefits but also for the rich taste it imparts. It makes the flatbread softer and enhances its overall texture. When I first started experimenting with homemade flatbreads, I noticed that the difference in flavor with or without olive oil was significant. It’s definitely worth including!
Salt: Enhancing Taste
Salt is a simple yet essential ingredient that enhances the flavor of the flatbread. Without it, the bread can taste bland. I usually add just the right amount to ensure that the flatbread is flavorful without being overpowering. It’s fascinating how such a small ingredient can make such a big difference. When I’ve forgotten to add salt, I’ve always regretted it!
Step-by-Step Guide to Making Gluten-Free Flatbread
Preparation: What You’ll Need
Before diving into making gluten-free flatbread, it’s essential to gather all the necessary tools and ingredients. Here’s what you’ll need:
- Gluten-free flour of your choice (I recommend a blend)
- Water
- Olive oil
- Salt
- Xanthan gum (if your flour blend doesn’t already contain it)
- A mixing bowl
- A rolling pin
- A skillet or baking sheet
I’ve found that having everything prepped and ready makes the process smoother and a lot more enjoyable. It’s almost like setting the stage for a little cooking adventure!
Mixing the Ingredients
Once you have your ingredients ready, it’s time to mix them. Start by combining the gluten-free flour, salt, and xanthan gum in a mixing bowl. I usually whisk them together to ensure they’re evenly distributed. Next, create a well in the center and add the olive oil and water. I like to start with less water; I’ve learned that it’s easier to add more than to fix a too-wet dough.
Using a spoon or my hands, I mix everything together until a dough forms. Don’t worry if it looks a little crumbly at first; as you knead it gently, it will come together. I often find that letting the dough rest for about 10 minutes helps hydrate the flour better, giving the flatbread a softer texture.
How to Roll Out the Dough
After the dough has rested, it’s time to roll it out. I like to sprinkle a little gluten-free flour on my work surface to prevent sticking. Then, I divide the dough into smaller portions, roughly the size of a golf ball. This makes it easier to handle and helps ensure more uniform flatbreads.
With a rolling pin, I roll each portion into a flat circle, aiming for about a ¼-inch thickness. I’ve noticed that if the dough is too thick, it won’t cook through, and if it’s too thin, it can easily tear. Finding that sweet spot takes a bit of practice, but I assure you it’s worth it!
Cooking Methods: Stovetop vs. Oven
When it comes to cooking your flatbread, you have a couple of options: stovetop or oven. Personally, I prefer the stovetop method because it’s quick and gives a nice char to the flatbread.
To cook on the stovetop, I preheat a skillet over medium-high heat and lightly grease it with olive oil. Once it’s hot, I place a rolled-out flatbread in the skillet. I find that letting it cook for about 2-3 minutes on one side is perfect; you’ll start to see bubbles forming. Then, flip it over and cook for another 1-2 minutes. The result is a beautifully browned flatbread that smells heavenly!
If you choose to use the oven, I recommend preheating it to about 400°F (200°C). Place the rolled flatbreads on a baking sheet lined with parchment paper and bake for about 10-12 minutes, flipping halfway through. This can be a great option if you’re making a large batch.
Cooking Times and Temperature Settings
Cooking times can vary based on the thickness of the flatbread and the method you choose. For stovetop cooking, I usually keep an eye on the flatbreads to ensure they don’t burn. If I see them puffing up nicely and getting golden brown, I know they’re close to being done.
In the oven, I’ve learned that it’s better to check a couple of minutes early. You want them to be just golden and not too crispy, as they should remain pliable for wraps or dipping. If they’re overcooked, they can become brittle, which isn’t ideal for my favorite uses.
Overall, I find that practice makes perfect. The more I cook these flatbreads, the more intuitive it becomes. And trust me, the aroma wafting through your kitchen while they cook is absolutely worth it!
Tips for Perfecting Your Flatbread
Common Mistakes to Avoid
As I’ve ventured into making gluten-free flatbread, I’ve stumbled upon a few common mistakes that can be easily avoided with a bit of awareness. One of the biggest pitfalls is not measuring ingredients accurately. Gluten-free flours can behave quite differently, so I always recommend using a kitchen scale for precision. I remember the time I thought I could eyeball the flour and ended up with a dough that was too dry; it was a frustrating experience!
Another mistake is not allowing the dough to rest. Resting gives the flour time to absorb the moisture, which leads to a softer texture. I often forget this step in my eagerness, but taking that extra time makes a noticeable difference in the final product. Lastly, avoid cooking the flatbread on too high of heat. If the skillet is too hot, the outside can burn before the inside cooks properly. I’ve learned to start with medium heat and adjust as needed.
How to Achieve the Right Texture
Getting that perfect texture is an art I’ve come to appreciate. The key is in the dough consistency. It should be smooth but slightly tacky. If it’s too crumbly, it won’t hold together well, while a sticky dough can be hard to roll out. I often find it helpful to test a small piece by rolling it out and cooking it; this way, I can adjust the water or flour before committing to the whole batch. Another tip I’ve picked up is to knead the dough gently, as over-kneading can make it tough and chewy instead of soft and pliable.
Additionally, the thickness of the rolled dough matters. I usually aim for about ¼ inch thick, as this allows for even cooking without compromising the texture. If it’s too thick, the inside might remain doughy, and if it’s too thin, it can become crisp and break easily. I’ve experimented a lot, and finding that sweet spot is part of the fun!
Storing Leftover Flatbread
If, by chance, you have leftover flatbread, storing it properly is essential to maintain its freshness. I usually let the flatbreads cool completely before placing them in an airtight container. They can be stored at room temperature for up to two days, though I’ve found they taste best the day they’re made. If I want to keep them longer, I pop them in the fridge, where they can last up to a week. However, I learned that they can become a bit dry in the fridge, so I try to consume them quickly!
If I ever have a significant batch, freezing is my go-to option. I separate each flatbread with parchment paper to prevent them from sticking together and place them in a freezer bag. When I’m ready to enjoy them, I simply take out as many as I need and let them thaw at room temperature. It’s a great way to always have fresh flatbread on hand without the hassle of making it from scratch every time!
Reheating Tips for Best Results
Reheating gluten-free flatbread can be tricky, but I’ve found a few methods that work wonders. The microwave is convenient, but it can make the flatbread chewy if overheated. I usually wrap it in a damp paper towel and heat it for about 15-20 seconds, checking to ensure it’s just warm and not hot. This method keeps it soft and enjoyable.
For a crispier option, I recommend using the skillet. I preheat the skillet on medium heat, add a tiny drizzle of olive oil, and then place the flatbread in for about a minute on each side. This method revives the texture while adding a little extra flavor. I love the final product; it’s almost like having freshly made flatbread again!
Another option is the oven, which is excellent if I’m reheating several flatbreads at once. I preheat it to 350°F (175°C) and place the flatbreads directly on the rack or on a baking sheet for about 5-10 minutes. This method warms them through while keeping them nice and soft. I’ve learned that no matter how I choose to reheat them, taking a moment to revive that warmth and texture makes all the difference!
Serving Suggestions and Pairings
Delicious Dips and Spreads
One of my favorite ways to enjoy gluten-free flatbread is by pairing it with a variety of dips and spreads. Hummus is a classic choice; its creamy texture and rich flavor complement the flatbread perfectly. I often make my own hummus by blending chickpeas, tahini, lemon juice, and garlic – it’s so simple and tastes amazing! Another favorite is tzatziki, a refreshing yogurt-based dip that brings a cool contrast to the warm flatbread. I love that we can also experiment with different flavors, like roasted red pepper or olive tapenade, to keep things exciting.
Using Flatbread in Wraps and Sandwiches
Gluten-free flatbread is incredibly versatile and can easily serve as a base for wraps or sandwiches. I often fill mine with grilled vegetables, lean proteins, and fresh greens for a nutritious meal on the go. One of my go-to combinations is grilled chicken, avocado, and spinach, drizzled with a bit of balsamic glaze. I find that the flatbread holds everything together nicely, making it a satisfying option for lunch. For a vegetarian option, I love stuffing it with falafel, lettuce, and a drizzle of tahini sauce. The possibilities are truly endless! If you’re looking for a hearty meal to pair with your flatbread, try a Vegan version of Middle Eastern pasta.
Serving with Soups and Salads
Flatbread also makes a fantastic accompaniment to soups and salads. It’s perfect for dipping into a hearty bowl of lentil soup or a creamy tomato bisque. I remember the first time I served my homemade flatbread with a warm bowl of soup; my family couldn’t get enough! I often tear off pieces of flatbread to enjoy alongside a fresh salad, which adds a nice texture to the meal. Whether it’s a light garden salad or a more substantial grain salad, the flatbread enhances the overall dining experience.
Variations of Gluten-Free Flatbread
Herbed Flatbread for Extra Flavor
If you’re looking to add a burst of flavor to your flatbread, consider incorporating fresh or dried herbs into the dough. I love adding rosemary or thyme, which infuses the flatbread with a delightful aroma. Simply mix a tablespoon or two of your chosen herbs into the dry ingredients before adding the wet ones. It’s a small change, but it can elevate your flatbread to a whole new level!
Spicy Flatbread: Adding Heat
For those who enjoy a little kick, experimenting with spices is a great option. I often add a pinch of cayenne pepper or crushed red pepper flakes into the dough. It’s a fun way to spice things up, especially if you’re serving the flatbread with bold flavors. Just be cautious with the amount, as you can always add more, but it’s tough to tone it down once it’s in!
Sweet Flatbread Options with Natural Sweeteners
Who says flatbread has to be savory? I love making a sweet version, especially for breakfast or dessert. By adding a touch of honey or maple syrup to the dough, along with cinnamon, you can create a delightful flatbread that pairs wonderfully with fresh fruits or yogurt. I often serve it with a smear of almond butter and slices of banana for a delicious and wholesome treat. It’s a fun twist that shows how versatile flatbread can be!
Frequently Asked Questions (FAQs)
Can I Substitute Ingredients in the Recipe?
Absolutely! One of the beauties of cooking is the ability to tailor recipes to your preferences. However, be mindful of how substitutions might affect the texture and flavor. For instance, if you’re out of xanthan gum, you can try using psyllium husk as a binding agent, but the consistency may vary slightly.
What is the Best Gluten-Free Flour to Use?
In my experience, a gluten-free all-purpose flour blend works great for flatbread, especially if it contains xanthan gum. If you prefer to make your own blend, combining almond flour and coconut flour can yield delicious results, but be sure to adjust the liquid accordingly.
How Long Does Homemade Flatbread Last?
Homemade flatbread is best enjoyed fresh, but it can last for about two days at room temperature. If you’d like to keep it longer, I recommend refrigerating it for up to a week. Just remember, it may dry out a bit in the fridge!
Can I Freeze Gluten-Free Flatbread?
Yes, freezing is a fantastic option! I often place parchment paper between each flatbread and store them in a freezer bag. This way, I can take out just what I need without defrosting the entire batch, which is super convenient!
Final Thoughts
Making gluten-free flatbread at home has been a rewarding journey for me. It’s not just about enjoying a delicious, wholesome bread; it’s about the creativity and adaptability that comes with it. I’ve discovered new flavors, textures, and ways to enjoy this versatile flatbread in my meals. Whether you opt for savory or sweet variations, or pair it with your favorite dips and dishes, I hope you find joy in trying out this recipe. It’s become a staple in my kitchen, and I believe it will be a delightful addition to yours too!
Frequently Asked Questions
What is gluten-free flatbread?
Gluten-free flatbread is a type of unleavened bread made without gluten-containing grains such as wheat, barley, or rye. It utilizes alternative flours and ingredients to achieve a similar texture and taste.
What are the benefits of a gluten-free diet?
The benefits of a gluten-free diet include essential health maintenance for those with celiac disease or gluten intolerance, relief from digestive issues, increased energy levels, and the introduction of new ingredients and flavors into meals.
What are the key ingredients needed to make gluten-free flatbread?
You will need gluten-free flour, water, olive oil, salt, and a binding agent like xanthan gum to make gluten-free flatbread.
How should I choose gluten-free flour for flatbread?
Choosing a gluten-free all-purpose flour blend that includes xanthan gum is recommended for simplicity. Almond flour and coconut flour are also good options, but they may require adjustments in the recipe.
What role does water play in making flatbread?
Water is essential for hydrating the flour and activating the binding agents, helping to bring the dough together. The right balance of water is crucial for achieving the desired dough consistency.
Can I use different cooking methods for gluten-free flatbread?
Yes, you can cook gluten-free flatbread either on the stovetop or in the oven. The stovetop method is quicker and gives a nice char, while the oven method is suitable for preparing larger batches.
What are some common mistakes to avoid when making gluten-free flatbread?
Common mistakes include not measuring ingredients accurately, skipping the resting period for the dough, and cooking at too high of heat. Precision and patience are key to achieving the best results.
How should I store leftover gluten-free flatbread?
Leftover flatbread should be stored in an airtight container at room temperature for up to two days. If you want to keep it longer, refrigerate it for up to a week or freeze it with parchment paper in between each flatbread.
What are some serving suggestions for gluten-free flatbread?
Gluten-free flatbread can be served with dips like hummus or tzatziki, used in wraps and sandwiches, or paired with soups and salads for added texture and flavor.
Can I make variations of gluten-free flatbread?
Yes, you can create variations of gluten-free flatbread by adding herbs for extra flavor, spices for heat, or natural sweeteners for a sweet version, making it versatile for different meals.