
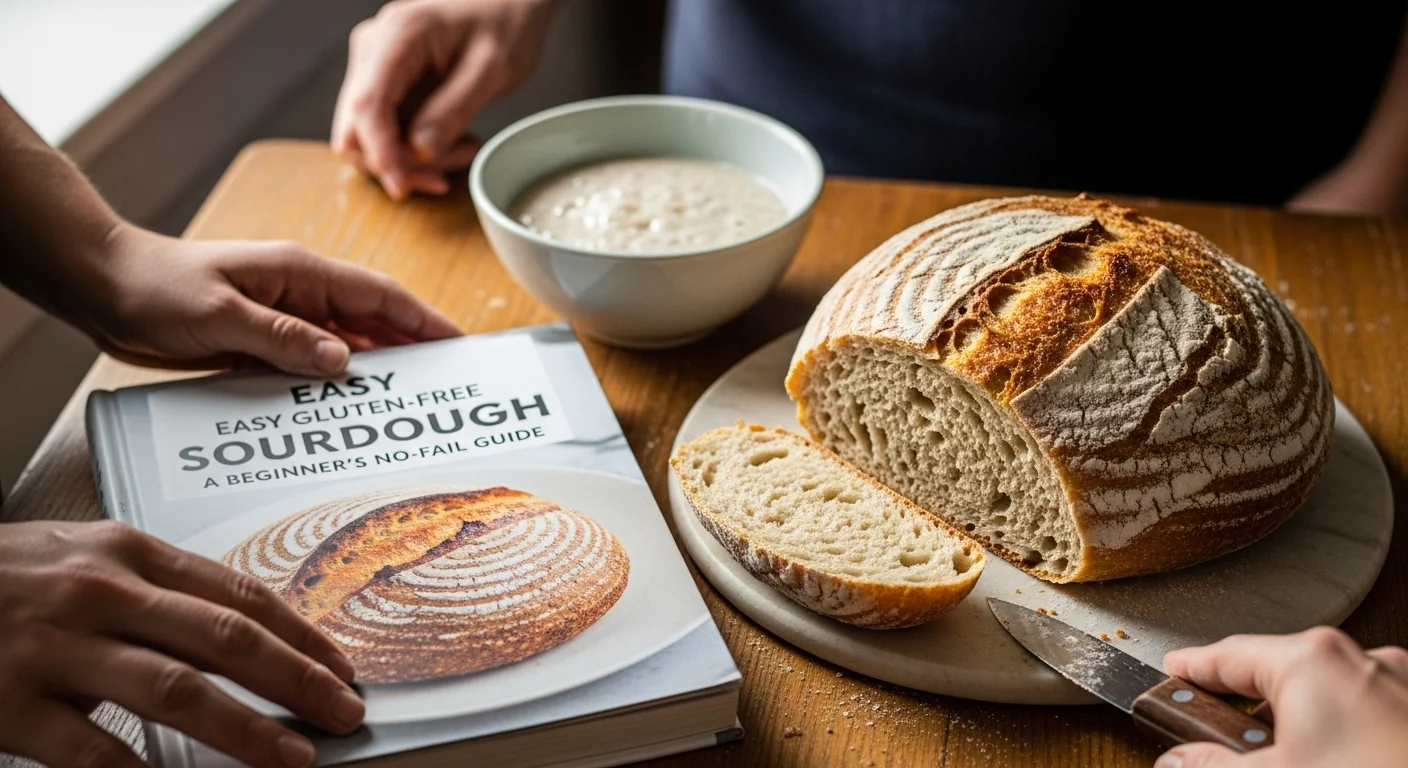
Have you ever craved the tangy goodness of sourdough bread but thought it was impossible to enjoy while avoiding gluten? Let me tell you, it’s entirely possible, and I’m here to guide you through the delightful journey of making easy gluten-free sourdough!
Understanding Gluten-Free Sourdough
What is Gluten-Free Sourdough?
Gluten-free sourdough offers a way to experience the distinctive tang and texture of traditional sourdough bread without the gluten. This bread is made using gluten-free flours and relies on the natural fermentation that comes from a sourdough starter, just like the regular version. The unique flavor and texture are developed through a combination of beneficial bacteria and wild yeast, creating a delightful loaf that’s safe for those with gluten sensitivities or celiac disease.
Benefits of Gluten-Free Sourdough
One of the most exciting aspects of gluten-free sourdough is its potential health benefits. For me, knowing that I can enjoy bread that is not only delicious but also easier to digest is a huge plus. The fermentation process breaks down some of the complex carbohydrates and proteins in the flour, making it lighter on the stomach. Plus, sourdough has a lower glycemic index, which can help with blood sugar control. I’ve noticed that gluten-free sourdough can also have added nutritional value, depending on the flours used. For instance, many gluten-free flours are rich in fiber, vitamins, and minerals.
Common Gluten-Free Flours Used
When it comes to gluten-free sourdough, the type of flour you choose plays a significant role in the final product. After experimenting with various flours, I found a few favorites that work particularly well.
Almond Flour
Almond flour is a staple in many gluten-free kitchens. It’s made from finely ground almonds and adds moisture and richness to bread. I love using almond flour because it brings a slightly nutty flavor that complements the sourdough’s tanginess.
Coconut Flour
Coconut flour is another popular choice, but it’s more absorbent than other flours. When I use coconut flour, I usually mix it with almond flour or other gluten-free flours to balance out the texture. It adds a subtle sweetness and a hint of coconut flavor, which can be delightful.
Brown Rice Flour
Brown rice flour is a great base for gluten-free sourdough. It has a mild flavor and a texture that mimics traditional wheat flour. In my experience, using brown rice flour helps create a nice crumb structure in the bread.
Sorghum Flour
Sorghum flour is another excellent gluten-free option. It’s high in protein and fiber, which makes it a nutritious choice. I often blend sorghum flour with other flours to enhance the flavor and texture of my sourdough.
Getting Started: Essential Ingredients and Tools
Basic Ingredients for Gluten-Free Sourdough
Now that we understand the different flours, let’s dive into the basic ingredients you’ll need to create your gluten-free sourdough. Gathering the right ingredients is key to ensuring your bread turns out well.
Gluten-Free Flour Blends
Using a gluten-free flour blend can simplify the process. I recommend looking for blends that contain a mix of the flours we discussed earlier. This way, you’ll get a balanced flavor and texture in your final product. It’s worth experimenting with a few different blends to find one that you love.
Water
Water is essential for hydrating your flour and activating the wild yeast in your sourdough starter. I usually opt for filtered water because it can help avoid any chlorine that might interfere with fermentation.
Salt
Salt is crucial in any bread recipe, including gluten-free sourdough. It enhances flavor and helps control the fermentation process. I like to use sea salt for its mineral content and taste.
Tools You’ll Need
Having the right tools on hand can make the process smoother and more enjoyable. Here are some essentials I find useful in my gluten-free sourdough journey:
Mixing Bowls
You’ll need a couple of mixing bowls—one for your sourdough starter and another for mixing your dough. I prefer glass or stainless steel bowls for easy cleaning and durability.
Digital Scale
Measuring ingredients by weight is more accurate than using volume measurements, especially with gluten-free flours. I use a digital scale to ensure I’m getting the right amounts every time I bake.
Proofing Basket
A proofing basket, or banneton, helps shape your dough while it rises. I find that using a proofing basket gives my sourdough a lovely round shape and allows for better air circulation during the proofing process.
Baking Stone or Dutch Oven
To achieve that perfect crust, I recommend using a baking stone or a Dutch oven. Both methods create a steamy environment that helps develop a crispy crust while keeping the inside soft and fluffy. I’ve had great results with both, so it’s all about which one you prefer.
Creating Your Gluten-Free Sourdough Starter
What is a Sourdough Starter?
A sourdough starter is a living culture made from flour and water that captures wild yeast and beneficial bacteria from the environment. It’s the heart of sourdough baking, providing the leavening needed to make bread rise and develop that characteristic tangy flavor. I remember the first time I started my own sourdough starter; it felt like I was nurturing a little pet! A gluten-free sourdough starter works the same way, but instead of regular flour, we use gluten-free options to create a bubbly, active culture that can make delicious bread.
Step-by-Step Guide to Making a Gluten-Free Starter
Creating a gluten-free sourdough starter may sound daunting, but trust me, it’s quite straightforward. Here’s how I did it:
Day 1: Mixing the Ingredients
On the first day, I mixed equal parts of gluten-free flour and water. I usually went with a blend of brown rice flour and sorghum flour for this. For me, this combination has worked best in terms of flavor and fermentation. I used about 100 grams of each flour and 100 grams of filtered water. In a glass jar, I stirred everything together until it formed a thick paste. Then I covered the jar loosely with a cloth to allow airflow but keep any unwanted pests out. It was exciting to think about all the wild yeast in the air getting ready to join the party!
Days 2-7: Feeding Your Starter
Over the next few days, I made sure to feed my starter. Every 24 hours, I would discard half of the mixture and add fresh flour and water—keeping that 1:1:1 ratio. At first, nothing much seemed to happen, but around the third day, I started to see some bubbles forming, and the starter began to rise. The smell was a bit sour, which was a good sign! By the end of the week, my starter was bubbly, frothy, and had doubled in size. I felt like a proud parent watching my creation grow and thrive.
Signs Your Starter is Ready
Knowing when your starter is ready to bake with is crucial. I learned that the best indicators are its ability to double in size within a few hours after feeding and a pleasant, tangy aroma. When I would drop a spoonful of the starter into a glass of water, if it floated, I knew it was ready. This meant it had enough air bubbles to provide leavening power for my gluten-free sourdough bread. It’s a rewarding moment when you realize that your hard work has paid off!
Easy Gluten-Free Sourdough Recipe
Ingredients List
Now that you have your starter ready, let’s talk about making the actual bread! Here’s what I usually gather for my gluten-free sourdough:
- 150 grams of active gluten-free sourdough starter
- 300 grams of gluten-free flour blend (I like to use a mix of brown rice, almond, and sorghum flour)
- 250 grams of filtered water
- 8 grams of salt
Step-by-Step Instructions
Mixing the Dough
To start, I combine the active starter, filtered water, and gluten-free flour blend in a large mixing bowl. Using a spatula, I mix everything until it comes together into a sticky dough. It’s different from traditional dough, so don’t worry if it feels more like a thick batter than a kneadable dough. I usually let it rest for about 30 minutes to allow the flours to absorb the water better.
First Rise
After the dough has rested, I add the salt and mix it in thoroughly. Then, I cover the bowl with a damp cloth and let it rise in a warm spot for 4 to 6 hours. I love this part; the anticipation of watching the dough puff up is so exciting! It should ideally double in size. If it doesn’t, don’t fret; sometimes gluten-free bread takes a little longer.
Shaping the Dough
Once the dough has risen, I gently turn it out onto a floured surface. I use a bit of gluten-free flour to keep it from sticking. I shape it into a round loaf by folding the edges into the center, then flip it over and gently tighten the surface by pulling it towards me on the counter. This helps create surface tension, which is key for a good rise.
Second Rise
Next, I place the shaped dough into my proofing basket, seam side up, and cover it with a cloth again. This second rise usually takes about 1 to 2 hours, or until it has puffed up noticeably. I often use this time to preheat my oven to around 450°F (230°C), along with my Dutch oven if I’m using one.
Baking the Bread
Finally, it’s time to bake! I carefully turn the dough out onto a piece of parchment paper and score the top with a sharp knife—this allows the bread to expand properly in the oven. I then transfer the dough (with the parchment paper) into the hot Dutch oven, cover it, and bake for about 30 minutes. After that, I remove the lid and bake for an additional 15 to 20 minutes until it’s golden brown. The smell that fills the kitchen is simply heavenly!
Common Challenges and Solutions
Dealing with Dense or Gummy Bread
One of the most common issues I encountered when making gluten-free sourdough was ending up with dense or gummy bread. It can be frustrating, especially after putting in so much effort. From my experience, there are a few key factors to consider that can help you achieve a lighter loaf. First, make sure you’re using a well-fed and active sourdough starter. If the starter isn’t bubbly and has doubled in size after feeding, it may not have enough leavening power. I learned this the hard way!
Another aspect to look at is the hydration level of your dough. Gluten-free flours absorb water differently, so you might need to adjust the amount of water you’re using. If your dough feels too thick, try adding a little more water to achieve a better consistency. Lastly, don’t be shy about letting your dough rise for longer. Sometimes those extra hours can make a world of difference!
Addressing Crumb Structure Issues
When it comes to gluten-free sourdough, achieving a good crumb structure can be tricky. I’ve had my share of loaves that were either too crumbly or too dense. One thing I found helpful is to mix different gluten-free flours to create a more balanced texture. For example, blending brown rice flour with almond flour usually gives my bread a nice structure.
Another tip I’d suggest is to incorporate a small amount of xanthan gum or psyllium husk into your flour blend. These ingredients can act as binding agents and help provide that desired elasticity that’s often missing in gluten-free breads. It took me a while to figure this out, but now I can confidently say that a little bit of xanthan gum goes a long way!
Storing Your Gluten-Free Sourdough
Once you’ve achieved that perfect loaf, you’ll want to ensure it stays fresh. I’ve learned the best way to store gluten-free sourdough is by keeping it in a paper bag at room temperature for a few days. If I know I won’t finish the bread in that time, I wrap it tightly in plastic wrap and then place it in an airtight container before putting it in the freezer. This way, I can enjoy slices of fresh-tasting sourdough straight from the freezer whenever a craving strikes.
When I’m ready to eat, I simply take out what I need and let it thaw on the counter or pop it in the toaster. It’s amazing how delicious it still tastes! I’ve found that freezing gluten-free sourdough doesn’t compromise its quality as long as it’s wrapped correctly.
Tips for Perfecting Your Gluten-Free Sourdough
Experimenting with Flavor
One of the fun aspects of making gluten-free sourdough is the ability to play around with flavors. I love to experiment with different herbs and spices to elevate my bread. A sprinkle of garlic powder or dried rosemary can add a delightful twist to the classic sourdough flavor. I remember one weekend I decided to add some fresh herbs from my garden, and it truly took my bread to a new level!
Don’t hesitate to try new flavor combinations. You might just discover a favorite that becomes a staple in your baking routine.
Adjusting Hydration Levels
As I mentioned earlier, hydration is crucial when it comes to gluten-free baking. The type of flour you use can greatly affect how much water you’ll need. I usually start with the recommended amount and then adjust based on the feel of the dough. A good rule of thumb is to aim for a dough that’s sticky but not overly wet. This can take some trial and error, but over time, I’ve learned to trust my instincts when it comes to hydration.
Keep a notebook handy to jot down your observations with different batches. This way, you’ll have a record to refer back to the next time you bake!
Using Add-Ins and Variations
Adding ingredients like seeds, nuts, or even dried fruit can make your gluten-free sourdough even more exciting. I love to toss in sunflower seeds or walnuts for a delightful crunch. When I added dried cranberries once, it turned out to be a lovely sweet and savory bread that was perfect for breakfast.
Herbs and Spices
As I mentioned before, fresh or dried herbs can bring a whole new dimension to your sourdough. Basil, thyme, and oregano are fantastic options, especially if you plan to use the bread for sandwiches or as a side to a savory meal. Experimenting with different spices can also add warmth and depth to your loaf.
Seeds and Nuts
I often sprinkle chia seeds or flaxseeds into my dough for added nutrition. These not only enhance the texture but can also help with binding. Nuts like chopped pecans or almonds can contribute a satisfying crunch and flavor profile that pairs beautifully with the tang of sourdough.
Dried Fruits
Dried fruits like raisins, apricots, or figs can turn your gluten-free sourdough into a delightful treat. I once made a loaf with figs and walnuts, and it quickly became a family favorite. Just be sure to chop the fruits into smaller pieces so they distribute evenly throughout the dough.
Frequently Asked Questions
What is gluten-free sourdough?
Gluten-free sourdough offers a way to experience the distinctive tang and texture of traditional sourdough bread without the gluten. It is made using gluten-free flours and relies on natural fermentation from a sourdough starter, similar to the regular version.
What are the benefits of gluten-free sourdough?
Gluten-free sourdough may be easier to digest due to the fermentation process, which breaks down complex carbohydrates and proteins. It also has a lower glycemic index and can have added nutritional value depending on the flours used.
What types of gluten-free flours are commonly used in gluten-free sourdough?
Common gluten-free flours include almond flour, coconut flour, brown rice flour, and sorghum flour. Each of these flours contributes different flavors and textures to the final product.
What basic ingredients do I need to make gluten-free sourdough?
You will need a gluten-free flour blend, water, and salt. Using a gluten-free flour blend simplifies the process and ensures a balanced flavor and texture.
What tools are essential for making gluten-free sourdough?
Essential tools include mixing bowls, a digital scale for accurate measurements, a proofing basket for shaping the dough, and a baking stone or Dutch oven for baking the bread.
How do I create a gluten-free sourdough starter?
To create a gluten-free sourdough starter, mix equal parts of gluten-free flour and water, cover it loosely, and feed it daily by discarding half and adding fresh flour and water until it becomes bubbly and doubles in size.
What are the signs that my sourdough starter is ready to bake with?
Your starter is ready when it doubles in size within a few hours after feeding, has a pleasant tangy aroma, and floats when dropped into a glass of water.
How can I avoid dense or gummy gluten-free sourdough?
To avoid dense or gummy bread, ensure your starter is active, adjust the hydration level of your dough, and allow it to rise for longer if needed.
What is the best way to store gluten-free sourdough?
Store gluten-free sourdough in a paper bag at room temperature for a few days. If not consumed in that time, wrap it in plastic wrap and place it in an airtight container in the freezer.
How can I experiment with flavors in gluten-free sourdough?
You can experiment with flavors by adding herbs, spices, seeds, nuts, or dried fruits to your dough. This can enhance the taste and texture of your gluten-free sourdough.
Read Interesting article: This Viral Chicken Toast Fold Might Replace Breakfast
Read Interesting article: The Internet’s New Favorite Roasted Tomato Toast Is Actually Worth It