
Making homemade gluten-free bagels can be a game-changer for anyone craving that chewy, delicious taste without the gluten! I’m excited to share my journey of creating easy, mouthwatering bagels right in my own kitchen. Read Interesting article: The Viral Avocado Rice Cake Trend Just Got Better
Understanding Gluten-Free Baking
When I first dove into gluten-free baking, I had a lot to learn about gluten and how it affects our food. Gluten is a protein found in wheat and similar grains that gives bread its chewy texture. For many people, especially those with celiac disease or gluten intolerance, consuming gluten can lead to serious health issues. This realization drove me to explore gluten-free recipes, and I quickly fell in love with the challenge of creating delicious alternatives.
What is Gluten?
Gluten is essentially a group of proteins that act like a glue, helping foods maintain their shape. I remember my first time baking with gluten-free flour; it felt like I was trying to solve a puzzle. Without gluten, my baked goods were often crumbly and dry. Understanding what gluten does helped me appreciate the importance of finding the right substitutes.
Why Choose Gluten-Free?
There are many reasons someone might choose a gluten-free lifestyle. For me, it started with a curiosity about diet and health. I wanted to explore new ingredients and cooking methods. Others may choose gluten-free for health reasons or dietary restrictions. Whatever the reason, I think we can all agree that delicious food should be accessible to everyone, regardless of dietary needs.
Common Gluten-Free Flours
As I experimented, I discovered a variety of gluten-free flours that produced amazing results. Some of my favorites include almond flour, coconut flour, and oat flour. However, the star for bagels tends to be gluten-free flour blends. These blends usually contain a mix of several flours and starches, which helps mimic the texture that gluten gives to traditional bagels. I found that a good blend is essential for achieving that perfect chewiness that we all love in bagels.
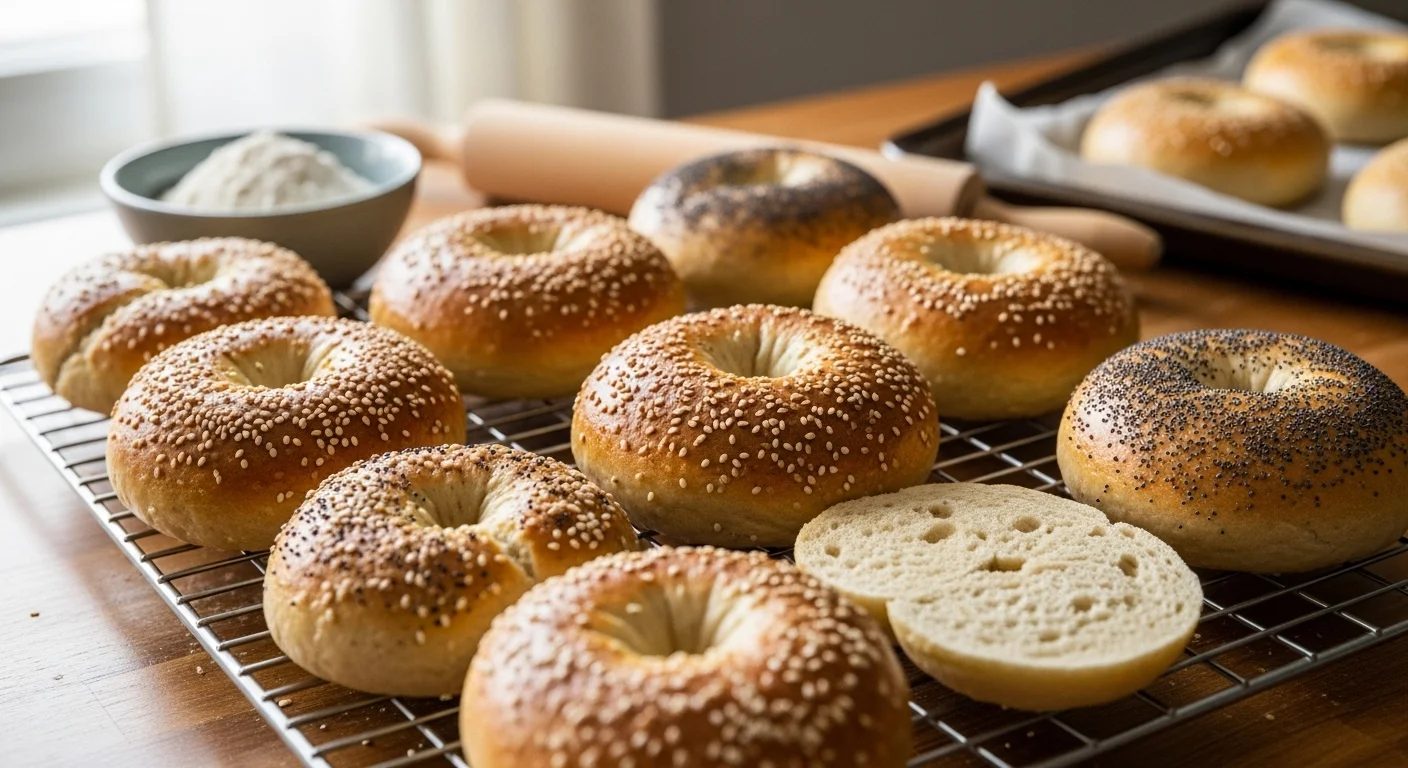
Importance of Texture in Bagels
When I set out to make gluten-free bagels, I quickly learned that texture is crucial. A bagel should be chewy on the outside and soft on the inside. Getting that balance right without gluten can be a challenge, but it’s not impossible! I’ve found that using the right ingredients and techniques can help create that beloved texture. Not only that, but a well-textured bagel can elevate any meal or snack. It’s all about experimenting until you find what works best for you!
Essential Ingredients for Gluten-Free Bagels
Now that we understand gluten and its alternatives, let’s dive into the ingredients. Each component plays a role in the final product. I’ve learned that picking the right ingredients can make or break your bagel-making experience.
Gluten-Free Flour Blends
Choosing the right gluten-free flour blend is key. I prefer blends that include a mix of rice flour, tapioca starch, and potato starch. These blends tend to yield the best results. If you’re interested in making your own blend, you can experiment with ratios until you find what works for your taste and texture preferences.
Yeast and Its Role in Bagel Making
Yeast is another essential ingredient. It’s what gives our bagels their rise and fluffy interior. I always make sure my yeast is fresh; old yeast can lead to flat bagels. When I activate the yeast with warm water and a little sugar, I can see it bubbling up. That’s when I know I’m on the right track!
Binding Agents: Xanthan Gum vs. Psyllium Husk
In gluten-free baking, binding agents play a huge role in mimicking the elasticity that gluten provides. I’ve tried both xanthan gum and psyllium husk, and both have their merits. Xanthan gum is great for creating a stretchy texture, while psyllium husk adds fiber and helps with moisture retention. I often alternate between the two based on what I have on hand or what I’m feeling that day.
Flavor Enhancers: Salt, Sweeteners, and Seasonings
Don’t underestimate the power of flavor! Salt is a must to enhance the taste of any bagel. I also like to add a touch of sweetener, like honey or maple syrup, which helps feed the yeast and gives a subtle sweetness. I’ve even experimented with different seasonings, and it’s amazing how a little garlic powder or onion powder can elevate the flavor profile.
By understanding these essential ingredients, I found that making gluten-free bagels became not just a task, but a fulfilling experience. With the right knowledge and components, I could create bagels that not only tasted great but also brought my family and friends together. The joy of sharing my homemade gluten-free bagels has been one of my favorite parts of this journey!
Step-by-Step Guide to Making Gluten-Free Bagels
Preparation: Tools and Equipment Needed
Before I dive into the actual bagel-making process, I want to share the tools that have made my experience smoother. I remember feeling overwhelmed at first, but having the right equipment on hand can make all the difference. Here’s what I found essential for my gluten-free bagel adventure:
- Mixing Bowls: A couple of different sizes work well for mixing the dough and letting it rise.
- Measuring Cups and Spoons: Precise measurements are crucial in baking, so I always keep these handy.
- Wooden Spoon or Dough Scraper: I prefer using a wooden spoon for mixing, and a dough scraper helps in handling sticky dough.
- Baking Sheet: I line mine with parchment paper for easy cleanup.
- Large Pot: This is for boiling the bagels, and I always make sure it’s deep enough so the bagels can float.
- Cooling Rack: Once baked, the bagels need to cool, and a cooling rack allows air to circulate around them.
With the tools ready, I feel confident to start the process. Having everything organized really helps reduce stress and keeps the joy in baking!
Mixing the Dough
When it comes to mixing the dough, I’ve found that patience is key. I start by activating the yeast in warm water with a touch of sugar. It’s amazing to watch it come to life! Once it’s bubbly, I combine my dry ingredients in a separate bowl, making sure everything is well mixed. I remember the first time I tried to make bagels; the dough was so sticky! It took me a while to learn how to adjust the flour ratios until I found the perfect consistency.
After the dry ingredients are mixed, I pour in the yeast mixture and any other liquids, like oil or vinegar. Using my wooden spoon, I gradually incorporate the wet and dry ingredients until a soft, slightly sticky dough forms. I always knead the dough for a good 5-10 minutes, which helps develop its structure. I love this part – it’s like a workout and meditation rolled into one!
Shaping the Bagels
Shaping is where the magic happens. I find it satisfying to transform the dough into bagels. After letting it rest and rise for about 30 minutes, I take small portions of the dough and roll them into balls. Then, I poke a hole in the center with my thumb and gently stretch it to create that classic bagel shape. I remember my first few attempts were a bit awkward, but practice definitely makes perfect. It’s important to make the hole a bit larger than you think, as it tends to close up during boiling and baking.
Once shaped, I place the bagels on a parchment-lined baking sheet. I learned that letting them rest for another 10-15 minutes helps them rise a bit more, giving them that lovely fluffy texture inside.
Boiling: The Secret to Chewy Bagels
Now, here’s where it gets interesting: boiling the bagels! This step is what truly sets bagels apart from other bread. I fill a large pot with water and add a bit of sugar or honey to it, which helps give the bagels a nice sheen. When the water is at a rolling boil, I gently drop in a few bagels at a time. I let them boil for about 30 seconds on each side. This is the part where the kitchen fills with an amazing aroma, and I can hardly wait for them to come out!
After boiling, I use a slotted spoon to remove the bagels and let them drain on a cooling rack for a minute before moving them back to the baking sheet. This process gives them that chewy, dense texture we all love.
Baking Techniques for Perfect Bagels
Baking is the final step, and it’s where all my efforts come together! I preheat my oven to 425°F (220°C) because a hot oven is crucial for achieving the perfect bagel crust. Just before baking, I like to sprinkle some toppings on my bagels. This could be everything bagel seasoning, sesame seeds, or even a sprinkle of cheese.
Once in the oven, I watch closely. The smell that fills the air is heavenly! I bake them for about 20-25 minutes until they turn a lovely golden brown. I’ve learned that every oven is different, so I always keep an eye on them to ensure they don’t get too dark.
When they finally come out of the oven, I can hardly contain my excitement! Letting them cool slightly before digging in is the hardest part. There’s something incredibly rewarding about taking that first bite of a warm, homemade gluten-free bagel, knowing all the love and effort that went into it.
Flavor Variations and Toppings
Flavor Variations and Toppings
One of the things that truly excites me about making gluten-free bagels is the endless possibilities for flavor variations and toppings. I remember feeling a rush of creativity when I first started experimenting. Bagels don’t have to be just plain or boring—there are so many ways to elevate them and make them uniquely yours!
Classic Everything Bagel Seasoning
If you’re like me, the classic everything bagel holds a special place in your heart (and stomach!). I love how the blend of sesame seeds, poppy seeds, garlic, onion, and a sprinkle of salt creates a burst of flavor in every bite. To make my own everything seasoning, I combine equal parts of each ingredient and sprinkle it generously on top of the bagels just before baking. It adds a beautiful crunch and a savory kick that makes each bagel feel like a little celebration!
Herb and Cheese Bagels
Another variation that has become a favorite in my house is herb and cheese bagels. I often add fresh or dried herbs like rosemary, thyme, or dill into the dough itself. Then I sprinkle shredded cheese on top before baking. The aroma that fills my kitchen while they’re baking is truly heavenly! I love how the melted cheese creates a delightful crust, and the herbs give it a fresh twist. It’s a bagel that’s perfect for breakfast or a snack paired with some cream cheese. Read Interesting article: Healthy sandwich ideas for kids
Sweet Variations: Cinnamon Raisin Bagels
For those days when I’m craving something sweet, I whip up a batch of cinnamon raisin bagels. This variation is nostalgic for me because it reminds me of the bagels I used to enjoy at my favorite café. I mix ground cinnamon and a touch of brown sugar into the dough, along with a generous handful of raisins. The sweetness of the raisins combined with the warm spice of cinnamon creates a comforting bagel that’s perfect for breakfast with a smear of butter or cream cheese. It’s like having a little treat any time of day!
Healthy Toppings: Seeds and Nuts
When I want to add a nutritious twist, I love topping my bagels with seeds and nuts. Chia seeds, sunflower seeds, or even chopped walnuts can be a great addition. They not only add a satisfying crunch but also boost the nutritional value of the bagels. I often sprinkle them on top after boiling the bagels but before baking, ensuring they stick nicely. For me, this is a way to make my bagels not just delicious but also a bit healthier, providing extra fiber and protein.
Getting creative with flavors and toppings has been one of the most enjoyable parts of my gluten-free bagel-making adventure. It’s a chance to play with ingredients and make something that truly satisfies my taste buds. Plus, sharing these unique bagels with friends and family adds an extra layer of joy to the experience. Each bite is a little piece of my creativity, and I love seeing the smiles on everyone’s faces when they try them!
Frequently Asked Questions (FAQs)
Can I Use Regular Flour for Gluten-Free Bagels?
No, using regular flour won’t work for gluten-free bagels. Gluten is what gives traditional bagels their chewy texture, and without it, we need to rely on gluten-free flour blends. I’ve experimented with various types of gluten-free flours, and they have their unique characteristics that contribute to the final product. So, stick with gluten-free options to achieve that delicious bagel texture!
How Do I Store Gluten-Free Bagels?
I’ve learned that storing gluten-free bagels properly is essential to keeping them fresh. I usually let them cool completely after baking, then place them in an airtight container. If I know I won’t eat them within a few days, I freeze them. Wrapping each bagel in plastic wrap and placing them in a freezer bag helps maintain their quality. When I’m ready to enjoy one, I simply take it out and toast it, and it tastes just like freshly baked!
Can I Freeze Gluten-Free Bagels?
Absolutely! Freezing gluten-free bagels is one of my favorite tricks. It allows me to make a big batch and enjoy them over time. After they cool, I wrap them well and pop them in the freezer. This way, I can pull out a bagel whenever I want, and after a quick toast, it feels like I’m biting into a fresh bagel once again!
What to Serve with Gluten-Free Bagels?
The options are endless when it comes to serving gluten-free bagels! I often enjoy them with classic cream cheese or a homemade avocado spread. For a heartier meal, I might add some smoked salmon and capers. I’ve also made bagel sandwiches using turkey, lettuce, and mustard for a quick lunch. The versatility of bagels means they can fit into any meal, and I love how they can be sweet or savory depending on what I’m in the mood for! Read Interesting article: 15 Make-Ahead Holiday Breakfasts to Feed a Crowd
Tips for Success in Gluten-Free Bagel Making
Common Mistakes to Avoid
As I’ve navigated the world of gluten-free bagel making, I’ve stumbled upon a few common mistakes that I want to share. One major mistake is not measuring ingredients accurately. Gluten-free baking can be finicky, so precise measurements are crucial. I always recommend using a kitchen scale for the best results. Another mistake is not allowing the dough to rise enough. Patience is key here; letting the dough rise properly will yield a better texture.
Adjusting for Humidity and Elevation
I’ve noticed that humidity can affect gluten-free baking significantly. On particularly humid days, I may need to adjust the flour ratio to ensure my dough isn’t too sticky. Similarly, if I’m baking at a higher elevation, I’ve learned that I might need to decrease the amount of liquid slightly. These small adjustments can make a big difference in the final product!
Testing Dough Consistency
Getting the right dough consistency is crucial for success. I’ve learned to trust my instincts—if the dough feels too wet, I add a bit more flour. If it feels too dry, I can add a splash of water or oil. The dough should be soft and slightly sticky, but still manageable. I often test it by gently pressing it with my fingers; if it springs back, I know I’m on the right track!
Health Benefits of Homemade Gluten-Free Bagels
Control Over Ingredients
One of the best parts about making my own gluten-free bagels is the control I have over the ingredients. I can choose high-quality flours, avoid preservatives, and customize flavors to suit my dietary needs or preferences. For me, this control means I can create bagels that not only taste good but are also nutritious. Knowing what goes into my food gives me peace of mind.
Nutritious Add-Ins
I love incorporating nutritious add-ins, like seeds or nuts, which can boost the health benefits of my bagels. I often experiment with chia seeds or flaxseeds for added fiber and omega-3s. It’s a way to make my bagels not just a treat but also a part of a balanced diet. The added nutrition makes me feel good about enjoying them!
Portion Control and Dietary Preferences
Making bagels at home also allows me to control portion sizes. If I’m in the mood for a smaller bagel, I can easily adjust the dough portions. Plus, I can cater to my family’s dietary preferences, whether they’re looking for higher protein options or lower carb variations. This flexibility is fantastic, as it means everyone can enjoy a bagel that fits their taste and lifestyle!
Frequently Asked Questions
Can I Use Regular Flour for Gluten-Free Bagels?
No, using regular flour won’t work for gluten-free bagels. Gluten is what gives traditional bagels their chewy texture, and without it, we need to rely on gluten-free flour blends.
How Do I Store Gluten-Free Bagels?
I usually let them cool completely after baking, then place them in an airtight container. If I know I won’t eat them within a few days, I freeze them by wrapping each bagel in plastic wrap and placing them in a freezer bag.
Can I Freeze Gluten-Free Bagels?
Absolutely! Freezing gluten-free bagels allows me to make a big batch and enjoy them over time. After they cool, I wrap them well and pop them in the freezer.
What to Serve with Gluten-Free Bagels?
The options are endless! I often enjoy them with cream cheese or avocado spread, and for a heartier meal, I might add smoked salmon and capers or make bagel sandwiches.
What are Common Mistakes to Avoid in Gluten-Free Bagel Making?
One major mistake is not measuring ingredients accurately. Precise measurements are crucial in gluten-free baking. Another mistake is not allowing the dough to rise enough; patience is key for a better texture.
How Does Humidity Affect Gluten-Free Bagel Baking?
Humidity can significantly affect gluten-free baking. On humid days, I may need to adjust the flour ratio to ensure my dough isn’t too sticky.
How Can I Test Dough Consistency for Gluten-Free Bagels?
The right dough consistency is crucial. If the dough feels too wet, I add more flour. If too dry, I can add a splash of water or oil. The dough should be soft and slightly sticky, but manageable.
What are Some Health Benefits of Homemade Gluten-Free Bagels?
Making my own gluten-free bagels gives me control over the ingredients, allowing me to choose high-quality flours and avoid preservatives. I can also incorporate nutritious add-ins for added fiber and omega-3s.
Can I Experiment with Flavor Variations in Gluten-Free Bagels?
Yes! There are endless possibilities for flavor variations and toppings. For example, I enjoy making everything bagels, herb and cheese bagels, or sweet cinnamon raisin bagels.
What Essential Ingredients are Needed for Gluten-Free Bagels?
Essential ingredients include gluten-free flour blends, yeast, binding agents like xanthan gum or psyllium husk, and flavor enhancers such as salt and sweeteners.