
If you’ve ever dreamed of creating a delicious loaf of bread without the hassle of kneading, you’re in for a treat! No-knead sourdough focaccia is not only beginner-friendly but also incredibly satisfying to make. If you’re looking for a gluten-free option, check out No-Knead Gluten-Free Focaccia Bread (Olive Oil & Herbs).
Understanding No-Knead Sourdough Focaccia
What is No-Knead Sourdough Focaccia?
No-knead sourdough focaccia is a delightful Italian bread characterized by its soft, airy texture and a slightly crisp crust. What sets it apart is the use of a sourdough starter, which not only contributes to its unique flavor but also makes the bread more digestible. The no-knead method simplifies the process, allowing the dough to develop its structure through long fermentation rather than physical manipulation. You might be surprised at how such a simple technique can yield such incredible results!
Benefits of No-Knead Method
When I first stumbled upon the no-knead technique, I was skeptical. How could something so simple produce bread that rivals those made by skilled bakers? But I quickly learned that this method has several benefits:
- Time-Saving: You don’t need to spend hours kneading the dough. Instead, most of the work is done by the yeast and bacteria in the sourdough starter as they ferment.
- Flavor Development: The longer fermentation time allows more complex flavors to develop in the bread. Each bite becomes a delightful experience of tangy, nutty goodness.
- Beginner-Friendly: This is an ideal bread recipe for beginners. You don’t need to worry about perfect technique or timing, making it less intimidating.
- Versatility: You can customize your focaccia with various toppings, herbs, and flavors, making it a great canvas for creativity.
Key Ingredients for Focaccia
To make no-knead sourdough focaccia, you’ll need some basic ingredients that I believe everyone should have in their pantry:
- Sourdough Starter: This is the star of the show! If you don’t have one, it’s easy to make your own or you can find some from a friend or local bakery.
- Flour: I recommend using bread flour for its higher protein content, which helps create a chewier texture.
- Water: The temperature of the water can impact yeast activity, so using room temperature water is best.
- Salt: Don’t skip this! Salt not only enhances flavor but also controls fermentation.
- Olive Oil: This adds flavor and moisture to the focaccia, creating that delightful, tender crumb.
Essential Tools and Equipment
Baking Pan Options
When I first started making focaccia, I experimented with different types of pans. The best options are:
- Metal Baking Sheet: A standard metal sheet works well for creating a nice, crispy bottom.
- Casting Iron Skillet: If you have one, this is perfect for achieving a golden crust.
- Glass Baking Dish: For a softer crust, a glass dish is a great choice since it retains heat well.
Mixing and Measuring Tools
Gathering the right tools made my baking experience more enjoyable. Here’s what I found essential:
- Mixing Bowl: A large bowl for mixing your dough is crucial. I prefer one that’s clear so I can see the dough’s progress.
- Measuring Cups and Spoons: Accurate measurements can make or break your focaccia, so invest in good measuring tools.
- Rubber Spatula: This is handy for folding the dough and scraping the sides of the bowl.
Storage Containers for Sourdough
Once your focaccia is baked, proper storage is key to preserving its freshness. I recommend using:
- Bread Box: This allows air circulation while keeping the bread from drying out too quickly.
- Plastic Wrap or Aluminum Foil: For short-term storage, wrapping focaccia tightly can keep it fresh for a few days.
- Freezer Bags: If you want to store it longer, slice your focaccia and place it in freezer bags. It can last for up to three months in the freezer!
Step-by-Step Guide to Making No-Knead Sourdough Focaccia
Preparing the Sourdough Starter
Getting your sourdough starter ready is an exciting first step. If you’re like me, you might have a starter that you’ve been nurturing for a while. It’s essential to feed your starter about 4 to 12 hours before you plan to bake. This ensures it’s active and bubbly, which is crucial for the fermentation process. I usually mix equal parts of flour and water, then let it sit at room temperature. When it’s ready, it should have doubled in size and have a pleasant, tangy aroma. If you’re starting fresh, remember that making your starter can take a week or so to reach its peak activity, so plan ahead!
Mixing the Dough
Once your starter is primed and ready, it’s time to mix the dough. In a large mixing bowl, combine your active sourdough starter with water. I find it helpful to use room temperature water for a better rise. Next, add the flour and salt. I like to use a rubber spatula to mix everything until all the flour is incorporated. It may look a bit shaggy and sticky, but that’s perfectly normal! Just make sure there are no dry bits in the bottom of the bowl. I remember the first time I mixed my dough; I was surprised at how easy it was to create something so delicious with just a few ingredients!
First Rise: What to Expect
Now comes the part where you show a little patience. Cover the bowl with a damp cloth or plastic wrap, and let it sit at room temperature for about 8 to 12 hours. I usually mix my dough in the evening, and by morning, it’s ready to go. During this time, you’ll notice the dough expanding and bubbling, which is a great sign! It can be a bit mesmerizing to watch, and I love the anticipation that builds as I wait. When it’s ready, it should be puffy and have a nice, airy texture.
Shaping the Focaccia
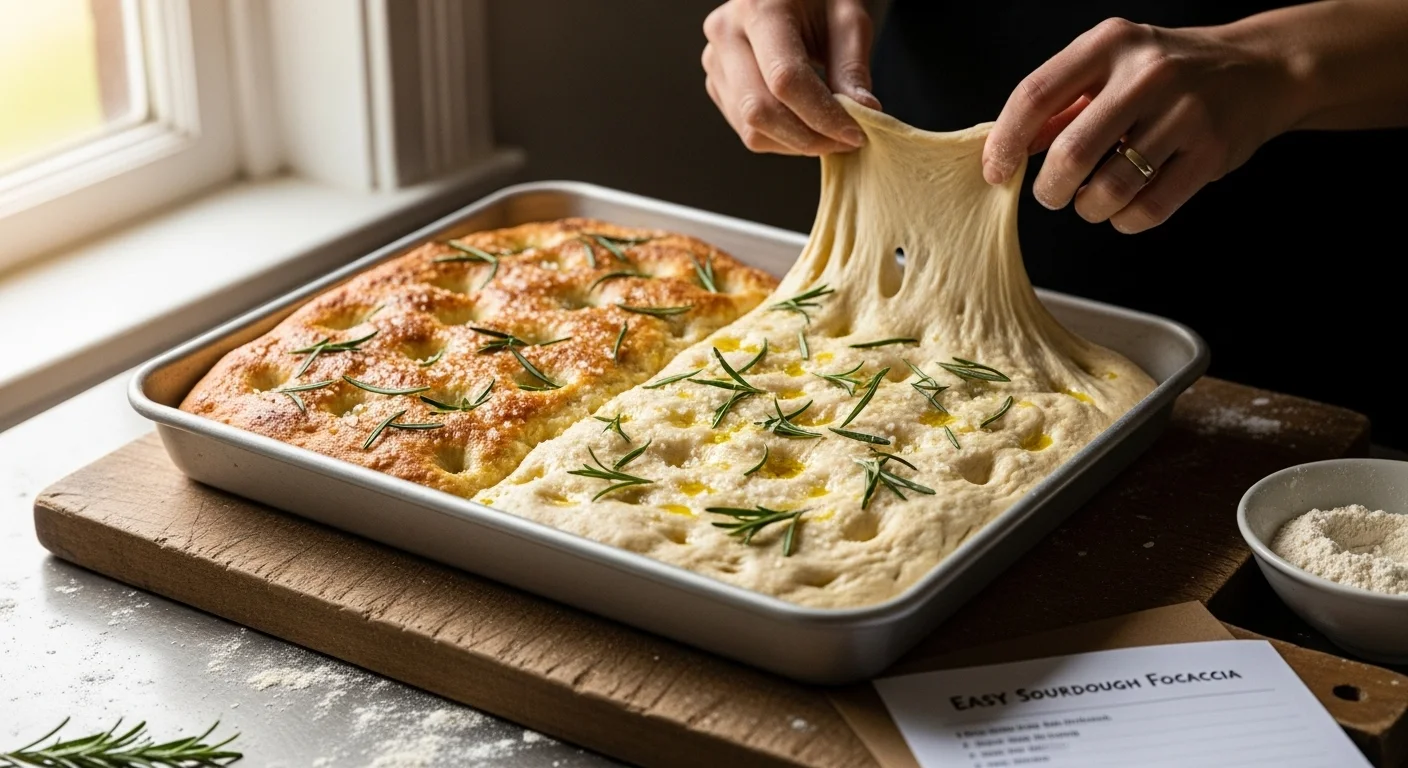
After the first rise, it’s time to shape the dough. This is where I really get to feel like a bread-making pro! Generously oil your baking pan to prevent sticking. When I first started, I made the mistake of skimping on the oil, and my focaccia didn’t come out as nicely. Gently transfer the dough onto the prepared pan by using a spatula or your hands, being careful not to deflate it too much. Once the dough is in the pan, use your fingers to stretch it out gently to fit the shape of the pan. I love to create dimples all over the surface, which not only looks nice but also helps to hold the toppings later on!
Second Rise and Toppings
Next, cover your shaped focaccia with a towel and let it rise for another 30 minutes to 1 hour. This second rise gives the dough even more lift and makes it light and fluffy. While it’s rising, I like to prepare my toppings. You can go simple with just olive oil and sea salt, or get creative with herbs, garlic, or even sliced olives. I often find myself raiding the fridge for whatever toppings I have on hand. Feel free to experiment! When the dough has puffed up nicely, sprinkle your desired toppings over the surface and drizzle a bit of olive oil to enhance the flavor.
Baking the Focaccia
Finally, it’s time to bake! Preheat your oven to 450°F (230°C), and make sure it’s hot before placing your focaccia inside. I usually bake mine for about 20 to 25 minutes, but keep an eye on it. You want it to be golden brown and crispy on the outside. When I first pulled my focaccia from the oven, the aroma was heavenly! Let it cool in the pan for a few minutes before transferring it to a wire rack. I can’t tell you how hard it is to wait, but letting it cool just a bit helps enhance the texture. Trust me, the first slice of warm focaccia is worth every bit of patience!
Flavor Variations and Toppings
Herb-Infused Options
One of the things I love most about making focaccia is how versatile it is when it comes to flavors. Adding fresh herbs can take your bread to the next level. I remember the first time I decided to infuse my focaccia with herbs; I used rosemary and thyme, which I had growing in my garden. The aroma while it baked was simply intoxicating! Just chop the herbs finely and mix them into the dough or sprinkle them on top before the second rise. You can also create a herbed oil by combining olive oil with minced garlic and herbs, then drizzle it over the dough after shaping. Honestly, any herb you enjoy can elevate the flavor profile of your focaccia, and it’s a great way to use up those fresh herbs before they wilt away.
Cheese and Onion Combinations
For those who love a bit of savory goodness, cheese and onions can transform your focaccia into a gourmet treat. I often use a sharp cheddar or mozzarella, but feel free to experiment with your favorites. Caramelizing onions beforehand adds a sweet depth that pairs beautifully with the cheese. Simply sauté sliced onions in olive oil until they’re golden and soft, then layer them on top of the dough along with the cheese before baking. I can tell you from experience, the combination of melted cheese with the rich, sweet flavor of caramelized onions is something you won’t be able to resist.
Seasonal Vegetable Toppings
When it comes to seasonal vegetables, the options are endless! I love to use whatever is fresh and available at the farmers’ market. For a springtime twist, try adding thinly sliced asparagus or cherry tomatoes. In the fall, roasted butternut squash or sautéed mushrooms can bring a cozy, hearty element to your focaccia. I often roast vegetables with a little olive oil, salt, and pepper beforehand to enhance their flavors before scattering them on top of the dough. It’s a great way to incorporate more veggies into our meals, and the colors of the vegetables can make your focaccia look absolutely stunning!
Common Mistakes to Avoid
Overproofing the Dough
In my early baking days, I learned the hard way about the risks of overproofing. This happens when the dough rises for too long, leading to a weak structure that can collapse. I remember one particular batch that looked perfect, but as soon as I tried to transfer it to the baking pan, it deflated like a balloon! To avoid this, keep an eye on the dough during the first and second rises. I find that timing can vary based on the temperature and humidity of your kitchen, so trust your instincts. When it’s puffy and has doubled in size, it’s time to move on!
Using the Wrong Flour
Using the right type of flour is crucial for achieving the perfect texture in your focaccia. I initially made the mistake of using all-purpose flour, thinking it would be fine. While it still turned out edible, it lacked that delightful chewiness that bread flour provides. Bread flour has a higher protein content, which helps develop gluten and gives your focaccia that lovely airy texture. If you want a lighter, airier focaccia, stick to bread flour or a mix that includes some whole wheat flour for added flavor and nutrition.
Baking Temperature Issues
Getting the oven temperature just right can make a world of difference. I learned this the hard way when I baked my first focaccia too low and slow. While the bread was cooked through, it didn’t have that golden, crispy crust I was hoping for. Make sure to preheat your oven to 450°F (230°C) before baking, and don’t open the door during the first few minutes of baking. I often keep a thermometer handy to ensure my oven is accurate. A high temperature is key to achieving that perfect crust while keeping the inside soft and fluffy.
Storing and Reheating Focaccia
Best Practices for Storage
Once you’ve baked your focaccia and savored that first warm slice, you might wonder how to store the leftovers properly. I’ve tried a few methods, and I’ve found that the best way is to let the focaccia cool completely before wrapping it in plastic wrap or aluminum foil. This keeps it fresh without trapping too much moisture, which can make the crust soggy. If you want to keep it for longer, consider slicing it and placing the pieces in a freezer bag for later use. It’s such a treat to pull out a slice of freshly baked focaccia from the freezer on a busy day!
How to Reheat Focaccia
When it comes time to enjoy leftover focaccia, reheating it is key to restoring some of that original freshness. I typically preheat my oven to 350°F (175°C) and place the focaccia on a baking sheet for about 10 to 15 minutes. This warms it through and refreshes the crust nicely. If I’m in a hurry, sometimes I just pop a slice in the toaster, which does a great job of getting that crust crispy again. Trust me, there’s nothing quite like the smell of reheated focaccia filling your kitchen!
Serving Suggestions
Pairing with Dips and Spreads
Focaccia can be enjoyed in so many delicious ways, one of my favorites being with dips and spreads. A simple olive oil and balsamic vinegar dip can elevate your focaccia experience. I often mix high-quality olive oil with a splash of balsamic, and sometimes I’ll sprinkle in some herbs or spices for added flavor. Other great options include hummus, tapenade, or even a creamy cheese spread. These pairings not only enhance the bread’s flavor but also make for a fun appetizer when entertaining friends!
Using Focaccia for Sandwiches
Another delightful way to enjoy focaccia is by turning it into a sandwich. The texture holds up beautifully against various fillings. I often find myself layering turkey, cheese, and some fresh greens for a hearty lunch. Or, for a vegetarian option, I love stacking roasted vegetables with a smear of pesto. The possibilities are endless, and it’s a fantastic way to use up any leftover focaccia!
Serving as a Side Dish
Finally, focaccia makes an excellent side dish. Whether it’s served alongside a fresh salad, a warm bowl of soup, or as part of an Italian feast, it complements a wide array of dishes. I like to slice it into small squares or strips and serve it warm on the side. It’s not just a bread; it can be the star of your meal!
Frequently Asked Questions (FAQs)
Can I use regular yeast instead of sourdough starter?
While you could use regular yeast, the sourdough starter gives the focaccia its unique flavor and texture. If you’re in a pinch, you might experiment with instant yeast, but I highly recommend embracing the sourdough starter for the best results!
How long does the focaccia last?
When stored properly, focaccia can last about 3 to 4 days at room temperature. If you want to keep it longer, freezing it is a great option, as it can last up to three months!
Can I freeze the focaccia?
Absolutely! Freezing focaccia is an excellent way to preserve it for future enjoyment. Just make sure to slice it before freezing, and place it in an airtight freezer bag. When you’re ready to eat, simply reheat as described, and you’ll have fresh-tasting focaccia in no time!
Frequently Asked Questions
What is No-Knead Sourdough Focaccia?
No-knead sourdough focaccia is a delightful Italian bread characterized by its soft, airy texture and slightly crisp crust, made using a sourdough starter for unique flavor and digestibility.
What are the benefits of the no-knead method?
The no-knead method is time-saving, allows complex flavor development, is beginner-friendly, and offers versatility for customizing toppings.
What key ingredients do I need to make No-Knead Sourdough Focaccia?
You will need a sourdough starter, bread flour, room temperature water, salt, and olive oil.
What baking pan options are best for focaccia?
The best options are a metal baking sheet for a crispy bottom, a cast iron skillet for a golden crust, or a glass baking dish for a softer crust.
How do I prepare my sourdough starter?
Feed your sourdough starter about 4 to 12 hours before baking by mixing equal parts of flour and water and letting it sit at room temperature until it doubles in size and has a tangy aroma.
How long should I let the dough rise?
The dough should rise for about 8 to 12 hours during the first rise and then for 30 minutes to 1 hour during the second rise.
What are some delicious toppings I can add to my focaccia?
You can add fresh herbs, cheese and onions, or seasonal vegetables like asparagus or roasted butternut squash to enhance the flavor of your focaccia.
What common mistakes should I avoid when making focaccia?
Avoid overproofing the dough, using the wrong flour, and not baking at the correct temperature, as these can affect the texture and quality of your focaccia.
How should I store leftover focaccia?
Let the focaccia cool completely before wrapping it in plastic wrap or aluminum foil. For longer storage, slice it and place it in a freezer bag.
How do I reheat focaccia?
Preheat your oven to 350°F (175°C) and warm the focaccia on a baking sheet for about 10 to 15 minutes, or pop a slice in the toaster for a quick reheat.