
Imagine waking up to the warm, inviting smell of freshly baked sourdough bread. With this easy overnight method, you can make that dream a reality. Let’s dive into the wonderful world of sourdough!
Understanding Sourdough Bread
What is Sourdough Bread?
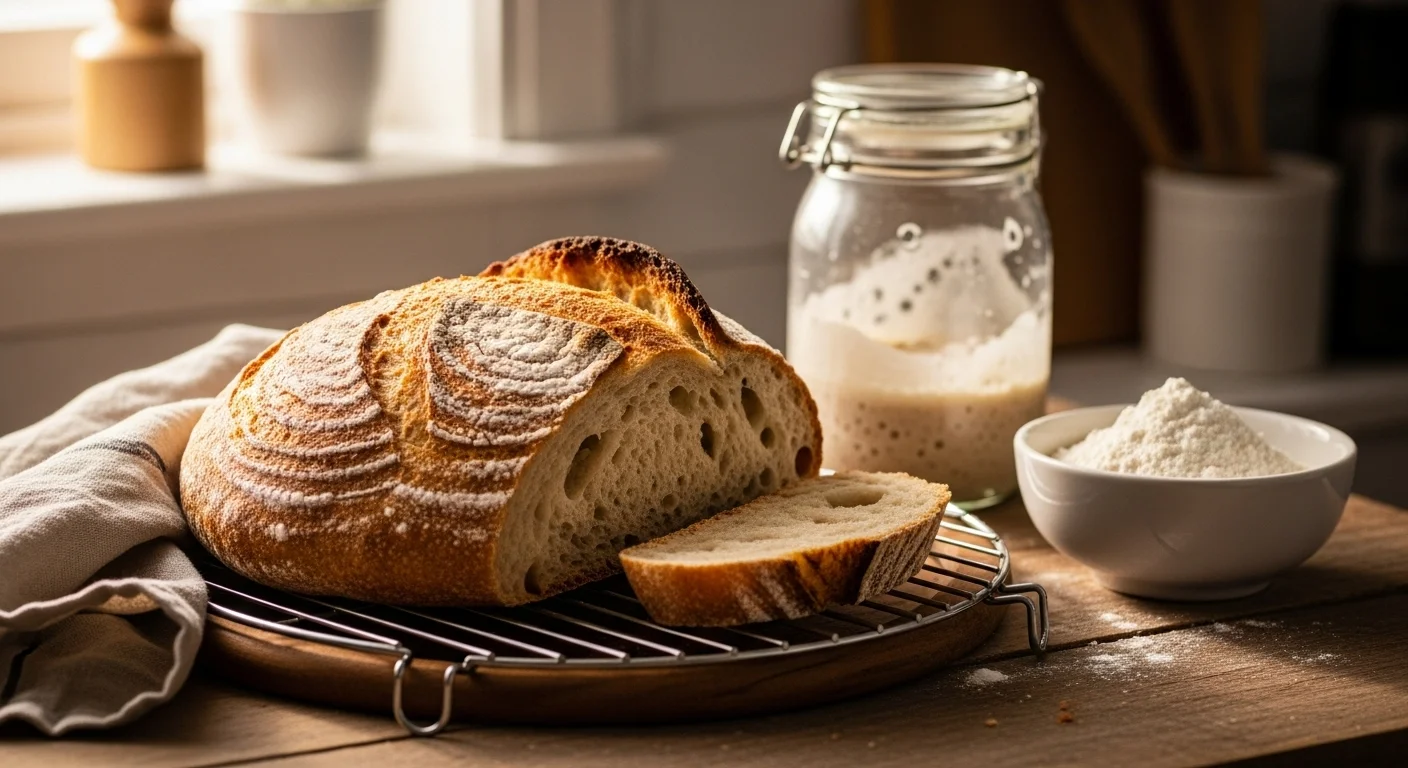
Sourdough bread is a type of bread that uses wild yeast and lactic acid bacteria for fermentation. Unlike commercial yeast, which gives bread its rise and texture in a matter of hours, sourdough develops slowly. This slow fermentation process not only enhances the flavor but also contributes to its unique tanginess. I remember the first time I tried sourdough; the depth of flavor was unlike anything I had experienced with regular bread. It has a chewy crust and a soft, airy interior that makes it incredibly satisfying.
The History of Sourdough Baking
Sourdough has been around for thousands of years, dating back to ancient civilizations. The Egyptians are often credited with being the first to create sourdough bread around 1500 BC. They discovered that leaving dough out allowed wild yeast from the environment to ferment it. I find it fascinating that something so simple has such a rich history. Sourdough was the preferred method of bread-making until the advent of commercial yeast in the 19th century. Even today, many bakers choose sourdough for its flavor and health benefits, connecting us to our culinary ancestors.
Health Benefits of Sourdough Bread
Sourdough bread isn’t just delicious; it also comes with several health benefits that make it a fantastic choice for many. For one, the fermentation process breaks down gluten, making it easier to digest for some people. I’ve noticed that after switching to sourdough, my stomach feels much better compared to when I eat regular bread. Additionally, the presence of lactic acid bacteria can help improve gut health, which is something we all can benefit from. Sourdough also boasts a lower glycemic index compared to other breads, meaning it can help maintain stable blood sugar levels. I believe these factors make sourdough a wholesome option for bread lovers.
Ingredients for Easy Overnight Sourdough Bread
Essential Ingredients
To make easy overnight sourdough bread, there are a few essential ingredients you’ll need. The basic recipe consists of flour, water, salt, and your sourdough starter. Each ingredient plays a crucial role in the bread-making process. I always ensure my ingredients are at room temperature before starting, as this helps with the fermentation process. The right balance of these ingredients sets the foundation for a delicious loaf. Read Interesting article: A Guide To Same Day Sourdough Bread (No Overnight Proof)
Types of Flour
The type of flour you use can greatly affect your sourdough bread. I usually opt for bread flour due to its higher protein content, which helps create that lovely gluten structure we all crave. However, I’ve experimented with all-purpose flour and even whole wheat flour at times. Whole wheat flour adds a nuttier flavor and a denser texture, which I really enjoy. Mixing different types of flour can lead to exciting flavor experiences, so don’t hesitate to play around!
The Role of Water
Water is another key ingredient that impacts the final bread. I’ve learned that using filtered water can make a difference, as chlorine and other chemicals in tap water can inhibit yeast activity. The hydration level of your dough also matters; a higher hydration dough can lead to a more open crumb structure. When mixing the dough, I like to add the water gradually, ensuring I achieve the right consistency. This factor can be a game-changer in your sourdough journey.
Understanding Sourdough Starter
Your sourdough starter is essentially your pet for baking. It’s a mix of flour and water that has been fermented over time, capturing wild yeast from the environment. I remember when I first started my sourdough starter; it felt like a science experiment. Feeding it regularly and watching it bubble and rise was so rewarding. A healthy starter is essential for good sourdough, as it provides the leavening power and contributes to the flavor. If you’re just starting, there are plenty of resources to help you create your own starter or you can often find a friend or local baker willing to share theirs.
Equipment Needed
Mixing Bowls
When it comes to making sourdough bread, having the right mixing bowls can make a world of difference. I prefer using large, deep bowls to give the dough plenty of space to rise and stretch. A glass or ceramic bowl works well because they don’t retain heat, which can affect fermentation. I’ve also invested in a few stainless steel bowls, as they’re durable and easy to clean. Whatever you choose, just make sure you have a bowl that’s big enough to accommodate the dough as it rises; trust me, it can get quite fluffy!
Measuring Tools
Precision is key in baking, especially with sourdough. I can’t stress enough how important it is to have reliable measuring tools. A digital kitchen scale is my best friend – it allows me to measure ingredients accurately by weight rather than volume. This is especially helpful for flour, as it can vary greatly depending on how you scoop it. I also keep a set of measuring cups and spoons handy for smaller quantities, like salt. Investing in good measuring tools has made my baking experience much more enjoyable and consistent.
Baking Vessel Options
The vessel you use to bake your sourdough can affect the crust and texture of the bread. I’ve experimented with several options, and I often find myself reaching for a Dutch oven. It traps steam during the first part of baking, creating that beautiful crust we all love. If you don’t have a Dutch oven, a baking stone or even a cast-iron skillet can work well. I’ve also used a baking sheet with a pan of water placed in the oven to create steam. Each method yields its own unique results, so I encourage you to explore what works best for you!
Tools for Scoring and Shaping
Scoring tools are essential for achieving that artisan look on your sourdough bread. I use a lame, which is a specialized tool with a sharp blade for making precise cuts on the surface of the dough. The first time I scored my loaf, I was nervous, but it turned out to be so satisfying! A sharp knife can work in a pinch, too. When it comes to shaping the dough, I rely on my hands, but a bench scraper can be a great help for cutting and transferring the dough. Having these tools handy has truly enhanced the process for me.
Step-by-Step Guide to Easy Overnight Sourdough Bread
Preparing the Sourdough Starter
Before you can dive into the bread-making process, it’s essential to make sure your sourdough starter is bubbly and active. I usually take mine out of the fridge the night before baking and give it a good feeding. I mix equal parts of flour and water into my starter, ensuring it’s well combined. I love watching it come to life as it bubbles and grows throughout the night. This little ritual has become a cherished part of my baking routine.
Mixing the Dough
Once my starter is ready, I begin mixing the dough. I start by combining my flour, water, and salt in a large bowl. I typically add the starter last, letting it dissolve into the water before mixing everything together. I’ve found that using my hands is the best way to ensure everything is well incorporated. It’s a tactile experience that connects me with the dough. I mix until everything is combined, and then I let it rest for about 30 minutes. This period allows for the flour to hydrate fully, making the dough easier to work with later on.
First Rise (Bulk Fermentation)
After mixing, I cover the bowl with a damp cloth and let the dough rise at room temperature. This is called bulk fermentation, and it usually lasts about 4 to 6 hours. During this time, I like to perform a series of stretch and folds every 30 minutes. I gently pull one side of the dough and fold it over itself, rotating the bowl each time. This technique helps develop the gluten structure, which is crucial for a good rise. I love this part of the process; it feels like I’m nurturing the dough, and it’s so rewarding to see it expanding.
Shaping the Dough
Once the bulk fermentation is complete, it’s time to shape the dough. I gently turn it out onto a floured surface, being careful not to deflate all the air I’ve worked so hard to incorporate. I gently shape it into a round or oval, depending on the vessel I’m using for baking. I’ve learned that the key to a good shape is to create surface tension by pulling the dough towards me while rotating it. It’s a bit of an art, and with practice, I’ve found my technique improving.
Final Rise (Proofing)
After shaping, I place the dough into a proofing basket lined with a floured cloth. I cover it again and let it rise for another 1 to 2 hours at room temperature or overnight in the fridge if I’m feeling patient. The fridge option has become my go-to for that extra depth of flavor. When I wake up the next morning, the anticipation of baking my loaf is almost overwhelming. I can’t wait to see how it turns out!
Baking the Bread
When it’s time to bake, I preheat my Dutch oven in the oven at a high temperature, usually around 450°F. I carefully transfer the dough into the hot pot, which is always a bit nerve-wracking but oh-so-rewarding when done right. Before closing the lid, I score the top of the dough with my lame, allowing it to expand beautifully as it bakes. I bake it covered for the first 30 minutes to lock in steam and then uncover it for an additional 15 to 20 minutes, watching the crust turn a lovely golden brown. The smell wafting through my kitchen during this time is divine!
Cooling and Storing Your Sourdough
After baking, I carefully remove the loaf from the Dutch oven and place it on a cooling rack. It’s so tempting to slice into it immediately, but I’ve learned that letting it cool completely is crucial for the texture. I usually wait at least an hour before cutting in, although the wait feels eternal! Once cooled, I store my bread in a paper bag or wrapped in a cloth to keep it fresh. If I have leftovers, I freeze them for another day, ensuring I can enjoy that delicious sourdough whenever I want.
Common Issues and Troubleshooting
Dough Too Sticky or Dry
Have you ever found yourself wrestling with a sticky dough that seems more suited for a wrestling match than baking? I’ve been there! A dough that’s too sticky can be frustrating, but it usually comes down to hydration levels or flour type. If your dough feels like a blob that just won’t come together, I recommend adding a little more flour, a tablespoon at a time, until you reach a better consistency. On the flip side, if your dough is too dry and crumbly, it might need a splash more water. Remember, it’s all about finding that balance. I’ve learned to trust my instincts when it comes to feel; it’s part of the joyful journey of sourdough baking!
Under or Over Fermentation
Fermentation is one of the most crucial stages in sourdough baking, and it can be tricky to get just right. I remember the first few times I baked, my dough would either rise like a champ or sit flat as a pancake. Under-fermentation often results in a dense loaf that lacks that beautiful airy texture we’re after. If your dough hasn’t risen adequately during the bulk fermentation, consider giving it a little more time. On the other hand, if you’ve over-fermented your dough, you might notice it’s too sticky and hard to handle, leading to a loaf that collapses in the oven. Trust me, the sweet spot is where the dough has doubled in size and feels puffy to the touch. Keep an eye on it, and don’t hesitate to take notes on your observations; it really helps in getting it just right next time!
Crust and Crumb Problems
Getting the perfect crust and crumb can feel like an art form. I’ve had my fair share of loaves that had a crust too hard to bite into or a crumb that was overly dense. If your crust isn’t developing a nice golden color, it could be due to insufficient steam during baking. I’ve found that using a Dutch oven really helps in creating that steam environment. If you’re aiming for a thicker crust, try leaving the lid off for the last few minutes of baking to allow moisture to escape. As for the crumb, if it’s too gummy or dense, it might be a sign of under-baking. I usually gauge doneness by tapping the bottom of the loaf; if it sounds hollow, it’s time to take it out. It’s all about experimenting and learning what works for you!
Flavor Issues
One of the most delightful aspects of sourdough is its unique flavor. But what if your bread comes out tasting bland? I’ve experienced this too, and it usually boils down to a few factors. The quality of your sourdough starter is paramount; if it isn’t active enough or well-fed, it can lead to lackluster flavor. I make it a point to keep my starter bubbly and vibrant. Additionally, the length of fermentation can greatly impact flavor. A longer fermentation often brings out those deep, tangy notes we love. If you find your bread lacking that punch, consider extending the bulk fermentation time or tweaking the feeding schedule of your starter. Trust me, a little patience goes a long way in this delicious journey!
Variations and Add-Ins for Sourdough Bread
Seeded Sourdough Bread
If you’re looking to add a little crunch and flavor to your sourdough, I highly recommend trying a seeded loaf. Seeds not only enhance the flavor profile but also provide added nutrition. My favorite combination includes sunflower seeds, sesame seeds, and flaxseeds. I typically add about a half cup of mixed seeds to my dough during the mixing stage, and it’s incredible how much texture and flavor they bring. The best part? You can customize the seeds based on your preference. I’ve even tried pumpkin seeds for a seasonal twist!
Herb-Infused Sourdough
Herb-infused sourdough is another fantastic way to elevate your bread-making game. Fresh herbs like rosemary, thyme, or basil can add a delightful aroma and taste. I usually chop a handful of herbs finely and fold them into the dough during the mixing stage. The scent that fills my kitchen while it bakes is nothing short of heavenly! This variation goes wonderfully with soups or as a base for delicious bruschetta. It’s amazing how a little addition can transform the whole experience.
Dried Fruit and Nut Variations
For a sweeter twist, consider incorporating dried fruits and nuts into your sourdough. I love adding chopped walnuts and dried cranberries or apricots for a delightful contrast of textures and flavors. I usually mix these in during the folding stages of the dough, ensuring they’re well-distributed. This variation has become a favorite in my household, especially when toasted with a bit of butter for breakfast. It’s a great way to make use of seasonal fruits, and I find that the possibilities are endless! Read Interesting article: Flaky Sourdough Discard Shortcrust Pastry (For Pies)
Serving and Pairing Suggestions
Best Pairings for Sourdough Bread
Once you’ve baked your delicious sourdough, the next question is: how do I enjoy it? Fresh sourdough pairs beautifully with a wide range of toppings. I personally love spreading a bit of good quality butter over a warm slice, letting it melt into the nooks and crannies. For something a bit heartier, avocado toast topped with a sprinkle of salt and red pepper flakes is my go-to. And let’s not forget about pairing it with rich cheeses or charcuterie; the combination of flavors is simply divine!
Serving Ideas for Breakfast and Snacks
For breakfast, I like to keep things simple yet satisfying. A slice of toasted sourdough with a poached egg on top, drizzled with a bit of olive oil, is a hearty way to start the day. I’ve also made delightful sandwiches for lunch, using sourdough as the base for everything from classic grilled cheese to more adventurous combinations like turkey and cranberry sauce. For snacks, I enjoy making bruschetta with fresh tomatoes, basil, and a drizzle of balsamic glaze. The versatility of sourdough opens up a world of serving possibilities, and I often find myself experimenting with new ideas!
FAQs About Overnight Sourdough Bread
How Long Can Sourdough Bread Last?
Sourdough bread has a unique ability to stay fresh longer than most commercial breads. When stored properly, it can last for about 4 to 5 days at room temperature. I usually keep mine in a paper bag or wrapped in a clean kitchen towel to allow it to breathe. If you want to keep it longer, freezing is an excellent option!
Can I Freeze Sourdough Bread?
Yes! Freezing sourdough bread is a fantastic way to enjoy your creations later on. I slice my bread before freezing, as it makes it much easier to toast a slice at a time. Just make sure to wrap it tightly in plastic wrap and then place it in a freezer bag to prevent freezer burn. When you’re ready to enjoy it, simply pop it in the toaster or the oven, and it’s like fresh bread again!
How to Refresh Stale Sourdough?
If you’ve got some stale sourdough on your hands, don’t toss it out just yet! I often refresh stale bread by wrapping it in a damp towel and placing it in a preheated oven at 350°F for about 10 to 15 minutes. This trick revives the crust and softens the interior, making it enjoyable once more. Alternatively, you can turn stale bread into croutons or breadcrumbs for future cooking adventures!
Frequently Asked Questions
What is sourdough bread?
Sourdough bread is a type of bread that uses wild yeast and lactic acid bacteria for fermentation, resulting in a distinctive flavor and chewy crust with a soft, airy interior.
What are the health benefits of sourdough bread?
Sourdough bread is easier to digest for some people due to the fermentation process breaking down gluten. It also improves gut health, has a lower glycemic index compared to other breads, and can help maintain stable blood sugar levels.
What ingredients are essential for making easy overnight sourdough bread?
The essential ingredients for easy overnight sourdough bread include flour, water, salt, and your sourdough starter.
What type of flour is best for sourdough bread?
While bread flour is typically preferred due to its higher protein content, all-purpose flour and whole wheat flour can also be used, with whole wheat flour offering a nuttier flavor and denser texture.
How should I prepare my sourdough starter before baking?
Before baking, it’s essential to ensure your sourdough starter is bubbly and active. This usually involves taking it out of the fridge the night before and feeding it with equal parts of flour and water.
What baking vessel is recommended for sourdough bread?
A Dutch oven is often recommended as it traps steam during baking, creating a beautiful crust. Other options include a baking stone, cast-iron skillet, or a baking sheet with a pan of water to create steam.
How long can sourdough bread last when stored properly?
When stored properly in a paper bag or wrapped in a clean kitchen towel, sourdough bread can last about 4 to 5 days at room temperature.
Can sourdough bread be frozen, and if so, how?
Yes, sourdough bread can be frozen. It’s best to slice the bread before freezing to make it easier to toast later. Wrap it tightly in plastic wrap and place it in a freezer bag to prevent freezer burn.
How can I refresh stale sourdough bread?
Stale sourdough can be refreshed by wrapping it in a damp towel and placing it in a preheated oven at 350°F for about 10 to 15 minutes, or it can be turned into croutons or breadcrumbs for future use.
What are some variations and add-ins for sourdough bread?
Variations for sourdough bread include adding seeds for crunch, infusing with fresh herbs for flavor, or incorporating dried fruits and nuts for a sweeter twist.