
If you’ve ever enjoyed the delightful crunch of a ciabatta loaf with its airy, open crumb, you’re in for a treat. This easy sourdough ciabatta recipe will help you create that perfect texture right in your own kitchen! Read Interesting article: 30-Minute Creamy Tomato Soup (With Grilled Cheese)
Understanding Sourdough and Ciabatta
What is Sourdough?
Sourdough is more than just a type of bread; it’s a method of baking that relies on natural fermentation. The magic lies in the wild yeast and bacteria found in the sourdough starter. I remember my first time experimenting with a sourdough starter; it was fascinating to watch it bubble and grow. The tangy flavor that develops during fermentation creates a unique taste that commercial yeasts just can’t replicate. Using a sourdough starter adds depth and a little bit of personality to your bread, making each loaf a labor of love.
History of Ciabatta Bread
Ciabatta, which means “slipper” in Italian, was created in the 1980s as a response to the popular French baguette. I learned that it was designed to be crusty on the outside and soft and airy on the inside, making it perfect for sandwiches or enjoyed with a dipping oil. This rustic bread quickly found its way into the hearts of many bakers around the world. Whenever I make ciabatta, I feel connected to this rich history, knowing that I’m carrying on a tradition that started less than half a century ago.
Characteristics of Ciabatta
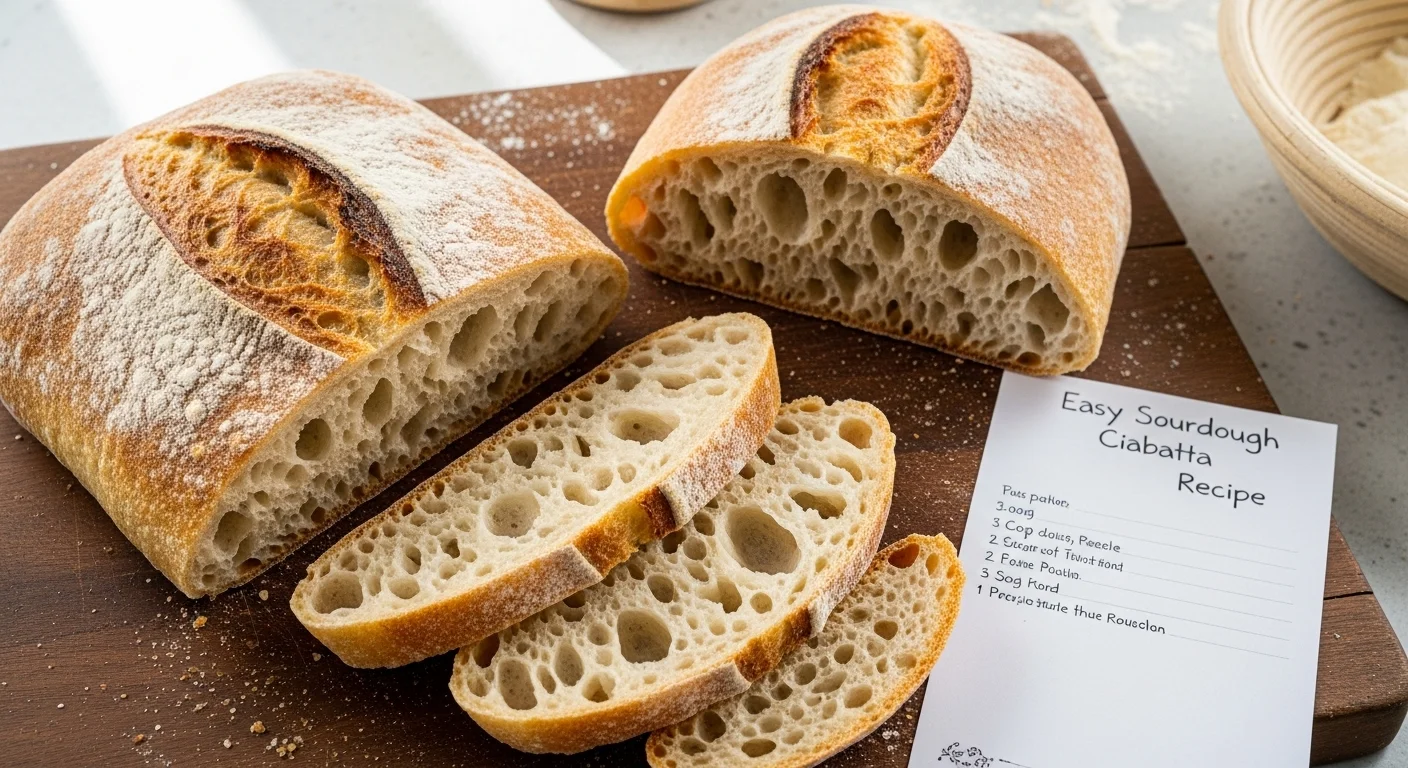
What makes ciabatta so special? Its characteristic open crumb, crispy crust, and chewy texture set it apart from other breads. I’ve always loved how ciabatta can hold up against hearty toppings without losing its integrity. When you slice into a freshly baked loaf, the irregular holes within the crumb are a sign of a well-made ciabatta. This airy structure not only enhances the bread’s texture but also allows it to soak up flavors beautifully. I’ve found that the best ciabatta is made with a careful balance of hydration and fermentation, resulting in that perfect, chewy bite.
Key Ingredients for Sourdough Ciabatta
Flour Types: Bread Flour vs. All-Purpose Flour
The flour you choose is crucial for achieving the right texture in your sourdough ciabatta. I prefer bread flour for its higher protein content, which helps develop gluten and contributes to that chewy texture we all love. All-purpose flour can work, but it may not yield the same open crumb structure. In my experience, using a blend of both can also create a nice balance, giving the bread a tender crumb while still maintaining strength.
Importance of Water Quality
Water plays a vital role in bread making, affecting everything from texture to flavor. I always use filtered water in my sourdough ciabatta. It’s surprising how much the quality of water can impact the final product. Chlorinated tap water can stunt yeast activity, leading to a denser bread. I recommend using room temperature water to help activate your sourdough starter and promote fermentation.
Choosing the Right Sourdough Starter
Your sourdough starter is the heart of this recipe. I’ve experimented with different starters, and each one brings a unique flavor profile. Some are more tangy, while others are milder. Make sure your starter is healthy and active before you begin baking. It’s a good idea to feed it a few hours before you start your dough; this ensures that it’s bubbly and ready to work its magic. In my case, I’ve found that a well-maintained starter gives my ciabatta that characteristic sour flavor and airy crumb.
Salt: Role in Flavor and Texture
Salt is often underestimated in baking. It enhances flavor and strengthens gluten structure, which is essential for developing that chewy texture in ciabatta. I like to use kosher salt because it dissolves easily and doesn’t leave a metallic taste. However, it’s important to use the right amount. Too little can lead to bland bread, while too much can inhibit fermentation. I usually aim for about 2% of the flour weight in salt.
Equipment Needed
Baking Tools for Sourdough Bread
When it comes to baking sourdough ciabatta, having the right tools can make the process easier and more enjoyable. I find that a large mixing bowl, a sturdy bench scraper, and a dough whisk are essential for handling the sticky dough. A kitchen scale is also a must for precise measurements. Trust me, it makes a significant difference in the consistency of your bread!
Recommended Baking Surface
A good baking surface can help achieve that crispy crust we all crave. I usually use a baking sheet lined with parchment paper or a silicone baking mat. Some bakers swear by using a baking stone for better heat retention, which can lead to a beautifully baked loaf. I’ve tried both methods, and while I appreciate the stone’s performance, the parchment paper makes for easier cleanup!
Using a Dutch Oven vs. Baking Stone
When it comes to baking methods, I’ve found that using a Dutch oven can create an excellent steam environment, which is crucial for achieving a crispy crust. The steam helps the bread expand while it bakes. On the other hand, a baking stone can also work well, especially if you place a pan of water in the oven to create steam. Each method has its benefits, and I often switch between them depending on my mood and available equipment.
Step-by-Step Guide to Making Easy Sourdough Ciabatta
Preparing the Dough: Autolyse Method
One of my favorite techniques when making sourdough ciabatta is the autolyse method. This step involves mixing the flour and water first and letting it rest before adding the sourdough starter and salt. I find that this not only improves the dough’s extensibility but also enhances the flavor. When I first tried this method, I noticed a remarkable difference in the texture of my bread. To do this, I mix my chosen flour and water in a bowl until no dry bits remain. Then, I let it sit for about 30 minutes. During this time, the flour absorbs the water, and the gluten starts to develop naturally, setting the stage for a fantastic loaf!
Mixing and Kneading Techniques
After the autolyse, it’s time to mix in the starter and salt. I add my active sourdough starter and salt to the dough and mix it by hand. This is where the fun begins—getting a little messy! I usually fold the dough over itself a few times rather than kneading it in the traditional sense. This gentle technique helps maintain the dough’s structure while incorporating all the ingredients. I’ve learned that patience is key during this phase. If the dough feels too sticky, I resist the urge to add too much extra flour. Instead, I just keep folding and stretching until it becomes smoother.
Bulk Fermentation: Importance and Tips
Bulk fermentation is a crucial step in developing flavor and texture in sourdough ciabatta. I typically let my dough ferment for about 4 to 6 hours at room temperature, depending on the ambient temperature and the activity of my starter. During this time, I like to perform a series of stretch and folds every 30 minutes for the first two hours. This helps strengthen the dough while incorporating air, which is essential for that open crumb structure we all desire. I often use a timer as a reminder, which makes it easier to stay on track and not lose track of time!
Shaping the Ciabatta
Once the bulk fermentation is complete, it’s time to shape the ciabatta. I find this part very satisfying. I gently turn the dough out onto a floured surface, being careful not to deflate it too much. I usually cut the dough in half and shape each piece into a rough rectangle by stretching and folding the edges toward the center. When I’m shaping, I try to maintain that airy structure. I’ve discovered that the key is to keep your hands floured to prevent sticking and to avoid overly pressing down on the dough. After shaping, I place the dough on a well-floured surface or parchment paper, cover it with a cloth, and let it rest for about 30 minutes to relax.
Proofing: How Long and How to Tell When It’s Ready
Proofing is one of those moments where I can feel the excitement building! I cover the shaped loaves and let them rise for another 30 to 60 minutes. To tell if they’re ready, I use the poke test: if I lightly press my finger into the dough and it springs back slowly but leaves a slight indentation, it’s ready to go. I’ve learned that over-proofing can lead to a flat loaf, so I keep a close eye on it. If the dough feels puffy and airy, it’s a good sign that we’re on the right track!
Baking: Temperature and Timing
Now for the grand finale—baking! Preheating the oven to around 475°F (245°C) is essential to ensure a good oven spring. If I’m using a Dutch oven, I place it in the oven while it heats up. After preheating, I carefully transfer the proofed ciabatta into the hot Dutch oven or onto my baking stone. If I’m using the Dutch oven, I cover it for the first 20 minutes to trap steam, which helps create that beautiful crust. Then, I remove the lid and let it bake for an additional 15 to 20 minutes until the crust is golden brown. I love the aroma that fills the kitchen during this time; it’s pure bliss!
Achieving an Open, Airy Crumb
What Contributes to an Open Crumb Structure?
Achieving that coveted open crumb structure is the holy grail of ciabatta baking, and from my experience, it’s all about the right combination of factors. Hydration plays a significant role, and I often aim for a high hydration dough (around 70% or higher). This helps create large air pockets in the bread. Additionally, proper fermentation and handling techniques, like the stretch and fold method, contribute to the gluten development needed for that airy texture. It’s all about creating a balance; I’ve seen that even small adjustments can lead to different outcomes.
Common Mistakes to Avoid
From my baking journey, I’ve made plenty of mistakes along the way, and I’ve learned what to avoid. One common pitfall is using flour that is too low in protein, which can lead to a denser crumb. Another mistake is under-fermenting the dough; this can result in a lack of flavor and structure. I’ve also seen bakers get too eager and rush the shaping or proofing. Patience is key, and I remind myself to embrace the process. If things don’t turn out as expected, I try to learn from them rather than get discouraged.
Tips for Enhancing Airiness
To enhance airiness in my ciabatta, I’ve found a few tips that work wonders. First, maintaining an active and healthy sourdough starter is crucial. The more vigorous the starter, the better the rise. I also incorporate a longer bulk fermentation, allowing for more flavor development and bigger bubbles. Lastly, I never shy away from using a little extra flour on my hands while shaping; this reduces sticking but doesn’t compromise the dough’s moisture content. I believe these small practices can make a significant difference in the final loaf!
Flavor Variations and Add-Ins
Herbs and Spices
One of the joys of baking sourdough ciabatta is the ability to customize it with various flavors. I love experimenting with different herbs and spices to elevate the bread. For instance, adding dried oregano or rosemary can infuse the dough with a delightful aroma and taste. When I made a batch with fresh basil, the result was absolutely refreshing! You can mix these herbs right into the dough during the mixing phase or sprinkle them on top before baking. I’ve also enjoyed adding spices like garlic powder for a savory twist. Just be careful not to overpower the natural flavor of the sourdough; a little goes a long way!
Cheese and Other Mix-ins
Another fun way to personalize your ciabatta is by adding cheese or other mix-ins. I’ve found that incorporating shredded cheeses like mozzarella or Parmesan adds a wonderful flavor and a slightly chewy texture. When I made a batch with sharp cheddar, it became a favorite in my household! You can fold in the cheese during the mixing phase, or sprinkle it on top just before baking for a delicious crust. Other tasty mix-ins could include sun-dried tomatoes, olives, or even nuts for a unique twist. The possibilities are endless, and I enjoy discovering new combinations that complement the sourdough flavor. Read Interesting article: This Viral Chicken Toast Fold Might Replace Breakfast
Using Different Types of Flour
While bread flour is my go-to for making sourdough ciabatta, I’ve also experimented with different types of flour to bring out new flavors and textures. I once tried adding a bit of whole wheat flour, which gave the bread a heartier texture and a subtle nutty flavor. I usually use about 25% whole wheat to keep the overall structure intact while enhancing the taste. Rye flour can also be an interesting addition; it brings a unique flavor profile that pairs beautifully with the sourdough tang. Each flour type brings its own personality to the loaf, and I love how it can transform the final product!
Storing and Serving Your Sourdough Ciabatta
Best Storage Practices
Once you’ve baked your delicious sourdough ciabatta, you’ll want to know how to store it properly to maintain its freshness. From my experience, I’ve found that the best way to keep ciabatta is at room temperature, wrapped in a clean kitchen towel. This keeps the crust crispy while preventing the bread from drying out. I usually avoid plastic bags, as they can create steam and make the crust soft. If you happen to have leftover ciabatta, I recommend consuming it within a couple of days for the best taste and texture.
Freezing Sourdough Ciabatta
If I know I won’t finish the ciabatta in a couple of days, I like to freeze it for later enjoyment. Freezing is a great way to preserve the bread’s flavor and freshness. I typically slice the ciabatta first, which makes it easy to grab just what I need later. I wrap each slice in plastic wrap and then place them in a resealable freezer bag to prevent freezer burn. When I’m ready to enjoy a piece, I simply take it out and let it thaw at room temperature or pop it in the oven for a few minutes to refresh it. The aroma that fills the kitchen is fantastic, making it feel like I just baked it fresh!
Serving Suggestions and Pairings
When it comes to serving my sourdough ciabatta, I love to get creative! It makes an excellent base for sandwiches; I’ve had success with everything from classic turkey and cheese to hearty veggie spreads. I also enjoy serving it alongside a bowl of olive oil and balsamic vinegar for dipping. I remember a lovely dinner party where I sliced the ciabatta and served it with a homemade garlic herb butter. It was a hit! Additionally, toasted slices make fantastic bruschetta topped with fresh tomatoes and basil, or even a smear of creamy goat cheese. It’s delightful how this simple bread can complement so many dishes and occasions! Read Interesting article: This TikTok Chicken Melt Is Too Easy Not to Make
Frequently Asked Questions
How long does it take to make sourdough ciabatta?
From start to finish, making sourdough ciabatta generally takes about 8 to 12 hours, depending on fermentation times and your room temperature. This includes the time for mixing, bulk fermentation, shaping, proofing, and baking. While it does require some patience, the end result is definitely worth it!
Can I use a store-bought sourdough starter?
Absolutely! I’ve used store-bought sourdough starters with great success. They can be a convenient option if you’re just starting out and don’t want to make your own. Just be sure to feed the starter according to the package instructions and ensure it’s active before using it in your dough.
What to do if the dough is too sticky?
If you find your dough is too sticky, resist the urge to add too much flour right away. Instead, I recommend using a well-floured surface and your floured hands to work with the dough. Gentle folding and stretching can help develop the gluten and improve the dough’s structure without compromising its hydration. If it’s still too sticky, you can add a little flour, but be cautious not to overdo it!
Why is my ciabatta dense?
A dense ciabatta can result from several factors. Common reasons include not enough fermentation time or using flour with insufficient protein content. It might also be due to handling the dough too roughly during shaping or not achieving enough gluten development. I’ve discovered that paying attention to each step in the process helps me avoid these mistakes and achieve that light, airy texture we all desire.