
Discover the magic of Vegan Pavlova, a stunning meringue dessert that’s as delicious as it is beautiful. Perfect for any occasion, this showstopper will impress family and friends without the use of eggs or dairy. If you’re looking for more culinary inspiration, check out I Tried the Trending Thai Coconut Chicken – Insanely Good.
What is Vegan Pavlova?
Pavlova is a light and airy dessert that has captured hearts around the world. Traditionally made with egg whites, it features a crisp exterior and a soft, marshmallow-like center. But what happens when you take out the eggs? You get vegan pavlova, a delightful twist on the classic that is just as enjoyable and satisfying. I remember the first time I tasted it; I couldn’t believe how similar it was to the traditional version! The secret lies in one magical ingredient: aquafaba.
History of Pavlova
The pavlova dessert is named after the famous Russian ballerina Anna Pavlova, who toured Australia and New Zealand in the 1920s. Both countries claim to be the birthplace of this iconic dessert. It’s said that the dessert was created to honor Pavlova during her visit, with its light, airy texture reflecting her grace. As I learned more about its origins, I realized how much this dessert carries a sense of celebration and artistry, making it a perfect addition to special occasions.
Traditional vs. Vegan Ingredients
In traditional recipes, pavlova relies heavily on egg whites, sugar, and vinegar to create its signature meringue. The egg whites are whipped until stiff peaks form, then baked to achieve that crunchy outer shell. In contrast, vegan pavlova swaps the egg whites for aquafaba, the liquid found in canned chickpeas. I was skeptical at first—how could something as simple as chickpea water replace egg whites? But trust me, it works wonders! The texture and flavor turn out surprisingly similar.
Aside from the main ingredient switch, the sugar and vinegar remain the same. You’ll still want to use a fine sugar for the best results, and options like white or coconut sugar can work beautifully. Vinegar is important, as it helps stabilize the meringue, ensuring that our fluffy creation holds its shape. Exploring these ingredient differences opened my eyes to how versatile cooking can be, especially when accommodating dietary preferences. If you’re interested in more cooking tips, you might enjoy This TikTok Egg Sandwich Trick Feels Like Magic.
Key Ingredients for Easy Vegan Pavlova
Now that we’ve established what vegan pavlova is, let’s dive deeper into the key ingredients that make this dessert so special. Each element contributes to the final masterpiece you’ll create, so understanding their roles helps us appreciate the process.
Aquafaba: The Star Ingredient
Aquafaba is the true hero of vegan pavlova. It may sound odd, but this chickpea liquid whips up just like egg whites, developing volume and stability. I remember the first time I tried whipping aquafaba; I couldn’t believe my eyes! It transformed from a watery substance into a fluffy cloud. The key to perfect aquafaba is to use it chilled, so I always stick my can in the fridge a few hours before I plan to bake. It makes a noticeable difference!
Choosing the Right Sugar
The type of sugar you use can affect both taste and texture. I’ve found that superfine sugar works best for vegan pavlova, as it dissolves more easily and creates a smoother meringue. If you’re looking for a healthier option, coconut sugar is a great alternative. While it may give your pavlova a darker hue, the taste is rich and caramel-like, which can be delightful! I always recommend experimenting with sugar types to discover which one suits your palate best.
Essential Flavorings and Additives
To elevate your vegan pavlova, consider incorporating some flavorings. A dash of vanilla extract adds warmth and depth, while lemon juice or zest can brighten the overall flavor profile. I’ve even tried adding a pinch of almond extract for a lovely nutty undertone, and it was a hit! Remember, a little goes a long way, so start small and adjust to your taste. It’s fun to play around with these additions, and it makes each pavlova unique!
Step-by-Step Guide to Making Easy Vegan Pavlova
Now that we’ve gathered our ingredients and understand their roles, let’s get into the fun part: making your very own vegan pavlova! I found the process to be incredibly rewarding, and I love how simple it is once you get the hang of it. Here’s how I do it, step by step.
Preparing the Aquafaba
First things first, you need to prepare the aquafaba. I usually start by draining a can of chickpeas into a bowl. I save the chickpeas for other recipes, but the liquid is what we need. If you have time, I recommend letting the aquafaba chill in the fridge for a few hours. This helps it whip up better! Some people even use homemade aquafaba by cooking dried chickpeas, but I find the canned version to be very convenient and reliable.
Whipping the Meringue
Once my aquafaba is chilled, it’s time to whip it! I pour the aquafaba into my mixing bowl and start whisking. I usually use an electric mixer for this, as it makes the process much quicker. As I whip, I add a pinch of cream of tartar to help stabilize the mixture. As I watch the aquafaba transform from a liquid into fluffy peaks, I can’t help but feel a sense of excitement. It’s amazing how something so simple can create such a beautiful result! Once I get stiff peaks, I gradually add in the superfine sugar, being careful to mix just until it’s fully incorporated. This part is crucial because if you add the sugar too quickly, it can deflate the meringue.
Shaping and Baking the Pavlova
Now comes the fun part: shaping the pavlova! I line a baking sheet with parchment paper and use a pencil to draw a circle on the back, which helps me keep the shape consistent. I then spoon the whipped meringue onto the circle, gently spreading it out with a spatula to create a small nest shape. I love making a little dip in the center to hold my toppings later. Once I’m happy with the shape, I pop it into the oven. I bake it at a low temperature to ensure it dries out properly without browning. The aroma that fills the kitchen while it bakes is just heavenly!
Cooling and Storing Tips
After baking, I turn off the oven and let the pavlova cool inside with the door slightly ajar. This helps prevent cracking, which can happen if the pavlova cools too quickly. I usually leave it for a couple of hours or even overnight. Once it’s completely cool, I carefully transfer it to a serving platter. If I’m not serving it right away, I store it in an airtight container at room temperature. I’ve learned that pavlova doesn’t do well in the fridge because the moisture can make it soggy. So, keeping it at room temperature is the best way to maintain that delightful crispness!
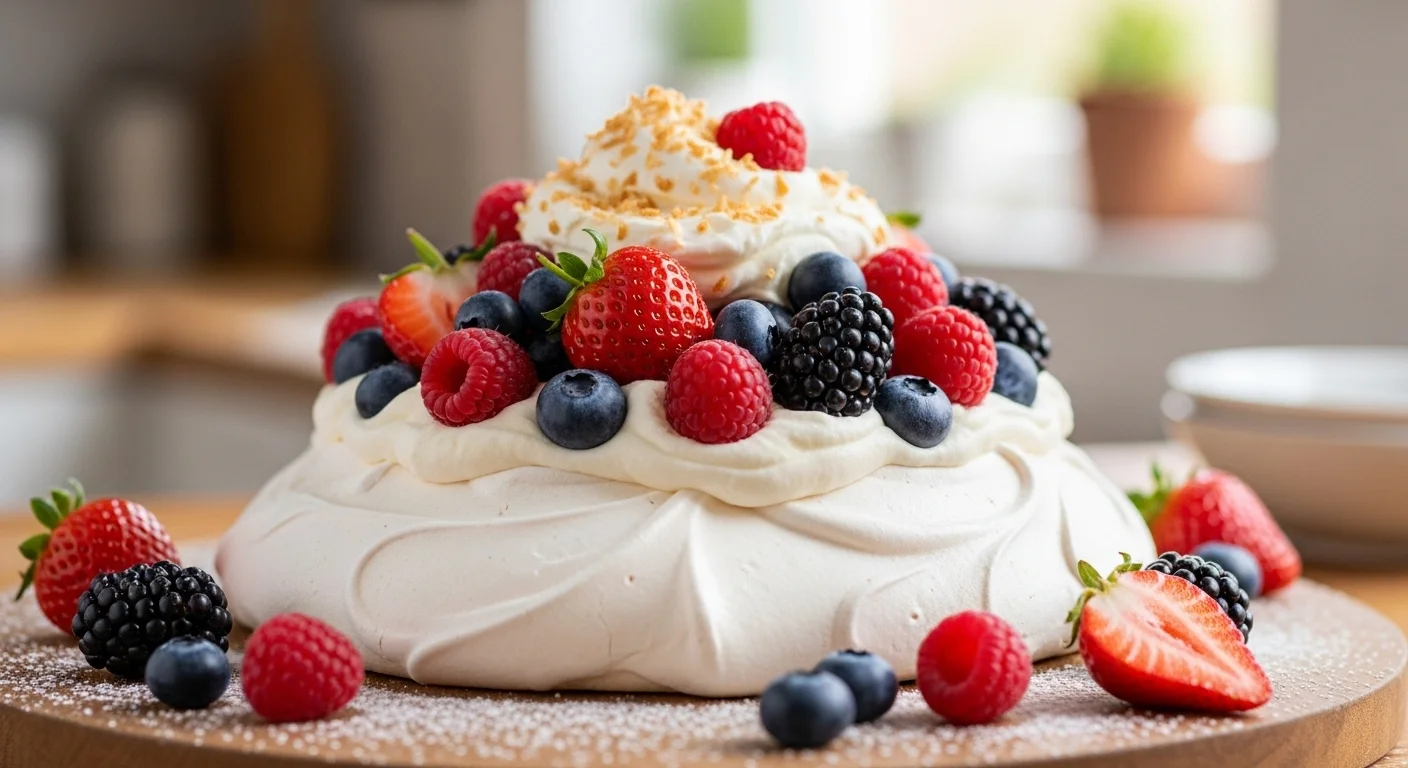
Delicious Toppings for Vegan Pavlova
Now that our pavlova is ready, it’s time to think about toppings! This is where you can get really creative, and I absolutely love this part. The toppings can make or break your dessert, so let’s explore some delicious options.
Fresh Fruits: Seasonal Options
Fresh fruits are a must for pavlova! I like to use whatever is in season, as it not only tastes better but also looks stunning. Some of my favorites are strawberries, kiwi, and passion fruit. I remember the first time I topped a pavlova with fresh berries and edible flowers; it looked like a work of art! You can mix and match fruits to create a colorful and vibrant display. I often toss the fruits in a little bit of lemon juice or maple syrup to enhance their sweetness.
Dairy-Free Whipped Cream Alternatives
For that creamy touch, I recommend using dairy-free whipped cream alternatives. There are several brands out there that whip up beautifully, or you can make your own with coconut cream. I find it so satisfying to whip up coconut cream, and it adds a lovely, rich flavor to the pavlova. Just remember to chill the coconut cream beforehand so it whips nicely!
Flavor Enhancements: Sauces and Syrups
To take your pavlova to the next level, think about adding sauces or syrups. A drizzle of chocolate or raspberry sauce can be heavenly. I often make a simple berry compote by simmering mixed berries with a touch of sweetener until it thickens. This adds a pop of color and a burst of flavor! There’s truly no limit to the combinations you can create.
Serving Suggestions for Vegan Pavlova
After putting in all that effort to create a stunning vegan pavlova, it’s essential to serve it in a way that highlights its beauty and deliciousness. I love thinking about how to present this dessert so that it becomes the center of attention at any gathering. Here are some serving suggestions that I’ve found to be quite effective.
Presentation Ideas
When it comes to presentation, I believe that we eat with our eyes first. One of my favorite ways to serve vegan pavlova is by placing it on a beautiful cake stand or a decorative platter. This really elevates the dessert and makes it feel special. You can also add a touch of elegance by garnishing the pavlova with fresh mint leaves or edible flowers. I remember making a pavlova topped with vibrant edible flowers; it looked like something straight out of a fancy bakery!
Another idea is to create individual pavlovas in ramekins or small bowls. This not only makes for a charming presentation but also allows guests to have their own little dessert. I’ve found that people appreciate having their own servings, especially in a larger gathering where sharing might be less practical. Plus, individual pavlovas can be topped with different fruits or sauces, catering to various preferences!
If you want to go the extra mile, consider layering the pavlova with the toppings in a parfait-style presentation. Start with a layer of whipped cream, then add some fruit, followed by pieces of the pavlova, and repeat until you reach the top. This not only looks impressive but also allows for a delightful mix of textures and flavors in every bite. I’ve served this at parties, and it always garners compliments!
Pairing with Beverages
Pairing drinks with your vegan pavlova can enhance the overall experience. I’ve found that a light sparkling wine or champagne complements the sweetness of the pavlova beautifully. If you prefer non-alcoholic options, a refreshing sparkling water with a splash of fruit juice, such as raspberry or lemon, works wonderfully too. It adds a nice fizz and balances the richness of the dessert.
For an added touch, I love serving tea with my pavlova. A floral tea, like chamomile or jasmine, pairs nicely and brings out the flavors of the fruits. I often prepare a pot of tea when I have friends over, creating a cozy atmosphere while enjoying our pavlova. It’s all about creating an experience that feels inviting and warm.
Another delightful option is to serve coffee alongside your pavlova. A rich espresso or a frothy cappuccino can be a perfect match, especially if you’ve added chocolate or a nutty flavor to your pavlova. I remember enjoying a slice of pavlova with a cup of dark roast coffee; the combination was heavenly!
Common Mistakes to Avoid When Making Vegan Pavlova
Even though making vegan pavlova might seem straightforward, there are a few common pitfalls that can trip us up. I’ve made my fair share of mistakes, and I believe sharing these insights can help ensure your pavlova turns out beautifully every time.
Overwhipping Aquafaba
One of the biggest mistakes I made was overwhipping the aquafaba. While it’s essential to achieve stiff peaks, going too far can cause the mixture to become grainy and lose its airy texture. I’ve learned that it’s best to stop whipping once you’ve reached that perfect consistency—think of how egg whites would look when they’re just right. It took me a few tries to get this down, but now I’m much more attentive during this step.
Incorrect Baking Temperatures
Baking at the wrong temperature can also lead to disaster. It’s tempting to crank up the heat to speed up the process, but pavlova needs a low and slow bake to dry out properly. I remember one time I was in a rush and set the oven too high, resulting in a pavlova that was cracked and brown instead of white and fluffy. Now, I always stick to the recommended low temperature and let patience do its work.
Storage Issues
Another common mistake is not storing the pavlova correctly. I mentioned earlier that keeping it at room temperature is vital, but I’ve seen many people mistakenly place it in the fridge, leading to a soggy mess. Whenever I make pavlova, I always make sure to have a designated spot on the counter or a cake stand covered with a cloth to keep it fresh. Trust me; the texture is far superior when it’s stored properly!
Frequently Asked Questions about Vegan Pavlova
As I’ve navigated through the adventures of making vegan pavlova, I’ve come across some questions that often arise. Here are a few FAQs that might help clarify any lingering doubts you may have.
Can You Make Pavlova in Advance?
Absolutely! One of the great things about pavlova is that it can be made in advance. I often prepare mine a day ahead of time, which allows me to focus on other dishes on the day of the event. Just remember to store it properly in an airtight container at room temperature to keep that delightful crispiness!
How to Fix a Failed Pavlova?
If your pavlova doesn’t turn out as expected, don’t despair! I’ve found that even the most flawed pavlovas can still be delicious. If it cracks, simply cover it with whipped cream and fresh fruits, and no one will be the wiser. If it’s too sticky, I’ve sometimes transformed it into a trifle by layering it in a bowl with cream and fruit. There’s always a way to salvage your delicious creation!
Can You Freeze Vegan Pavlova?
While I wouldn’t recommend freezing an entire pavlova, you can freeze leftover meringue if you have any. Just be sure to let it cool completely before placing it in an airtight container. When you’re ready to use it again, let it thaw at room temperature and then re-crisp it in a low oven for a few minutes. It’s a handy way to enjoy pavlova again without starting from scratch!
Variations of Vegan Pavlova to Try
After mastering the classic vegan pavlova, you might want to explore different variations to keep things exciting. I love experimenting with flavors and ingredients, and here are some fun ideas I’ve tried.
Chocolate Vegan Pavlova
If you’re a chocolate lover like me, you’ll want to try a chocolate variation. Simply add cocoa powder to the aquafaba mixture while whipping it. The result is a rich, decadent pavlova that can be paired beautifully with berries or a berry compote for a delightful contrast. I’ve served this at gatherings, and it’s always a hit!
Fruit-Infused Vegan Pavlova
For a twist, consider infusing your aquafaba with fruit flavors. I’ve experimented with adding a bit of fruit puree, like mango or raspberry, to the meringue. This adds a lovely hint of fruitiness and a beautiful color. The flavor combinations can be endless, and it’s a fun way to surprise friends and family!
Spiced Vegan Pavlova for Holidays
During the holidays, I love incorporating spices into my pavlova. A dash of cinnamon or nutmeg can add warmth and a festive touch. I once made a spiced pavlova topped with poached pears and a drizzle of caramel sauce, and it became an instant favorite. It’s a great way to celebrate the season while keeping things vegan!