
If you’re craving a chocolate treat that’s both fudgy and gluten-free, these chocolate crinkle cookies are a must-try! With their rich flavor and delightful texture, they’re sure to impress anyone, whether they follow a gluten-free diet or not. If you enjoy gluten-free baking, you might also like Chewy Oat Flour Chocolate Chip Cookies (Wholegrain & GF).
Understanding Fudgy Gluten-Free Chocolate Crinkle Cookies
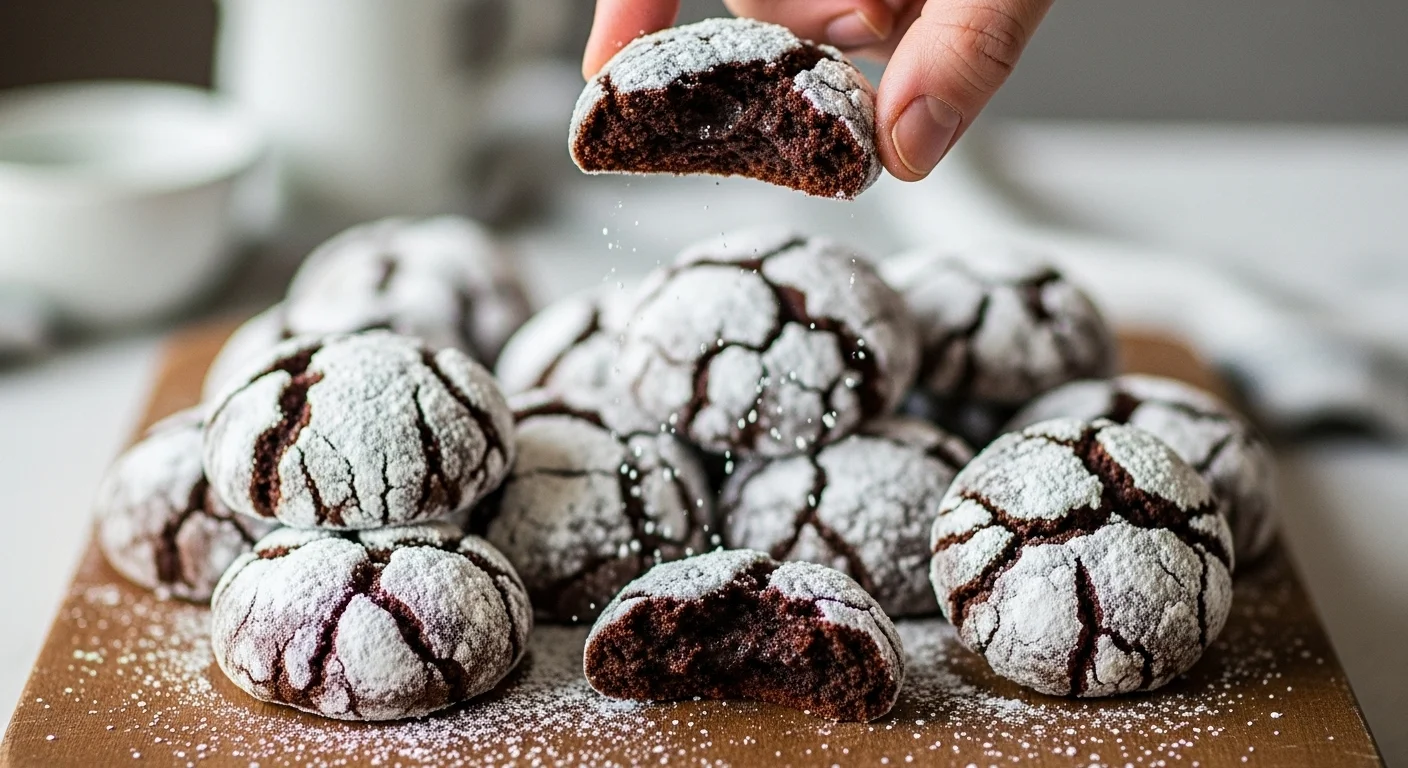
What Are Chocolate Crinkle Cookies?
Chocolate crinkle cookies are like little pieces of heaven. They have a soft, fudgy center that melts in your mouth, and a beautiful crinkled exterior that gives them a unique appearance. Originating from the classic American cookie repertoire, these cookies are often characterized by their rich chocolate flavor and the powdered sugar coating that adds both sweetness and a visually appealing contrast. When I first tried them, I was captivated by how they looked and even more so by their taste. They blend the perfect amount of chewiness and softness, making them a delightful treat for any chocolate lover.
Why Go Gluten-Free?
Going gluten-free is a necessity for many due to health reasons like celiac disease or gluten sensitivity. But even if you don’t have these conditions, you might find gluten-free options to be lighter and more digestible. I remember my first attempt at baking gluten-free cookies; I was a bit skeptical, worried they wouldn’t hold up to the traditional versions I loved. However, I was pleasantly surprised by how delicious and satisfying gluten-free cookies can be! They can be just as rich and fudgy, especially with the right combination of ingredients, which is exactly what we’re aiming for with these chocolate crinkle cookies. For those interested in exploring more gluten-free options, check out Chewy Coconut Flour Chocolate Cookies (Keto & GF).
Key Ingredients for Fudgy Gluten-Free Chocolate Crinkle Cookies
Cocoa Powder
Cocoa powder is the star of the show when it comes to these cookies. It’s what gives them that deep, rich chocolate flavor that we all crave. When I started experimenting with cocoa, I learned there are two main types: natural and Dutch-processed. Natural cocoa is more acidic and has a more intense flavor, while Dutch-processed cocoa is milder and darker. Personally, I prefer using Dutch-processed cocoa because it adds a nice depth to the cookies without being overwhelmingly bitter. Whichever you choose, make sure it’s unsweetened to maintain that balance of flavors.
Gluten-Free Flour Options
The choice of gluten-free flour can significantly affect the texture and flavor of your cookies. There are many options available, like almond flour, coconut flour, and gluten-free all-purpose blends. I’ve found that using a good quality gluten-free all-purpose flour blend often yields the best results, as they typically contain xanthan gum, which helps mimic the elasticity of gluten. When I first started baking gluten-free, I experimented with almond flour, but the cookies turned out denser than I liked. It took me a while to discover that a blend worked wonders for that soft, fudgy texture. Speaking of almond flour, you might enjoy making Melt-In-Your-Mouth Almond Flour Shortbread Cookies (GF) as well!
Sweeteners (Sugar, Brown Sugar, etc.)
Sweeteners play a crucial role in achieving that fudgy consistency. For my chocolate crinkle cookies, I love to use a combination of granulated sugar and brown sugar. The granulated sugar aids in creating that crinkled appearance, while the brown sugar adds moisture and a hint of caramel flavor. If you’re looking to reduce refined sugar, you can also experiment with alternative sweeteners like coconut sugar or maple syrup, but keep in mind that these can alter the texture slightly. I’ve learned that the right balance of sweetness is key to making these cookies irresistible!
Eggs and Their Role in Fudginess
Eggs are another essential ingredient that contributes to the cookies’ fudgy texture. They provide structure, moisture, and richness. I’ve always used large eggs in my baking, and I find that they help create a nice chewy interior. If you’re looking for a vegan alternative, you can try using flaxseed meal mixed with water as a substitute, but I recommend sticking to eggs for the best results when making these cookies for the first time.
Chocolate Chips and Variations
Chocolate chips are the final touch that elevates these cookies. You can go for semi-sweet, dark, or even white chocolate chips, depending on your preference. I personally love adding a mix of semi-sweet and dark chocolate chips for a richer taste. Sometimes, I even toss in some caramel chips for an extra layer of flavor! The beauty of these cookies is that you can customize them to your liking; the possibilities are endless!
Essential Tools and Equipment
Mixing Bowls and Utensils
Having the right mixing bowls and utensils can make a big difference in the baking process. I’ve learned through experience that a good set of mixing bowls in various sizes is essential. I often start with a large bowl for mixing all my ingredients together, and a smaller one for any separate mixtures, like the eggs and sugars. Silicone spatulas are my go-to utensils. They’re perfect for scraping the sides of the bowls to ensure that every bit of that delicious dough gets mixed in. Plus, they’re gentle on non-stick surfaces, which is a bonus!
Baking Sheets and Parchment Paper
A sturdy baking sheet is a must for achieving those perfectly baked cookies. I prefer using heavy-duty, non-stick baking sheets to prevent any sticking issues. To make cleanup easier and to ensure even baking, I always line my baking sheets with parchment paper. I remember the first time I baked cookies without it; the cookies were a sticky disaster! Now, with parchment paper, I can simply lift the cookies off once they cool a bit, and my baking sheets stay in pristine condition. It’s such a simple step that can save a lot of time and hassle.
Measuring Cups and Spoons
Accurate measuring tools are vital for baking, especially when it comes to gluten-free recipes, where precision is key. I’ve got a set of dry measuring cups for my flour and cocoa powder, alongside liquid measuring cups for my sweeteners and oils. I also keep a good set of measuring spoons handy for the smaller quantities of ingredients, like baking powder or salt. I remember a time I mis-measured my baking powder, and let’s just say, the cookies didn’t rise quite like I expected! Investing in a reliable set of measuring tools has really helped me improve my baking consistency.
Step-by-Step Recipe for Fudgy Gluten-Free Chocolate Crinkle Cookies
Preparation Time and Cooking Time
Preparing these fudgy gluten-free chocolate crinkle cookies is relatively quick! I usually spend about 15 minutes gathering my ingredients and mixing the dough. The baking time takes around 10-12 minutes, plus a few extra minutes for cooling. In total, I’d say you can have fresh cookies ready in under 30 minutes if you’re organized, which is one of my favorite things about this recipe!
Instructions for Mixing the Dough
To start, preheat your oven to 350°F (175°C) while you mix the dough. In a large mixing bowl, I combine the granulated sugar, brown sugar, and eggs. I whisk these together until they’re nice and frothy. Then, I gradually add in the melted butter and vanilla extract, stirring until everything is well combined. Next, I sift in the cocoa powder, gluten-free flour, baking powder, and salt, and mix until there are no dry spots left. The dough will be thick and a little sticky, which is just how I like it!
Shaping and Rolling the Cookies
Once the dough is ready, I let it chill in the fridge for about 30 minutes. This step is crucial because it makes the dough easier to work with and helps the cookies maintain their shape. After chilling, I use a cookie scoop or just my hands to scoop out portions of dough. I roll them into balls and then coat each ball generously in powdered sugar. This step not only adds sweetness but also gives those beautiful crinkles once they bake. I place the dough balls about two inches apart on my lined baking sheets, giving them plenty of room to spread.
Baking Tips for Perfect Crinkles
When it comes to baking, I’ve learned a few tricks to get those perfect crinkles. Firstly, keep an eye on the baking time; overbaking can lead to dry cookies, and nobody wants that! I usually take them out when the edges are set but the centers still look slightly underbaked. They’ll continue to firm up as they cool. Also, resist the urge to open the oven door too soon, as this can cause the cookies to collapse. Just let them bake peacefully, and you’ll be rewarded with those gorgeous crinkly tops!
Variations and Customizations
Adding Nuts or Dried Fruits
One of the best parts about baking is getting creative, and I love adding different mix-ins to my chocolate crinkle cookies. Chopped nuts, such as walnuts or pecans, can add a nice crunch. I also enjoy tossing in some dried cherries or cranberries for a pop of sweetness that complements the chocolate beautifully. The texture contrast can really elevate the experience, making each bite even more enjoyable.
Swapping Out Chocolate Types (Dark, Milk, White)
Another way to customize these cookies is by swapping out the chocolate types. While I’m a big fan of semi-sweet and dark chocolate, I’ve tried using milk chocolate for a sweeter, creamier cookie. White chocolate chips can also work well for those who prefer a milder chocolate flavor. I’ve even experimented with using peanut butter chips alongside dark chocolate for a deliciously indulgent twist!
Incorporating Flavor Extracts (Vanilla, Mint)
Don’t underestimate the power of flavor extracts! A splash of vanilla is a classic addition, but I’ve found that adding a hint of peppermint extract can transform these cookies into a festive treat. It’s especially delightful around the holidays. Just be careful with the amount; a little goes a long way. You can even mix in some orange zest for a refreshing twist that pairs beautifully with chocolate!
Serving Suggestions and Pairings
Best Beverages to Accompany Cookies
When it comes to enjoying fudgy gluten-free chocolate crinkle cookies, pairing them with the right beverages can enhance the experience. Personally, I love a good cup of coffee with my cookies. The bitterness of the coffee complements the sweetness of the cookies, creating a delightful contrast. I often reach for a rich, dark brew or even a mocha for an extra chocolatey kick. If you prefer tea, a nice herbal blend like peppermint can be refreshing and works surprisingly well with the chocolate flavors. For those who enjoy something colder, consider a glass of cold milk or a creamy chocolate milkshake—it’s a classic combo that never disappoints!
Serving for Special Occasions
These chocolate crinkle cookies are perfect for various occasions, and I love making them for celebrations. Whether it’s a birthday party, holiday gathering, or just a cozy get-together with friends, these cookies bring a smile to everyone’s face. For special occasions, I like to present them on a beautiful platter, perhaps dusting a little extra powdered sugar on top for that added touch of elegance. You can also get creative with your presentation by making cookie gift boxes. I remember gifting a box of these cookies to a friend for her birthday, and she absolutely loved it! Wrapping them in parchment paper and tying them with a ribbon makes for a thoughtful and delicious gift.
Storing and Freezing Your Cookies
How to Store for Freshness
After all the hard work you put into making these delicious cookies, you’ll want to keep them fresh for as long as possible. I’ve found that the best way to store fudgy chocolate crinkle cookies is in an airtight container at room temperature. This keeps them soft and chewy. If you live in a humid area, you might want to add a slice of bread to the container; it helps to absorb moisture and keeps the cookies fresh longer. Just be sure to check on them regularly—if they start to get a little too firm, it might be time to share them with friends or family!
Freezing Tips for Long-Term Storage
If you want to make a batch of cookies in advance, freezing is a great option. I often prepare a double batch and freeze half for later. To freeze, I let the cookies cool completely before placing them in a single layer on a baking sheet. Once they’re frozen solid, I transfer them to a freezer-safe bag or container. This way, I can pull out just a few whenever I have a craving or need a last-minute dessert for guests. Just remember to thaw them at room temperature for a bit before enjoying, or pop them in the microwave for a few seconds to warm them up. The joy of biting into a slightly warm cookie fresh from the freezer is simply unbeatable!
Common FAQs About Fudgy Gluten-Free Chocolate Crinkle Cookies
Can I Use Different Flour Blends?
Absolutely! I love that gluten-free baking allows for such creativity. You can experiment with various gluten-free flour blends, such as almond flour, coconut flour, or even chickpea flour. Each type will bring its unique flavor and texture, so it’s all about finding what you enjoy most. Just keep in mind that some flours may require adjustments in the recipe, such as adding more binding agents like eggs or flaxseed meal to achieve that desired fudgy texture.
What Makes Cookies Fudgy vs. Cake-Like?
The key difference between fudgy and cake-like cookies often comes down to the ratio of ingredients and the baking time. For fudgy cookies, you want a higher fat-to-flour ratio and less baking time. I find that using more butter and brown sugar really enhances that gooey texture. In contrast, cake-like cookies typically have more flour and often include baking powder or baking soda to lift them. If you’re aiming for fudgy cookies, aim for a thicker dough and keep an eye on the baking time—remember, they should look a touch underbaked when you take them out!
How Do I Know When They Are Done Baking?
Knowing when your cookies are done can be tricky, especially with fudgy cookies. I usually look for a set edge while the center still appears soft and slightly underbaked. They’ll firm up as they cool, so resist the urge to leave them in the oven too long. If you’re unsure, a gentle poke in the center can help; if it springs back, they’re likely good to go. Trusting your instincts and experience will help you become a cookie-baking pro!
Why You Should Try Fudgy Gluten-Free Chocolate Crinkle Cookies
Health Benefits of Gluten-Free Baking
Baking gluten-free can have its health benefits, even for those who don’t have gluten sensitivities. Many gluten-free flours, like almond and coconut flour, are packed with nutrients and can be lower in carbs compared to traditional wheat flour. I’ve noticed that I feel lighter and more energized after enjoying gluten-free treats. Plus, with the right ingredients, you can create delicious desserts without sacrificing flavor. It’s a win-win!
Deliciousness Factor: Why Everyone Loves Them
Let’s be honest—who doesn’t love a rich, fudgy chocolate cookie? The combination of textures, from the soft center to the slightly crisp outer layer, is pure bliss. I’ve shared these cookies with friends and family, and the reaction is always the same: pure delight! Whether it’s the rich chocolate flavor or the fun of watching those beautiful crinkles form, there’s something undeniably special about these cookies that makes them a favorite for everyone. Try them for yourself, and I guarantee you’ll understand the hype!
Frequently Asked Questions
What are chocolate crinkle cookies?
Chocolate crinkle cookies are soft, fudgy treats characterized by their rich chocolate flavor and a beautiful crinkled exterior. They have a soft center that melts in your mouth, making them a delightful treat for any chocolate lover.
Why should I consider gluten-free options?
Going gluten-free is essential for those with health issues like celiac disease or gluten sensitivity. Even without these conditions, gluten-free options can be lighter and more digestible, and they can be just as rich and fudgy with the right ingredients.
What key ingredients are needed for fudgy gluten-free chocolate crinkle cookies?
Key ingredients include cocoa powder, gluten-free flour options (like almond flour or gluten-free all-purpose blends), sweeteners (such as granulated and brown sugar), eggs, and chocolate chips.
How long does it take to prepare and bake the cookies?
Preparing the cookies takes about 15 minutes, and baking them takes around 10-12 minutes. In total, you can have fresh cookies ready in under 30 minutes if you’re organized.
What is the role of eggs in the cookie recipe?
Eggs provide structure, moisture, and richness to the cookies, contributing to their fudgy texture. They help create a nice chewy interior in the cookies.
Can I customize the chocolate crinkle cookies?
Yes! You can customize these cookies by adding nuts, dried fruits, swapping out different types of chocolate, or incorporating flavor extracts like vanilla or mint.
What are some best beverage pairings for these cookies?
Pairing these cookies with coffee, herbal tea, cold milk, or a creamy chocolate milkshake can enhance the experience. The bitterness of coffee complements the sweetness of the cookies beautifully.
How should I store the cookies for freshness?
Store fudgy chocolate crinkle cookies in an airtight container at room temperature to keep them soft and chewy. In humid areas, adding a slice of bread can help absorb moisture and keep the cookies fresh longer.
What makes cookies fudgy instead of cake-like?
The difference often comes down to the ratio of ingredients and baking time. Fudgy cookies have a higher fat-to-flour ratio and less baking time, while cake-like cookies typically have more flour and rising agents to create a lighter texture.
What health benefits can gluten-free baking offer?
Gluten-free baking can provide health benefits, as many gluten-free flours are packed with nutrients and can be lower in carbs. Enjoying gluten-free treats can leave you feeling lighter and more energized.