
Imagine sinking your teeth into a rich, buttery shortbread topped with creamy caramel and smooth chocolate. This gluten-free millionaire’s shortbread is a decadent treat that everyone can enjoy, regardless of dietary restrictions! If you’re interested in exploring more gluten-free options, check out Simple Gluten-Free Shortbread Cookies (Buttery & Crumbly).
Understanding Millionaire’s Shortbread
What is Millionaire’s Shortbread?
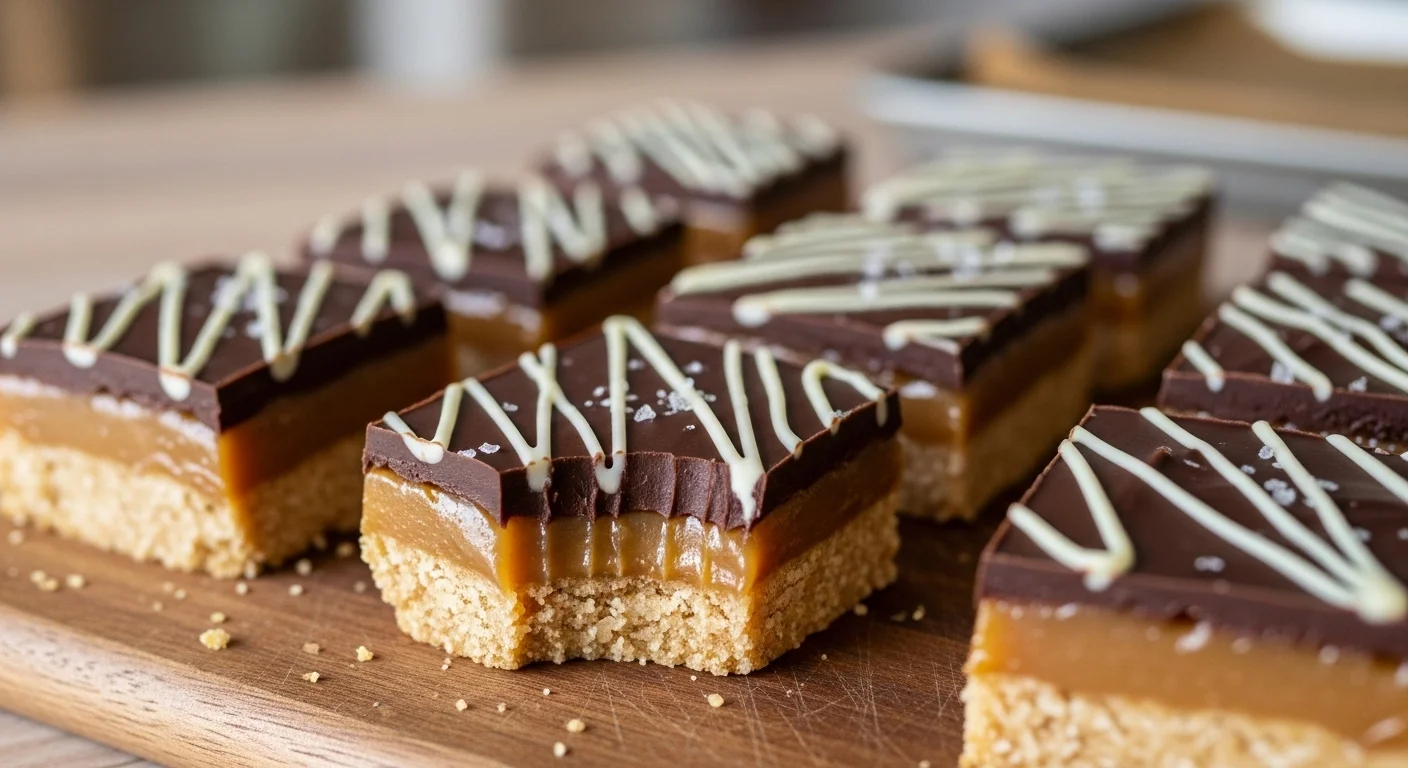
Millionaire’s shortbread is a delightful dessert that originates from the British Isles. It features a three-layer structure: a crumbly shortbread base, a luscious caramel filling, and a rich chocolate topping. Each layer complements the others beautifully, creating a sweet treat that’s hard to resist. I remember the first time I tried it at a small café; the blend of textures and flavors was unforgettable. It felt indulgent, almost like a little piece of heaven on a plate!
Traditional Ingredients Overview
When I think of the traditional ingredients in millionaire’s shortbread, I picture luxurious butter, sugar, and flour for the shortbread, followed by sweetened condensed milk, brown sugar, and butter for the caramel. Lastly, a generous layer of chocolate—either milk or dark—finishes it off. However, these ingredients often include gluten from wheat flour, making it unsuitable for those with gluten sensitivities or celiac disease. I used to think that to enjoy this treat, I’d have to stick to the traditional version, but I’ve learned that there are fantastic gluten-free alternatives!
Why Go Gluten-Free?
Choosing to make gluten-free millionaire’s shortbread is not just about dietary restrictions; it’s about inclusivity. I’ve had friends who are gluten intolerant, and I always felt bad that they couldn’t enjoy certain treats. When I started experimenting with gluten-free recipes, I realized just how easy it is to adapt classic desserts without sacrificing flavor or texture. The gluten-free version of millionaire’s shortbread can be just as delicious—and trust me, once you try it, you’ll agree! You might also enjoy The Ultimate Gluten-Free Lemon Bars (Tangy & Sweet) for another delightful dessert.
Key Components of Gluten-Free Millionaire’s Shortbread
Gluten-Free Shortbread Base
The foundation of our millionaire’s shortbread is the shortbread base. I experimented with various gluten-free flours and found that a blend of almond flour and a gluten-free all-purpose flour works wonders. Almond flour adds a rich, nutty flavor, while the all-purpose flour helps create the right structure. When preparing the shortbread, I make sure to cream the butter and sugar well to achieve that perfect crumbly texture. It’s important to chill it before baking so that it holds its shape. I still remember the first time I took my gluten-free shortbread out of the oven—it smelled like a dream!
Homemade Caramel Filling
Next comes the homemade caramel, which can seem daunting, but I promise it’s worth it! Using simple ingredients like butter, brown sugar, and sweetened condensed milk, I’ve learned to make a silky-smooth caramel that doesn’t require any special tools. Cooking it slowly over medium heat allows the sugars to melt and caramelize without burning. The key is to stir continuously until the mixture thickens and turns a beautiful golden color. I love pouring this luscious caramel over the baked shortbread base and letting it set for a bit—it’s like a mini test of patience that pays off deliciously!
Chocolate Topping Options
Finally, we can’t forget about the chocolate topping! I’ve tried both dark and milk chocolate, and honestly, it depends on your personal preference. Dark chocolate provides a rich contrast to the sweet caramel, while milk chocolate is creamier and sweeter. I usually melt the chocolate in a double boiler or microwave, taking care not to overheat it. Once melted, I pour it over the caramel layer and let it set until it’s firm. The combination of chocolate, caramel, and shortbread creates a delicious harmony of flavors that I can’t get enough of!
Step-by-Step Recipe for Gluten-Free Millionaire’s Shortbread
Ingredients List
Gathering everything you need is one of my favorite parts of baking. Here’s what you’ll need to make your gluten-free millionaire’s shortbread:
- For the shortbread base:
- 1 cup almond flour
- 1 cup gluten-free all-purpose flour
- ½ cup powdered sugar
- ½ cup unsalted butter, softened
- 1 teaspoon vanilla extract
- ¼ teaspoon salt
- For the caramel layer:
- ½ cup unsalted butter
- 1 cup brown sugar, packed
- 1 can (14 ounces) sweetened condensed milk
- For the chocolate topping:
- 1 cup chocolate chips (dark or milk, depending on your preference)
- 1 tablespoon coconut oil (optional, for a smoother finish)
Preparation of the Shortbread Base
Now, let’s dive into the preparation! First, preheat your oven to 350°F (175°C). I remember how the smell of buttery goodness filled my kitchen when I started baking this. It’s almost like a warm hug! In a mixing bowl, cream together the softened butter and powdered sugar until it’s nice and fluffy. This step is essential for achieving that perfect crumbly texture.
Next, gently mix in the almond flour, gluten-free all-purpose flour, vanilla extract, and salt. I like to use my hands to bring everything together into a dough. Once it’s formed, press the dough evenly into the bottom of a greased 8-inch square baking pan. Don’t worry about it being perfect, just make sure it’s even! Bake for about 15-20 minutes or until the edges start to turn a light golden brown. The anticipation builds as you wait for it to cool—it’s like waiting for the first snow of winter!
Making the Caramel Layer
Once your shortbread base is cooled, it’s time to make the caramel layer. In a medium saucepan over medium heat, melt the butter. Then, add the brown sugar and sweetened condensed milk, stirring continuously. I’ve learned that patience is key here—if you rush it, you risk burning the caramel. Keep stirring until the mixture thickens and turns a rich golden color, which usually takes around 8-10 minutes.
When you achieve that perfect consistency, pour the caramel over the cooled shortbread base. I love watching it spread evenly, creating a beautiful layer of sweetness! Allow it to cool slightly while you prepare the chocolate topping.
Preparing the Chocolate Topping
For the chocolate topping, I usually melt my chocolate chips in a microwave-safe bowl. I start with 30-second intervals, stirring in between to avoid overheating. If you want a glossier finish, adding a tablespoon of coconut oil can elevate the texture. Once melted, pour the chocolate over the caramel layer, spreading it with a spatula to ensure an even coating. This step is where the magic happens—seeing that glossy layer of chocolate is pure bliss! Allow the chocolate to set slightly, but not too long, because we want to assemble the layers while the caramel is still warm.
Assembling the Layers
Now that all our components are ready, it’s finally time to assemble! Start with your baked and cooled shortbread base, pour over the luscious caramel layer, and finish with the melted chocolate. I find this part so fulfilling, knowing that each layer is a step closer to the final product. If you’re feeling adventurous, you can sprinkle a little sea salt on top for that sweet-and-salty contrast I adore. It adds an extra touch that elevates the whole experience!
Cooling and Setting Instructions
Now comes the hardest part—waiting! It’s essential to let the assembled shortbread cool completely at room temperature before placing it in the fridge. I usually allow it to chill for at least two hours. The anticipation builds, but I promise, it’s worth every second. Once it’s set, I take it out, slice it into squares, and marvel at the beautiful layers of shortbread, caramel, and chocolate. There’s nothing quite like it!
Tips for Perfecting Your Millionaire’s Shortbread
Choosing the Right Gluten-Free Flour
I can’t stress enough how important it is to select the right gluten-free flour when making millionaire’s shortbread. From my experience, not all gluten-free flours work the same. Some can lead to a dry or crumbly texture that just doesn’t hold up. I’ve had great success with blends that include almond flour, as it adds moisture and flavor. Brands like Bob’s Red Mill or King Arthur Flour have excellent gluten-free all-purpose blends that include xanthan gum, which helps mimic the elasticity of wheat flour. I recommend experimenting with different flours until you find the one that gives you that perfect crumbly yet sturdy base. It’s definitely worth the trial and error! You might also consider trying out Easy Tapioca Flour Scones (Surprisingly Simple) for another gluten-free treat.
Caramel Cooking Tips
Making caramel can feel a bit like a dance—it requires patience and a gentle hand! I learned early on that cooking the caramel over medium heat is crucial. If you crank up the heat, you risk burning it before it even thickens. I suggest using a heavy-bottomed saucepan as it distributes heat evenly, which helps prevent any scorching. Stirring continuously might seem tedious, but it’s the key to getting that smooth, silky texture. I often use a silicone spatula to scrape the sides of the pan, ensuring no bits of sugar get left behind. The moment that caramel transforms into a deep golden hue is absolutely magical, and you’ll want to pour it over your shortbread immediately—just be careful, it’s hot!
Chocolate Melting Techniques
Melting chocolate can be a bit tricky if you’re not careful. I’ve learned a few tricks that make this step a breeze. If I’m using the microwave, I always start with 30-second intervals, stirring in between until it’s just melted. It’s all about being patient; overheating chocolate can lead to a grainy texture, and nobody wants that! If I’m at the stove, I like to use a double boiler. This method allows the chocolate to melt gently without direct heat. I’ve also found that adding a tablespoon of coconut oil to the chocolate not only helps it melt smoothly but gives it a nice sheen, making the chocolate layer even more appealing. Trust me, the glossy finish is worth the extra step!
Storage Recommendations
Once my gluten-free millionaire’s shortbread is ready, I usually can’t wait to dive in, but I’ve learned that proper storage is important for keeping it fresh. I like to let it cool completely before slicing it into squares. Once cut, I store it in an airtight container at room temperature if I know we’ll eat it within a few days. However, if I want to keep it for a longer time, the fridge is my go-to. The cool environment helps maintain the texture and flavor. Just ensure to layer parchment paper between the squares so they don’t stick together. I’ve even frozen slices for later indulgence, and they thaw beautifully! If you’re preparing for a special occasion, making them a few days in advance is a great way to save time and still enjoy that fresh taste.
Variations on Gluten-Free Millionaire’s Shortbread
Nut-Free Options
If you’re looking to make this delicious treat nut-free, I totally get it. I’ve had friends with nut allergies, and I wanted to ensure everyone could enjoy my baking. Instead of almond flour, you can use a simple gluten-free all-purpose flour blend. Just be sure to check the ingredients to ensure it’s nut-free. You might notice a slight difference in flavor, but the overall texture and experience remain delightful! I also like to add a bit of vanilla extract to enhance the sweetness—everyone loves a little extra flavor, right?
Vegan Adaptations
Going vegan doesn’t mean you have to miss out on millionaire’s shortbread! I’ve had a blast experimenting with plant-based ingredients. For the butter, you can use vegan butter or coconut oil, which works well to keep that rich flavor. Sweetened condensed milk can be replaced with full-fat coconut milk and a bit of maple syrup for sweetness. It’s amazing how these substitutions can keep the essence of the original recipe while making it suitable for a vegan diet. I was pleasantly surprised by how well my vegan version turned out, and my vegan friends were thrilled when I shared it with them!
Flavor Additions (Sea Salt, Nuts, etc.)
Sometimes, I like to get a little adventurous with flavors. Adding a sprinkle of sea salt on top right before the chocolate sets elevates the entire experience. It creates a wonderful contrast to the sweetness—trust me, it’s a game-changer! I’ve also experimented with different flavors in the caramel, like a splash of vanilla or even a hint of espresso for a coffee twist. If you enjoy nuts, I recommend folding in some chopped pecans or walnuts into the caramel layer for an added crunch. These personal touches can really make the recipe your own, and I love how they add a unique spin to a classic dessert!
Serving Suggestions and Pairings
Best Beverages to Pair
When it comes to enjoying gluten-free millionaire’s shortbread, I’ve found that the right beverage can enhance the experience even more. A hot cup of tea is my go-to, especially a rich Earl Grey or a soothing chamomile. The warmth and subtle flavors of tea complement the sweetness of the shortbread perfectly. If you’re more of a coffee lover, I recommend a smooth, medium roast coffee. I’ve even tried pairing it with a frothy cappuccino, and let me tell you, that creamy texture alongside the layers of the shortbread is a match made in heaven!
For those who prefer something colder, a glass of almond milk or coconut milk can also be a refreshing choice. I’ve even had success with a chilled vanilla-infused sparkling water—it adds a fun fizz that balances out the sweetness. Whatever you choose, I encourage you to experiment and find what resonates best with your taste buds.
Presentation Ideas for Special Occasions
Now that you’ve made this delightful treat, presenting it well can add an extra touch of charm. When I’m serving my gluten-free millionaire’s shortbread at gatherings, I like to cut it into neat squares and arrange them on a beautiful platter. For a festive touch, I often sprinkle some finely chopped nuts or a light dusting of powdered sugar over the top. It really elevates the look and makes it feel special!
If you’re celebrating a special occasion, consider adding a few fresh berries or edible flowers around the edges of the platter. Not only do they look stunning, but they also bring a burst of color that draws the eye. I’ve even made mini individual servings in muffin cups for a fun twist. Each little cup is a perfect portion, and they look adorable lined up at a dessert table. The key is to have fun with it and let your creativity shine!
Frequently Asked Questions (FAQs)
Can I Make This Recipe Ahead of Time?
Absolutely! One of the best parts about gluten-free millionaire’s shortbread is that it keeps well. I often make it a day or two ahead of time, especially for gatherings. Just be sure to store it properly to maintain its freshness. Letting it sit for a bit can even enhance the flavors as they meld together!
How Long Does Gluten-Free Millionaire’s Shortbread Last?
When stored correctly in an airtight container, my gluten-free millionaire’s shortbread typically lasts about a week at room temperature. If you want to keep it fresh longer, the fridge can extend its life for up to two weeks. Just be aware that refrigeration may slightly alter the texture—though it will still taste amazing!
Can I Freeze Millionaire’s Shortbread?
Yes, you can freeze it! I often slice my millionaire’s shortbread into squares before freezing. I place parchment paper between the layers to prevent sticking, then store the squares in an airtight container. They can last for about three months in the freezer. When I’m ready to enjoy them, I let them thaw at room temperature, and they taste just as delicious as fresh! It’s a perfect way to have a sweet treat on hand whenever the craving strikes.
Final Thoughts
Making gluten-free millionaire’s shortbread has been such a rewarding experience for me. It’s exciting to create something that everyone can enjoy, regardless of dietary restrictions. I believe that this dessert embodies the spirit of indulgence and joy, and it has a way of bringing people together. Whether you’re enjoying it with a cup of tea at home or sharing it at a gathering, I hope you find as much happiness in making and eating it as I have. So go ahead, gather your ingredients, and embark on this delicious journey. You won’t regret it!
Frequently Asked Questions
What is Millionaire’s Shortbread?
Millionaire’s shortbread is a delightful dessert that originates from the British Isles. It features a three-layer structure: a crumbly shortbread base, a luscious caramel filling, and a rich chocolate topping.
Why should I choose gluten-free millionaire’s shortbread?
Choosing to make gluten-free millionaire’s shortbread is about inclusivity, allowing those with gluten sensitivities or celiac disease to enjoy a delicious treat without sacrificing flavor or texture.
What are the key ingredients for gluten-free millionaire’s shortbread?
The key ingredients for the gluten-free millionaire’s shortbread include almond flour, gluten-free all-purpose flour, powdered sugar, unsalted butter, vanilla extract, and salt for the shortbread base; unsalted butter, brown sugar, and sweetened condensed milk for the caramel layer; and chocolate chips for the chocolate topping.
How can I make the caramel filling?
To make the caramel filling, melt butter in a saucepan, add brown sugar and sweetened condensed milk, and stir continuously over medium heat until the mixture thickens and turns a rich golden color.
What chocolate options can I use for the topping?
You can use either dark or milk chocolate for the topping, depending on your personal preference. Dark chocolate provides a rich contrast to the caramel, while milk chocolate is creamier and sweeter.
How long should I let the assembled millionaire’s shortbread cool?
Once assembled, you should let the millionaire’s shortbread cool completely at room temperature before placing it in the fridge. It’s recommended to chill it for at least two hours.
Can I make gluten-free millionaire’s shortbread nut-free?
Yes, instead of almond flour, you can use a gluten-free all-purpose flour blend that is nut-free. Just check the ingredients to ensure it meets your dietary requirements.
How do I store gluten-free millionaire’s shortbread?
To store gluten-free millionaire’s shortbread, let it cool completely before slicing it into squares. Store in an airtight container at room temperature for a few days or in the fridge for up to two weeks.
Can I freeze millionaire’s shortbread?
Yes, you can freeze millionaire’s shortbread. Slice it into squares, place parchment paper between the layers to prevent sticking, and store in an airtight container. It can last for about three months in the freezer.
What beverages pair well with gluten-free millionaire’s shortbread?
Some great beverage pairings include a hot cup of tea (like Earl Grey or chamomile), medium roast coffee, almond milk, coconut milk, or even chilled vanilla-infused sparkling water.