
Gluten-free baking can be a delightful adventure, especially when it comes to recreating British classics like Victoria Sponge Cake. This fluffy, layered treat is perfect for any occasion, and making it gluten-free means everyone can enjoy a slice! Read Interesting article: Easy Gluten-Free Strawberry Shortcake (Summer Favorite)
Overview of Victoria Sponge Cake
History and Origin of Victoria Sponge Cake
When I think about Victoria Sponge Cake, I can’t help but feel a sense of nostalgia. This cake is not just a dessert; it’s a slice of British history. Named after Queen Victoria, who was known to enjoy a piece of this cake with her afternoon tea, it dates back to the 19th century. I remember learning that the cake’s simple yet elegant design was a favorite among the upper class during her reign. The original recipe typically consisted of equal weights of flour, sugar, eggs, and butter, making it light and airy—a perfect complement to a cup of tea.
Over the years, Victoria Sponge has evolved, and its popularity has spread beyond the UK. Every time I bake it, I’m reminded of its royal roots and the warmth it brings to gatherings. The classic version usually features a layer of jam and whipped cream or buttercream sandwiched between two round layers of sponge. It’s a cake that celebrates both tradition and creativity, and for those of us who have to avoid gluten, it’s an opportunity to recreate this beloved treat without compromising on taste or texture.
Traditional Ingredients in Victoria Sponge Cake
The traditional Victoria Sponge Cake is made with a handful of simple ingredients. When I first started baking, I was surprised to learn that the core components are just flour, sugar, butter, and eggs. However, the magic truly happens in the ratios and the method of mixing these ingredients. The butter needs to be softened, ideally at room temperature, to create a lovely creamy texture when blended with sugar. I’ve found that creaming these two together well forms the base of a great sponge.
Adding eggs one at a time helps in achieving a smooth batter. This is where I learned the importance of incorporating air into the mixture, which contributes to the lightness of the cake. As for the flour, it’s usually plain flour, but when I decided to go gluten-free, I needed to find the right alternatives that would still allow this cake to rise beautifully and maintain its classic flavor.
What is Gluten-Free Baking?
Types of Gluten-Free Flours
Gluten-free baking can feel like a daunting task at first, especially when you’re used to traditional recipes. However, I’ve discovered that there’s a whole world of gluten-free flours out there that can replace wheat flour. Some of my favorites include almond flour, coconut flour, and various blends available at grocery stores. Each type has its unique properties and flavor profiles, which can really enhance the final product.
For example, almond flour adds a rich, nutty flavor that complements cakes beautifully. On the other hand, coconut flour is more absorbent and requires more liquid in the recipe, something I learned the hard way! I’ve found that using a blend of gluten-free flours usually yields the best results, mimicking the texture of traditional flour more closely. This is crucial when making something as delicate as a Victoria Sponge Cake. Read Interesting article: Light & Airy Gluten-Free Angel Food Cake (A Classic)
Common Substitutes for Wheat Flour
In my experience, substituting wheat flour can be tricky, but it’s all about balance. Besides the flours mentioned, I’ve seen recipes that include tapioca flour or rice flour, which can help bind the ingredients and create a tender crumb. I recommend experimenting with different combinations to find what works best for your taste and texture preferences. I usually start with a gluten-free all-purpose flour blend that contains xanthan gum, which helps with the structure of the cake.
When switching to gluten-free, I noticed that the batter might be thicker compared to traditional recipes. It’s essential to pay attention to the baking time, as gluten-free cakes can sometimes bake faster or require a bit more time than their gluten-filled counterparts. I’ve made it a habit to check for doneness by inserting a skewer into the center; if it comes out clean, I know my cake is ready to come out of the oven!
Gluten-Free Victoria Sponge Cake Recipe
Ingredients Required
To make a gluten-free Victoria Sponge Cake that everyone will love, I’ve found that sticking to a simple ingredient list is best. Here’s what you’ll need:
- 1 cup (120g) gluten-free all-purpose flour blend (with xanthan gum)
- 1 cup (200g) granulated sugar
- 1/2 cup (115g) unsalted butter, softened
- 3 large eggs
- 2 teaspoons baking powder
- 1/4 cup (60ml) milk (or dairy-free milk alternative)
- 1 teaspoon vanilla extract
- Jam of your choice (strawberry or raspberry are my favorites)
- Whipped cream or buttercream for filling
Whenever I bake, I like to ensure my ingredients are at room temperature, especially the butter and eggs. This simple step makes a big difference in achieving a fluffy texture!
Step-by-Step Instructions
Now that we have our ingredients ready, it’s time to dive into the baking process. Here’s how I make my gluten-free Victoria Sponge Cake:
- Preheat your oven: Set your oven to 350°F (175°C) and grease two 8-inch round cake pans with butter or oil. You can also line them with parchment paper for easy removal.
- Mix the dry ingredients: In a bowl, whisk together the gluten-free flour, baking powder, and a pinch of salt. This helps to evenly distribute the baking powder, which is crucial for a good rise.
- Cream the butter and sugar: In a large mixing bowl, beat the softened butter and granulated sugar together until the mixture becomes pale and fluffy. I usually use an electric mixer for this—it makes the job much easier!
- Add eggs and vanilla: Incorporate the eggs one at a time, mixing well after each addition. Don’t forget to add the vanilla extract! This step adds a lovely aroma and flavor to the cake.
- Combine wet and dry ingredients: Slowly add the dry mixture to the wet ingredients, alternating with the milk. Start and finish with the flour mixture, mixing gently until just combined. I like to use a spatula for this to avoid over-mixing.
- Transfer to pans: Divide the batter evenly between the prepared cake pans and smooth the tops with a spatula.
- Bake: Place the pans in the preheated oven and bake for 25-30 minutes, or until a skewer inserted into the center comes out clean. Keep an eye on them, as gluten-free cakes can bake a little differently.
- Cool: Once baked, allow the cakes to cool in the pans for about 10 minutes, then transfer them to a wire rack to cool completely.
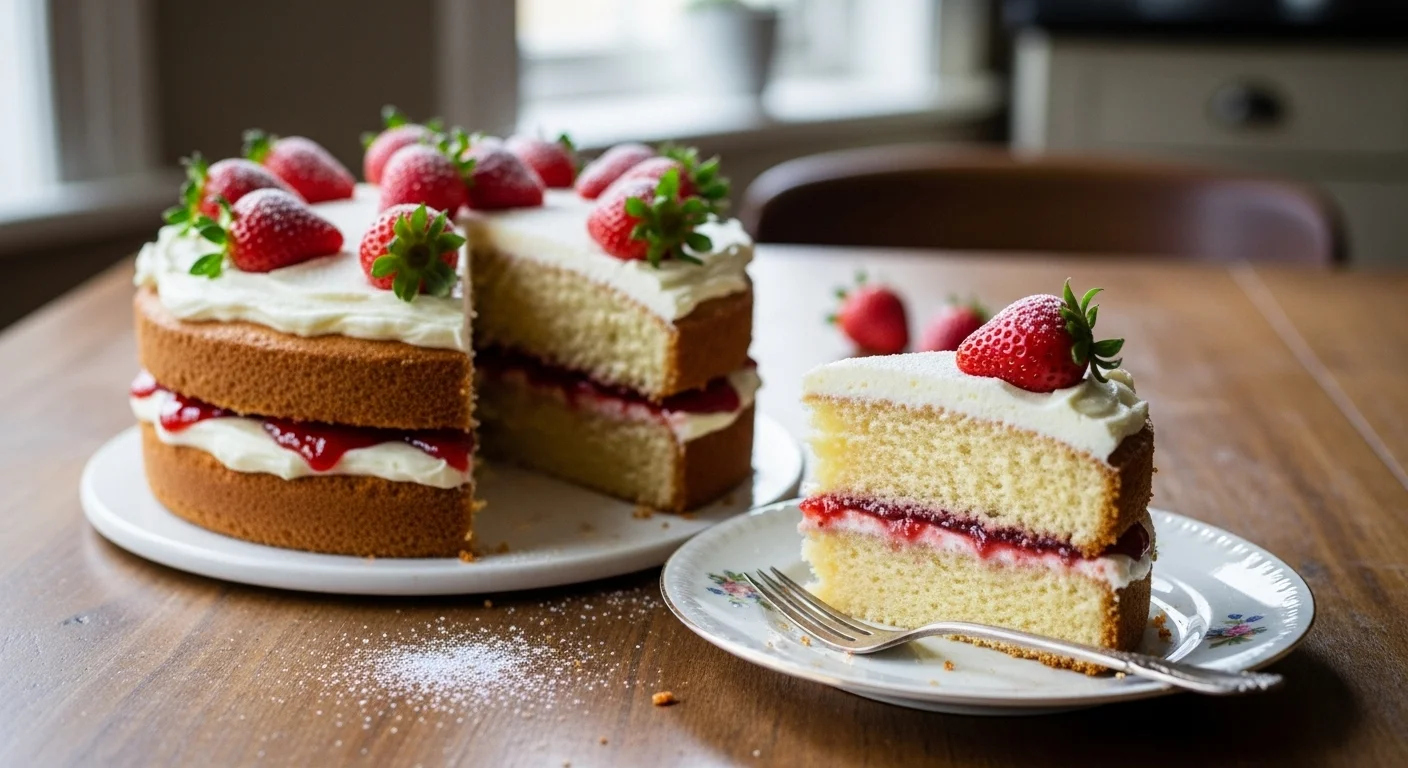
- Assemble: Once cool, spread a generous layer of jam on top of one of the cakes, followed by whipped cream or buttercream. Place the second cake on top, and dust the top with powdered sugar for a lovely finish.
And there you have it! A delicious gluten-free Victoria Sponge Cake that’s perfect for any celebration or just a cozy tea time at home. Read Interesting article: Gluten-Free Coffee Cake (With Cinnamon Streusel Topping)
Baking Tips for Gluten-Free Cakes
Baking gluten-free can come with its own set of challenges, but I’ve learned a few handy tips along the way that can make the process smoother:
- Don’t skip the xanthan gum: If your gluten-free flour blend doesn’t contain xanthan gum, consider adding 1/2 teaspoon to help with the cake’s structure.
- Monitor baking time: Since gluten-free cakes can sometimes bake faster, keep an eye on them a few minutes before the suggested baking time.
- Let the cake cool completely: This step is essential to prevent the cake from falling apart when you try to slice it. I usually leave it to cool for at least 30 minutes.
- Experiment with flavors: If you want to mix things up, try adding lemon zest or almond extract for a unique twist. I’ve experimented with these flavors, and they can take your cake to new heights!
With these tips in mind, I’m confident that you’ll have a beautiful and delicious gluten-free Victoria Sponge Cake that everyone will love to share. Happy baking!
Serving Suggestions
Classic Pairings: Jam and Cream
I can’t stress enough how perfect the combination of jam and cream is for a Victoria Sponge Cake. When I make mine, I love to use a thick layer of homemade strawberry jam. There’s something special about spreading that sweet, fruity goodness between the layers. The jam not only adds a burst of flavor but also brings a lovely moisture to the cake, which I think makes each bite even more delightful.
And then there’s the cream! I often whip up some heavy cream until it’s just firm enough to hold its shape. The richness of the cream balances out the sweetness of the jam, creating an indulgent treat. If I’m feeling adventurous, I might add a hint of vanilla extract or a sprinkle of powdered sugar to the cream for extra flavor. Trust me, this classic combination elevates the cake beyond ordinary desserts—it’s truly a match made in baking heaven.
For those looking for a twist, I’ve discovered that using flavored jams, like raspberry or even apricot, can give the cake a unique flavor profile. It’s all about finding what you love. I recommend mixing and matching until you find your perfect jam and cream combination!
Decorating Your Victoria Sponge Cake
When it comes to decorating, I believe less is often more, especially with a classic like Victoria Sponge. A light dusting of powdered sugar on top gives it an elegant finish that looks beautiful for any occasion. I love how it contrasts with the rich colors of the jam and cream underneath.
If you’re feeling a bit more creative, why not add fresh berries on top? I often use strawberries, blueberries, or raspberries, depending on what’s in season. Not only do they look stunning, but they also enhance the flavor with a fresh, tart bite. Sometimes, I even arrange the berries in a fun pattern—maybe a heart shape for special occasions like birthdays or anniversaries.
Another option I enjoy is adding edible flowers. They add a beautiful pop of color and a touch of elegance. Just make sure they’re safe to eat! I usually stick with flowers like violets or nasturtiums, which can also provide a delicate flavor to the cake.
For more festive occasions, I’ve played around with themed decorations, whether it’s sprinkling edible glitter for a party or using colored cream to pipe decorative swirls. The possibilities are endless! Just remember to keep the decorations in harmony with the classic flavors of the cake—after all, it’s the cake’s lovely taste that should always shine through.
Common Issues and Solutions
Dry or Crumbly Texture
One of the most common issues I’ve encountered while baking gluten-free cakes is dryness or a crumbly texture. It can be discouraging after all the effort put into baking. I’ve learned that one of the main culprits is often too much flour. It’s important to measure the flour accurately, as gluten-free flours can be more absorbent than regular flour. I recommend spooning the flour into the measuring cup instead of scooping it directly from the bag to avoid packing it down.
Another tip that has helped me is to ensure that you’re using enough moisture in the recipe. I sometimes add an extra tablespoon of milk or even a bit of yogurt to keep the cake moist. Additionally, I’ve found that incorporating applesauce or mashed bananas can also do wonders for adding moisture while contributing a subtle flavor.
If you do end up with a dry cake, don’t fret! A drizzle of simple syrup (equal parts water and sugar heated until dissolved) can revive the cake. Just brush it over the layers before assembling, and it’ll help to reintroduce moisture into the sponge.
Flattened Cake Problems
There’s nothing more disheartening than pulling out a cake that has flattened or sunk in the middle. I learned this the hard way after having my fair share of baking mishaps. One of the main reasons for this is underbaking. Gluten-free cakes can often look done on the outside while still being raw in the center. I’m always careful to check for doneness by using a skewer, as I mentioned earlier, but also trust your instincts. Sometimes, I give the cake an extra few minutes in the oven just to be safe.
Another factor can be the way the batter is mixed. Overmixing can lead to a denser cake, while undermixing can prevent proper structure. I’ve learned to mix until just combined—it’s a delicate balance! Additionally, ensuring that your oven temperature is accurate is crucial. I invested in an oven thermometer because my oven can sometimes run hot or cold, which can affect baking times and results.
Lastly, if you’re using a gluten-free flour blend, make sure it contains xanthan gum or another binding agent. This helps to keep the cake’s structure intact during baking. If I’m ever unsure, I always refer back to my trusted recipes and tips to guide me. With practice, I believe anyone can overcome these common baking challenges!
Variations of Gluten-Free Victoria Sponge Cake
Flavored Variations (e.g., Lemon, Chocolate)
One of the wonderful things about baking is the ability to experiment with flavors, and I’ve had so much fun creating variations of my gluten-free Victoria Sponge Cake. One flavor that I absolutely adore is lemon. To make a lemon version, I simply add the zest of one or two lemons into the batter, along with a tablespoon or so of freshly squeezed lemon juice. The citrus adds a refreshing tang that brightens up the cake, making it even more delightful, especially in warmer months.
If you’re a chocolate lover like I am, a chocolate variation might be more up your alley. I usually replace about a third of the gluten-free flour with cocoa powder for a rich chocolate flavor. Sometimes, I also fold in chocolate chips to the batter before baking for an extra indulgent treat. The combination of chocolate and cream is simply heavenly!
Another delightful twist I’ve tried is adding spices like cinnamon or cardamom, especially during the colder months. Just a teaspoon of ground cinnamon can add warmth and comfort to the cake, making it perfect for festive gatherings. I always enjoy how these subtle changes can transform the cake into something entirely different while still keeping the essence of the classic Victoria Sponge.
Seasonal and Festive Twists
As the seasons change, I find myself wanting to adapt my baking to reflect the time of year. During the fall, I love incorporating pumpkin puree into my Victoria Sponge Cake. This not only adds moisture but also gives the cake a lovely autumnal flavor. A sprinkle of nutmeg or cloves can enhance the taste even further, making it an ideal treat for Thanksgiving.
In the summer, I often reach for fresh berries. I’ve experimented with folding mashed strawberries or blueberries directly into the batter before baking. Not only does it add natural sweetness, but it also creates beautiful pops of color throughout the cake. Top it off with a berry compote for an extra burst of fruity goodness!
For festive occasions, I’ve played around with adding festive spices or colors. Incorporating a hint of peppermint extract for a wintery chocolate cake or using food coloring to create fun designs can be a hit at holiday parties. The creativity in baking can be such an enjoyable process, and I love sharing these variations with family and friends, who always look forward to my latest creations.
Health Benefits of Gluten-Free Baking
Digestive Health Benefits
When I first switched to gluten-free baking, I was pleasantly surprised by some of the health benefits that came along with it. Many people find that avoiding gluten helps improve their digestive health. I’ve noticed that my energy levels have increased, and my stomach feels much happier since I made the switch. It’s not just for those with gluten intolerances—many people are opting for gluten-free options to promote overall wellness.
Inclusion of Nutrient-Rich Ingredients
Gluten-free baking often encourages the use of a wider variety of ingredients, which can lead to a more nutrient-dense cake. For example, almond flour is rich in protein and healthy fats, while coconut flour is high in fiber. I’ve also enjoyed adding ground flaxseed or chia seeds to my batters, which not only boosts nutritional content but also contributes to a lovely texture. By exploring these alternatives, I feel like I’m creating something not just delicious but also nourishing.
Frequently Asked Questions (FAQs)
Can I Make This Recipe Dairy-Free?
Absolutely! I’ve made my gluten-free Victoria Sponge Cake dairy-free by substituting the butter with coconut oil or a dairy-free butter alternative. For the milk, I usually use almond milk or oat milk, both of which work beautifully in the recipe. Just be sure to check that your other ingredients, like the whipped cream or buttercream, are also dairy-free!
How to Store Gluten-Free Victoria Sponge Cake?
Storing gluten-free cakes can be a bit different. I recommend keeping the cake in an airtight container at room temperature if you plan to eat it within a couple of days. If it’s longer, I usually pop it in the fridge. Just remember to bring it back to room temperature before serving, as it tastes best that way!
Can I Freeze the Cake?
Yes, you can freeze gluten-free Victoria Sponge Cake! I usually slice the cake into portions, wrap each slice tightly in plastic wrap, and then place them in a freezer-safe bag. When I’m ready to enjoy a slice, I let it thaw at room temperature for a few hours or overnight in the fridge. It’s a great way to always have a delicious treat on hand!
Final Thoughts
Making a gluten-free Victoria Sponge Cake has become a cherished activity for me. It’s not just about baking; it’s about the joy it brings to gatherings and the delight of sharing a slice with loved ones. I’ve learned that with a little patience and creativity, gluten-free baking can be just as satisfying—and delicious—as traditional baking. Whether you stick to the classic recipe or venture into different flavors, I believe that every bite can be a celebration. So grab your ingredients, turn on your oven, and let’s bake something wonderful!