
Golden semolina sourdough bread is a delightful fusion of flavors and textures. Its beautiful yellow hue and crusty exterior invite everyone to take a slice and enjoy the magic of homemade bread. Read Interesting article: A Guide To High Hydration Sourdough (For Pros)
Understanding Golden Semolina Sourdough Bread
When I first came across golden semolina sourdough bread, I was intrigued by its unique appearance and the promise of a nutty flavor. I decided to dive into understanding what makes this bread special. It turns out, it all begins with semolina, a flour derived from durum wheat, which gives the bread its distinctive golden color and delightful texture.
What is Semolina?
Semolina is a coarse flour made from durum wheat, a hard variety of wheat that has a high protein content. I remember the first time I touched semolina; it felt gritty and had a lovely yellow hue. This flour is most commonly used in pasta, but when we use it in bread, it adds a unique flavor and texture. Semolina contains gluten, which contributes to the bread’s structure, but it’s less elastic than regular bread flour. This means that while it provides a sturdy loaf, it can also give a unique crumb that many find delightful.
The Role of Sourdough in Bread Making
I’ve always loved the tangy kick of sourdough. The sourdough fermentation process is what sets this bread apart from others. Using a sourdough starter introduces natural yeast and bacteria into the dough, which not only helps it rise but also adds complex flavors that develop over time. When I first made sourdough, I was amazed at how a simple mixture of flour, water, and time could transform into something so aromatic and flavorful. The longer you ferment the dough, the more pronounced the sour notes become, creating a beautiful balance with the nutty flavor of the semolina.
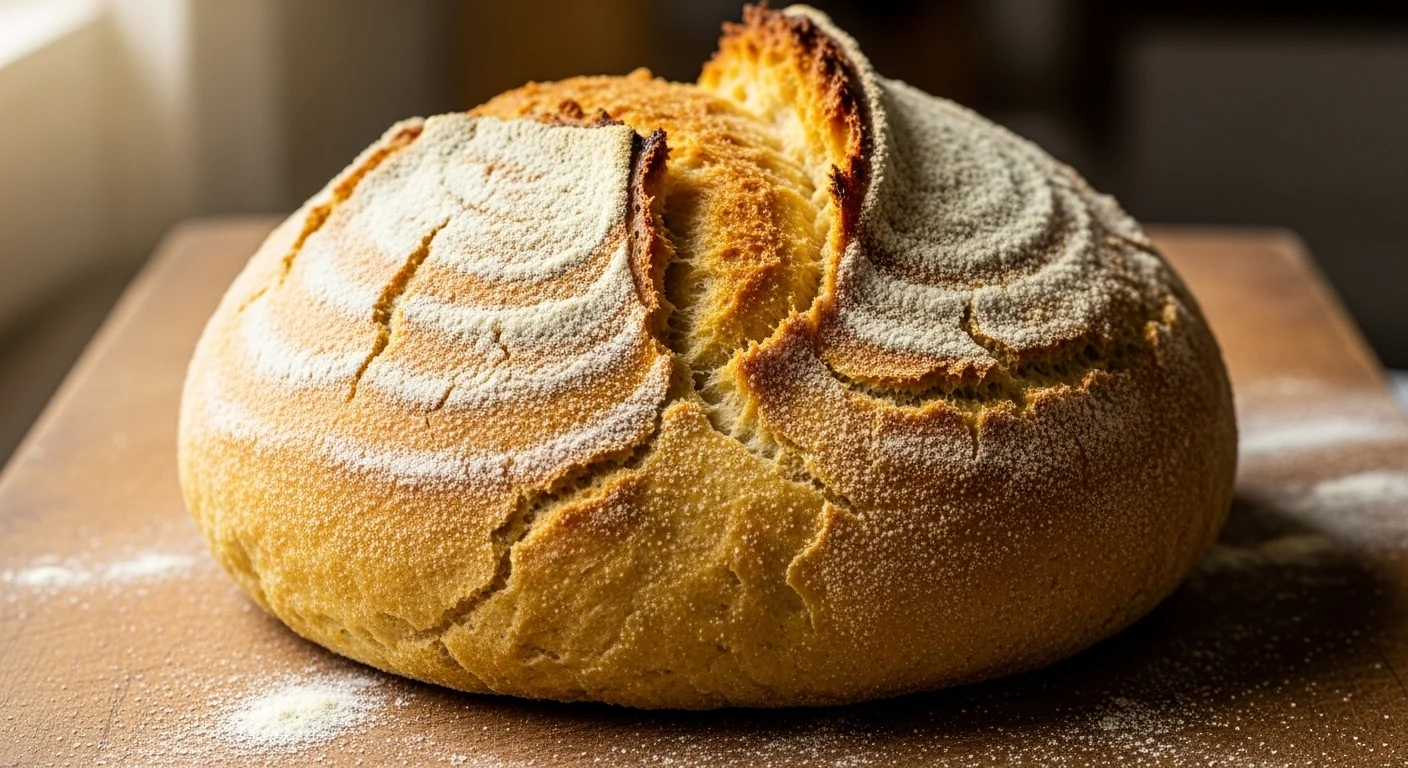
Characteristics of a Crusty Loaf
One of my favorite parts of baking bread is the crust. A crusty loaf has a hard exterior that contrasts perfectly with a soft, airy interior. The crust forms as the bread bakes, with moisture evaporating and the sugars caramelizing to create that beautiful golden-brown color. I’ve learned that achieving the perfect crust involves a few key factors, such as steam in the oven and the right baking temperature. When I pull a loaf out of the oven and hear that satisfying crackle as it cools, I feel a sense of accomplishment that’s hard to match. For me, the crust isn’t just a protective layer; it’s a crucial component of the overall experience of eating bread. The crunchiness when you first bite into it is just heavenly.
As I explored this recipe, I realized that each ingredient plays a vital role in the final product. The semolina adds a distinct nuttiness, while the sourdough culture contributes depth of flavor. The crustiness provides that satisfying texture that makes bread such a comfort food. It’s a dance of flavors and textures that I find incredibly rewarding to create.
There’s something magical about baking bread, especially when you know the ingredients and the process that go into it. Golden semolina sourdough bread is not just about feeding our bellies; it’s about the joy of creating something with our own hands. Whether you’re a seasoned baker or just starting, understanding the elements at play can elevate your bread-making experience.
In my experience, the journey to bake the perfect golden semolina sourdough bread is both an art and a science. Each step, from choosing the ingredients to the final bake, contributes to the delightful outcome. I can’t wait to share more about the ingredients we’ll need next, so we can embark on this baking adventure together!
Ingredients for Golden Semolina Sourdough Bread
Essential Ingredients
When I set out to bake golden semolina sourdough bread, I realized that the quality of the ingredients can make a significant difference in the final product. The essentials include semolina flour, all-purpose flour, water, salt, and, of course, a healthy sourdough starter. I like to keep things simple, but each ingredient plays a crucial role. The semolina flour gives that lovely nutty flavor and golden hue, while the all-purpose flour helps with the bread’s structure. Water is vital for hydration, and salt enhances the flavors and controls fermentation. It’s amazing how these few ingredients can combine to create something so wonderful! Read Interesting article: Curry Secrets: How to Make Authentic Thai Green Curry Paste
Choosing the Right Semolina
Not all semolina is created equal. I learned that it’s essential to choose high-quality semolina for the best results. I usually look for durum semolina, which is coarser and has a beautiful yellow color. When I first tried different types, I noticed that some brands yielded a denser loaf while others contributed to a lighter texture. I recommend experimenting with a few brands until you find one that resonates with your baking style. Trust me; you’ll appreciate the difference when you taste the final product!
Types of Flour to Use
While semolina is the star of the show, the combination of flours can make or break your loaf. I’ve found that mixing semolina with all-purpose flour creates a nice balance. The all-purpose flour adds elasticity, helping the bread rise beautifully. I sometimes use bread flour for even more strength, especially if I want a taller loaf. In my experience, it’s fun to play around with different ratios until I find the perfect mix that works for me. I love the idea of using a blend to create a unique flavor and texture.
Importance of Fresh Ingredients
One thing I’ve learned through my baking journey is the importance of fresh ingredients. Using fresh flour and an active sourdough starter can elevate the taste and texture of your bread. I make it a point to store my flour properly, in a cool, dark place, and I ensure my starter is fed regularly. Freshness not only affects the flavor but also the fermentation process. For me, there’s something satisfying about knowing I’m using quality ingredients. It feels like I’m giving my bread the best chance to shine!
Equipment Needed
Baking Tools and Utensils
Having the right tools can make the baking process smoother and more enjoyable. I’ve gathered a few essentials that I always keep on hand: a mixing bowl, a bench scraper, a kitchen scale, and a clean kitchen towel. I can’t stress enough how helpful a kitchen scale is when it comes to measuring ingredients accurately. It’s a game-changer! I also like to have a dough whisk for mixing the ingredients, which helps combine everything without overworking the dough. Trust me, investing in these tools pays off in the long run!
Choosing the Right Baking Vessel
When it comes to baking, the vessel you use can influence the outcome significantly. I’ve experimented with various options, including baking sheets and pizza stones, but I always come back to a Dutch oven for sourdough. It traps steam during the initial baking phase, creating that perfect crust I love. I recommend using a Dutch oven with a lid that fits well to maintain the steam. If you don’t own one, don’t worry; there are other options, but I find the Dutch oven to be the most reliable.
Using a Dutch Oven for Optimal Crust
Using a Dutch oven for baking golden semolina sourdough bread has truly been a revelation for me. The way the steam collects inside creates a beautiful crust that’s hard to replicate in other vessels. I remember the first time I pulled a loaf out of the oven, and the crust was crackling and golden. It was a moment of pride! I recommend preheating your Dutch oven along with your oven to ensure that it’s hot enough to encourage that lovely rise and crust formation. The results are well worth the extra effort! Read Interesting article: The Best Vegan Lemon Bars (Perfectly Tangy & Sweet)
Preparation Steps
Mixing the Dough
Now that we have our ingredients and equipment ready, it’s time to dive into the preparation steps. Mixing the dough is where the magic begins! I usually start by combining the semolina, all-purpose flour, and salt in a large mixing bowl. Then, I add the water and my sourdough starter. I find it helpful to use my hands to mix everything until it forms a shaggy dough. There’s something really satisfying about feeling the textures come together. Once everything is combined, I let it rest for a bit before moving on to the next step.
Autolyse Process
This part of the process is one of my favorites. During the autolyse, I let the dough rest for about 30 minutes after mixing. This allows the flour to absorb the water fully and helps develop gluten naturally. I’ve noticed that taking this extra time really improves the dough’s elasticity and texture. It’s a simple step, but it makes a big difference in the overall quality of the bread. While I wait, I enjoy the anticipation of what’s to come!
Bulk Fermentation
After the autolyse, I move on to bulk fermentation. I place the dough in a lightly oiled bowl and cover it with a kitchen towel. During this time, I typically let the dough rise for about 4-6 hours, depending on the room temperature. I like to perform stretch and folds every 30 minutes during the first couple of hours. It’s fascinating to watch how the dough evolves, becoming more elastic and airy with each passing fold. I’ve found that this step is essential for developing strength in the dough.
Shaping the Dough
Once bulk fermentation is complete, it’s time to shape the dough. I gently turn the dough out onto a floured surface and use my bench scraper to divide it into portions. I like to imagine the shape I want to achieve, whether it’s a round or oblong loaf. Shaping can feel a bit tricky at first, but I’ve learned that it’s all about being gentle yet firm. It’s a rewarding step because you can see how the dough holds its shape and starts to look like a proper loaf!
Final Proofing Techniques
After shaping, I let the dough proof again. I’ve tried various techniques, including proofing in a banneton or a bowl lined with a floured towel. The key is to cover it well to prevent it from drying out. I usually let it proof for another 1-2 hours at room temperature or overnight in the fridge if I want to slow down the fermentation. This step is where the flavors deepen, and the dough becomes even more airy. I can hardly wait to see how it’ll turn out when it’s time to bake!
Baking the Bread
Preheating the Oven
Baking golden semolina sourdough bread starts long before the dough goes in the oven. Preheating is crucial for achieving that perfect crust. I usually preheat my oven to around 450°F (232°C) at least 30 minutes before I’m ready to bake. During this time, I make sure my Dutch oven is also inside the oven. This allows it to heat up thoroughly, which is essential for creating steam when the dough is placed inside. I can’t stress how important this step is—having a hot baking surface sets the stage for a great loaf!
Scoring Techniques for a Beautiful Crust
Now, let’s talk about scoring. This step may seem small, but it’s one of my favorites because it’s where we get to be a bit artistic! Scoring the dough before baking allows for controlled expansion as the bread rises in the oven. I typically use a sharp blade or a lame to make shallow cuts on the surface of the dough. I’ve tried various patterns, from simple slashes to more intricate designs. Each time I pull the loaf out of the oven, I get excited to see how the scores open up and create a beautiful crust. It’s like revealing a hidden surprise!
Baking Time and Temperature Recommendations
After scoring, it’s time to carefully transfer the dough into the preheated Dutch oven. I find it helpful to lift the dough using the parchment paper to avoid any mishaps. Once inside, I cover it with the lid and place it back in the oven. I usually bake it covered for about 30 minutes to trap the steam, which helps create that lovely crust we all adore. After 30 minutes, I remove the lid and let it bake for an additional 15-20 minutes until it turns a deep golden brown. The aroma that fills my kitchen during this time is simply irresistible!
How to Know When It’s Done
Knowing when the bread is done can be tricky, but I’ve learned a few reliable methods. First, I like to check the color; a well-baked loaf should have a rich, golden-brown crust. I also tap the bottom of the loaf gently; it should sound hollow when it’s ready. If I’m ever in doubt, I use a digital thermometer to check the internal temperature, which should ideally be around 200°F (93°C) for sourdough. Once it’s done, I pull it out of the oven and let it cool on a wire rack. The cooling process is essential, as it allows the crumb to set properly, and the anticipation builds as I wait for that first slice!
Flavor and Texture Profile
The Nutty Flavor of Semolina
One of the most delightful aspects of golden semolina sourdough bread is its nutty flavor. Each bite has a subtle richness that my taste buds can’t get enough of. I remember serving this bread to friends, and their eyes would light up as they tasted it for the first time. The semolina brings a unique depth that pairs wonderfully with a variety of toppings, from simple butter to gourmet cheeses. I believe that this nutty flavor can elevate any meal, making it a versatile addition to our dining table.
Crust and Crumb: Achieving the Perfect Balance
The contrast between a crusty exterior and a soft, airy interior is what makes this bread truly special. I love that first bite where the crust gives way to the tender crumb. Achieving this balance requires care in both the mixing and baking processes. The steam created during baking helps form that crunchy crust, while the sourdough fermentation adds airiness to the inside. I’ve found that a well-baked loaf has a slight chew and a delightfully airy texture, making it perfect for sandwiches or simply enjoying with a spread!
Serving Suggestions and Pairings
Now, let’s talk about how to enjoy this amazing bread. One of my favorite ways is to slice it fresh and top it with a bit of olive oil and a sprinkle of sea salt. It’s simple, yet so satisfying. I’ve also enjoyed it with hearty soups or stews, where the crust can hold up to dipping. For something a bit fancier, I love making bruschetta with fresh tomatoes and basil or even using it as a base for a charcuterie board. The possibilities are endless, and I always feel excited to share this bread with family and friends, creating memorable meals around it.
Frequently Asked Questions
What is golden semolina sourdough bread?
Golden semolina sourdough bread is a type of bread made using semolina flour derived from durum wheat, which gives it a distinctive golden color and nutty flavor. It combines the unique texture of semolina with the tangy taste of sourdough fermentation.
What role does semolina play in this bread?
Semolina is a coarse flour that contributes to the bread’s unique nutty flavor and delightful texture. It contains gluten which helps in the structure of the bread, although it is less elastic than regular bread flour.
How does sourdough fermentation affect the bread?
The sourdough fermentation process introduces natural yeast and bacteria into the dough, helping it rise and adding complex flavors that develop over time. The longer the dough ferments, the more pronounced the sour notes become, balancing the nutty flavor of the semolina.
What are the essential ingredients for golden semolina sourdough bread?
The essential ingredients include semolina flour, all-purpose flour, water, salt, and a healthy sourdough starter. Each ingredient plays a crucial role in the final product.
Why is it important to choose high-quality semolina?
Choosing high-quality semolina is essential because it affects the texture and flavor of the bread. Higher quality durum semolina typically yields a better loaf with a lighter texture and improved taste.
What equipment is recommended for baking golden semolina sourdough bread?
Recommended equipment includes a mixing bowl, a bench scraper, a kitchen scale, a clean kitchen towel, and most importantly, a Dutch oven for baking. The Dutch oven helps create steam, which is vital for achieving a perfect crust.
What is the autolyse process?
The autolyse process involves letting the dough rest for about 30 minutes after mixing the ingredients. This allows the flour to fully absorb the water and helps develop gluten naturally, improving the dough’s elasticity and texture.
How can I tell when the sourdough bread is done baking?
To determine if the bread is done, check for a rich golden-brown crust, tap the bottom of the loaf (it should sound hollow), or use a digital thermometer to ensure the internal temperature is around 200°F (93°C).
What are some serving suggestions for golden semolina sourdough bread?
Serving suggestions include slicing the bread fresh and topping it with olive oil and sea salt, pairing it with hearty soups or stews, or using it for bruschetta or a charcuterie board. The nutty flavor makes it versatile for various toppings.
What makes the crust and crumb of this bread special?
The contrast between the crusty exterior and the soft, airy interior is what makes this bread special. The steam created during baking helps form a crunchy crust, while the fermentation process adds airiness to the inside, resulting in a satisfying texture.