
There’s something magical about the smell of fresh cinnamon rolls wafting through the kitchen. Now, imagine the delight of biting into a gooey, gluten-free version topped with creamy icing. Let’s dive into the world of gluten-free baking and create the perfect treat!
Understanding Gluten-Free Baking
What is Gluten and Why Go Gluten-Free?
Gluten is a protein found in wheat, barley, and rye. For many, gluten is harmless, but for those with celiac disease or gluten sensitivity, it can cause serious health issues. I remember when my friend first discovered she was gluten intolerant; she felt lost in the world of baking. I realized how common this situation is and wanted to help by exploring gluten-free options that are just as delicious as their traditional counterparts.
Going gluten-free means embracing a new way of cooking and baking that can feel daunting at first. However, once you find your rhythm and understand the available ingredients, it can be an exciting journey. From my experience, making gluten-free treats can open up a world of flavors and textures that are just waiting to be discovered.
Common Gluten-Free Flours and Their Properties
When it comes to gluten-free baking, the choice of flour is crucial. I’ve experimented with various gluten-free flours, and here are a few of my favorites:
- Almond Flour: This flour adds a wonderful nuttiness and moisture but can make baked goods denser.
- Coconut Flour: Absorbs a lot of liquid. I learned the hard way that using too much can lead to dry results, so it’s best used in combination with other flours.
- Brown Rice Flour: This is a great all-purpose flour that mimics the texture of regular flour quite well.
- Oat Flour: Made from ground oats, it adds a lovely flavor and texture. Just ensure you use certified gluten-free oats!
Mixing different flours is often the best approach. I’ve found that a blend of almond and brown rice flour gives a nice balance for cinnamon rolls, creating a soft, fluffy texture.
Challenges of Gluten-Free Baking
I won’t sugarcoat it: gluten-free baking comes with its challenges. One main issue is the lack of elasticity that gluten provides. This can lead to baked goods that are crumbly instead of soft and chewy. I remember the first time I made gluten-free bread; it turned out more like a brick than anything else!
Another challenge is ensuring that your baked goods rise properly. The right balance of leavening agents, like baking soda and baking powder, is essential. I’ve learned that sometimes adding an egg or using baking soda with vinegar can help achieve that lift. And, of course, the texture can differ from what you expect, but with practice, you can make delicious gluten-free treats. Read Interesting article: This Cinnamon Roll TikTok Trend Is My New Personality
Ingredients for Gooey Gluten-Free Cinnamon Rolls
Essential Ingredients Overview
Now that we’ve set the stage for gluten-free baking, let’s gather our ingredients for those gooey cinnamon rolls. I recommend using high-quality ingredients for the best results. Here’s a quick list of what we need:
- Gluten-free flour blend
- Active dry yeast
- Milk (or a dairy-free alternative)
- Eggs
- Butter (or coconut oil)
- Brown sugar
- Cinnamon
- Salt
Having everything prepped makes the process smoother. I usually lay out my ingredients on the counter, and it creates such a comforting atmosphere to begin baking.
Gluten-Free Flour Options
When it comes to the gluten-free flour blend, I’ve had the best luck with a mix that includes almond, brown rice, and tapioca flour. This combination gives a soft texture without sacrificing flavor. You can also find pre-made gluten-free blends in stores, which can be a huge time-saver. Just make sure they don’t contain any added gums unless you know you want that extra binding.
Sweeteners: Brown Sugar vs. Coconut Sugar
For sweetening our cinnamon rolls, I often use brown sugar. It not only adds sweetness but also that lovely caramel flavor that complements cinnamon beautifully. However, if you’re looking for a healthier alternative, coconut sugar is a great option. It has a lower glycemic index and a rich flavor. I’ve tried both, and while I lean towards brown sugar for texture, coconut sugar can be a fantastic substitute.
Spices: The Role of Cinnamon
Cinnamon is the star of this show. I can’t stress enough how important it is to use fresh, high-quality cinnamon. I’ve noticed a huge difference in flavor when I switched to freshly ground cinnamon. The warmth and aroma it provides as the rolls bake are simply irresistible. I usually add a bit more than the recipe calls for because, let’s be honest, can we ever have too much cinnamon?
Making Cream Cheese Icing: Ingredients Required
Now, what’s a cinnamon roll without cream cheese icing? I love making my icing with just a few simple ingredients: cream cheese, powdered sugar, vanilla extract, and a splash of milk. The creaminess balances out the sweetness and pairs perfectly with the cinnamon rolls. I usually whip it up while the rolls are baking so it’s ready to drizzle when they come out of the oven.
As we dive deeper into the recipe, you’ll see how these ingredients come together to create a cozy treat that’s perfect for any occasion. I can’t wait to share the step-by-step process with you next!
Step-by-Step Recipe for Gluten-Free Cinnamon Rolls
Preparing the Dough
Let’s get into the fun part: making the dough! First, I always start by activating the yeast. In a small bowl, I combine warm milk (or my dairy-free alternative) with a bit of sugar and the active dry yeast. I let it sit for about 5-10 minutes until it becomes frothy. This step is crucial; it means your yeast is alive and ready to do its job! I remember the first time I skipped this step, and my dough didn’t rise at all—it was a learning moment for sure!
While the yeast is doing its thing, I mix my gluten-free flour blend with salt in a large bowl. I find that it’s helpful to whisk it together to ensure an even distribution. Once the yeast is ready, I add it along with the eggs and melted butter (or coconut oil) to the flour mixture. I usually use a spatula at first to combine everything, then switch to my hands to knead it. The dough will be a bit stickier than traditional dough, but that’s perfectly okay. I’ve learned that adding a bit of extra flour as needed can help manage the stickiness without overdoing it.
Rolling and Shaping the Cinnamon Rolls
After kneading the dough, I let it rise in a warm place until it doubles in size, which usually takes about an hour. This step is so rewarding! Once the dough has risen, I lightly flour my work surface with some gluten-free flour and gently roll it out into a rectangle, about ¼ inch thick. I love this part; it’s where the magic begins!
Next comes the filling. I melt some butter and spread it evenly over the rolled-out dough. Then, I sprinkle a generous amount of brown sugar and cinnamon mix over the butter. The aroma of cinnamon fills my kitchen, creating an atmosphere that’s just so cozy. I always think to myself, “Can it get better than this?” After that, I carefully roll the dough from one end to the other, forming a tight log. Once it’s all rolled up, I slice it into equal pieces—usually about 1 to 1.5 inches thick. Using a sharp knife or a string helps to keep the swirls intact, which I’ve learned the hard way can be a bit tricky!
Making the Filling: Tips for Perfect Swirls
To make the perfect filling, I often mix together brown sugar, cinnamon, and a dash of nutmeg for an extra layer of flavor. I’ve found that adding a touch of vanilla extract to the butter before spreading it on the dough gives it a lovely depth. When sprinkling the sugar mixture, I try to ensure it’s distributed evenly, so each bite of cinnamon roll is bursting with flavor. I’ve noticed that if I’m a little heavy-handed, it can get too sweet, so balance is key.
Baking Instructions
Once the rolls are shaped, I place them in a greased baking dish, giving them a little space to rise again. Covering them with a towel, I let them sit for about 30 minutes while the oven preheats to 350°F. The second rise is essential for that fluffy texture. I’ve made the mistake of skipping this step a few times, and I can tell you, patience pays off!
After they’ve puffed up nicely, I pop them in the oven. The smell of cinnamon and sugar wafting through the house is truly heavenly. I typically bake them for about 25-30 minutes, or until they’re golden brown. I’ve learned to keep an eye on them toward the end, as oven temperatures can vary. It’s so satisfying to see them rise beautifully and turn that lovely golden hue!
How to Know When They’re Done
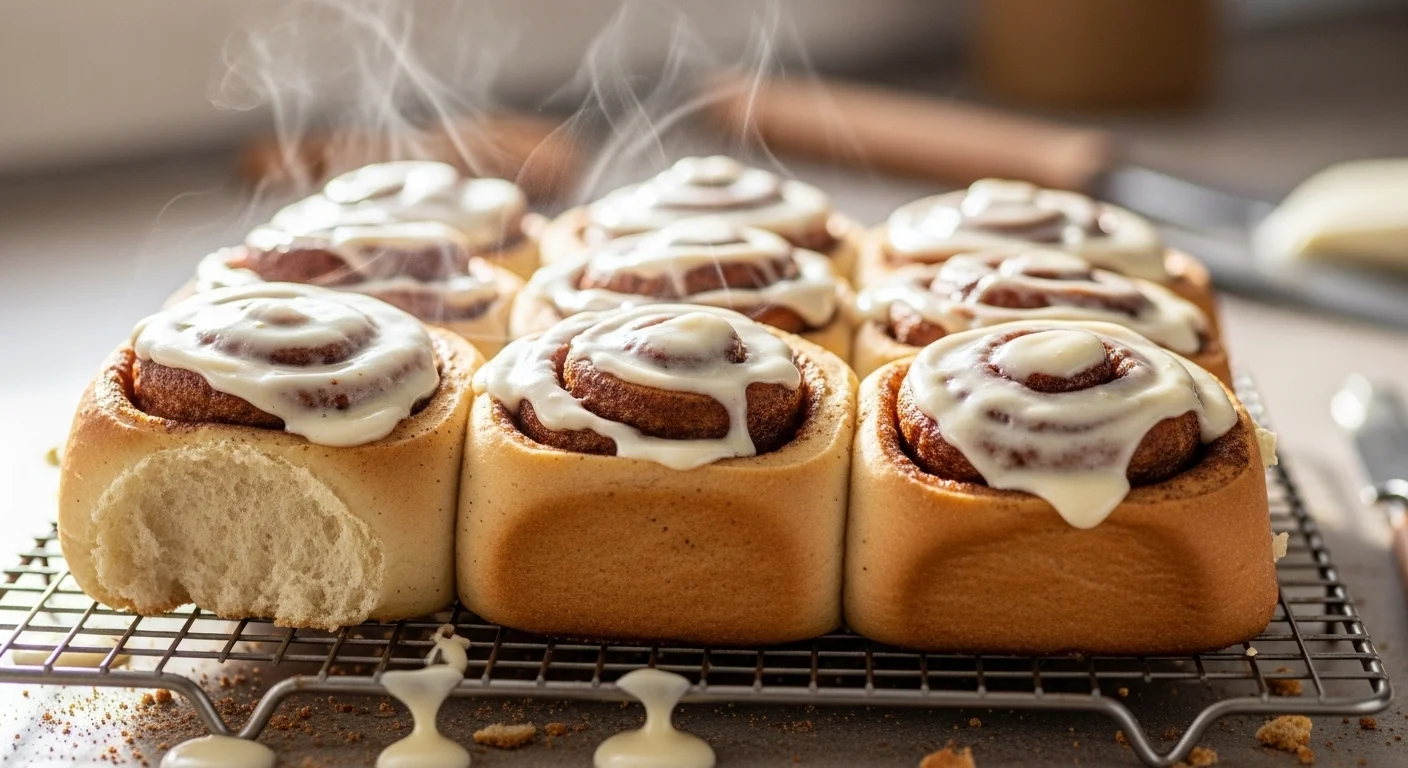
To tell if my cinnamon rolls are done, I look for a golden-brown top and a slight spring when I gently press them. I also love it when the edges start to pull away from the sides of the pan. The internal temperature should reach about 190°F when they’re fully cooked. If you have a kitchen thermometer, it can be a friendly tool! I can’t wait to pull them out of the oven and let them cool slightly before drizzling that delicious cream cheese icing on top. Trust me; this is the moment we’ve all been waiting for!
Next up, we’ll whip up that irresistible cream cheese icing that takes these cinnamon rolls to another level. I’m looking forward to sharing the secrets behind the perfect icing with you!
Preparing Cream Cheese Icing
Mixing Ingredients for the Perfect Icing
Now that our cinnamon rolls are perfectly baked and tempting, let’s talk about that creamy icing that will take them to the next level. Making cream cheese icing is one of my favorite parts of this whole process. I start with room-temperature cream cheese because it blends more smoothly. I usually take it out of the fridge about 30 minutes before I need it to soften up.
In a mixing bowl, I add about 8 ounces of cream cheese and 4 cups of powdered sugar. I love the sweetness that powdered sugar brings, and it dissolves so nicely. Then, I toss in a teaspoon of vanilla extract for that lovely, warm flavor. To help with the consistency, I also add a splash of milk—about 2 tablespoons usually does the trick. It’s amazing how these simple ingredients come together to create something so delicious!
Using an electric mixer, I whip everything together on medium speed until it’s smooth and fluffy. This is where the magic happens! I often find myself sneaking a taste or two during the mixing process—who can resist? If it’s too thick, I’ll add a tiny bit more milk until I achieve that perfect drizzle consistency. Just keep in mind, you don’t want it to be too runny or it’ll slide right off those beautiful rolls!
Adjusting Consistency and Flavor
If you want to get a little creative, you can easily adjust the icing to suit your taste. For a tangier flavor, I sometimes add a bit more cream cheese. I’ve also played around with incorporating different extracts, like almond or maple, for a unique twist. The key is to keep tasting as you go! I remember the first time I made it with a splash of orange juice instead of milk—it added a delightful citrus note that paired perfectly with the cinnamon.
If you prefer a lighter icing, consider reducing the cream cheese and adding more milk or even some Greek yogurt. The Greek yogurt creates a slightly tangy flavor, which I find complements the sweetness of the rolls beautifully. It’s all about finding that balance that works for you, and I genuinely enjoy experimenting with different flavors and textures.
Alternative Icing Recipes
Sometimes, I like to switch things up and try different icing options. A simple glaze made with powdered sugar and milk can be a great alternative if you’re looking for something lighter. To make it, I just whisk together 1 cup of powdered sugar with 2-3 tablespoons of milk until smooth. If you want to add a little flavor, vanilla or almond extract can be a nice touch.
Another favorite of mine is a caramel icing. I’ve learned to make a quick caramel sauce by melting butter and brown sugar in a saucepan, then stirring in some cream. It creates a rich, buttery topping that pairs wonderfully with cinnamon rolls. Just drizzle it on while it’s warm, and watch everyone’s eyes light up!
Lastly, for those who want to keep things even simpler, I’ve made a delicious dairy-free icing using coconut cream. I scoop the solid part from a can of coconut milk and whip it with powdered sugar and a dash of vanilla. It’s smooth, creamy, and adds a lovely coconut flavor that pairs nicely with the cinnamon.
Now, once your icing is ready, let’s drizzle it over those warm cinnamon rolls. I usually wait just a few minutes after they come out of the oven. It melts slightly into the rolls, creating that dreamy, gooey texture we all crave. Trust me, this is the moment you’ll want to capture on camera because it’s just so satisfying!
Serving Suggestions and Variations
How to Serve Cinnamon Rolls Warm
Serving warm cinnamon rolls is all about enhancing that delightful experience. I’ve found that they taste their best when served right out of the oven, still warm and gooey. Sometimes, I’ll place them on a large serving platter, drizzling the cream cheese icing generously over the top. It’s such a showstopper!
To add a little flair, I like to sprinkle some chopped nuts or even a light dusting of cinnamon on top just before serving. I remember one weekend brunch where I set my rolls on the table alongside fresh fruit and coffee; it created such a cozy, inviting atmosphere. Everyone couldn’t wait to grab one!
Flavor Variations: Adding Nuts or Raisins
If you want to get creative with flavors, there are all sorts of variations you can try! One of my favorites is adding chopped walnuts or pecans to the filling. The nutty crunch complements the soft rolls beautifully. I usually sprinkle about half a cup of nuts over the cinnamon-sugar mixture before rolling it up. It adds an extra texture that I just love.
Another delightful addition is raisins or even dried cranberries. I’ve found that soaking them in warm water or even a splash of rum for about 15 minutes plumps them up nicely, making them juicy and flavorful. Just sprinkle them into the filling along with the brown sugar and cinnamon. It’s amazing how something so simple can elevate the entire flavor profile!
Gluten-Free Cinnamon Roll Casserole Option
If you’re hosting a brunch or a gathering, consider turning your cinnamon rolls into a casserole! Instead of rolling them up, simply cut the dough into smaller pieces and layer them in a greased baking dish. Then, pour a mixture of eggs, milk, and vanilla over the top before baking. I’ve made this for gatherings, and it’s always a hit! It’s like a giant, shareable cinnamon roll that everyone can enjoy. Read Interesting article: I Tried the Trending Veg Omelette Wrap and It’s Genius
To finish it off, drizzle the cream cheese icing over the top once it’s out of the oven. It creates such a beautiful presentation, and it’s perfect for serving a crowd. I’ve often found that this option is not only easier but also gives everyone a chance to dig in and enjoy the deliciousness without the fuss of individual rolls!
Frequently Asked Questions
What is gluten and why should someone consider going gluten-free?
Gluten is a protein found in wheat, barley, and rye. While it is harmless for many, it can cause serious health issues for those with celiac disease or gluten sensitivity. Going gluten-free can feel daunting at first, but it opens up a world of flavors and textures in baking.
What are some common gluten-free flours and their properties?
Some common gluten-free flours include almond flour, which adds nuttiness and moisture; coconut flour, which absorbs a lot of liquid; brown rice flour, which mimics the texture of regular flour; and oat flour, which adds flavor and texture. Mixing different flours is often beneficial for achieving the desired texture in baked goods.
What are the challenges of gluten-free baking?
Gluten-free baking can be challenging due to the lack of elasticity that gluten provides, leading to crumbly baked goods. Ensuring proper rising with the right balance of leavening agents is also crucial. With practice, however, one can learn to make delicious gluten-free treats.
What essential ingredients are needed for gluten-free cinnamon rolls?
The essential ingredients for gluten-free cinnamon rolls include a gluten-free flour blend, active dry yeast, milk (or a dairy-free alternative), eggs, butter (or coconut oil), brown sugar, cinnamon, and salt.
How can I make cream cheese icing for cinnamon rolls?
To make cream cheese icing, combine room-temperature cream cheese, powdered sugar, vanilla extract, and a splash of milk in a mixing bowl. Use an electric mixer to whip everything together until smooth and fluffy, adjusting the consistency with more milk if necessary.
What are some flavor variations for cinnamon rolls?
Flavor variations for cinnamon rolls can include adding chopped nuts like walnuts or pecans to the filling, or incorporating raisins or dried cranberries that have been soaked in warm water or rum to make them juicier.
What is a gluten-free cinnamon roll casserole option?
A gluten-free cinnamon roll casserole involves cutting the dough into smaller pieces and layering them in a greased baking dish, then pouring a mixture of eggs, milk, and vanilla over the top before baking. This method is great for serving a crowd.
How can I tell when my cinnamon rolls are done baking?
Cinnamon rolls are done when they have a golden-brown top, spring back slightly when pressed, and the edges start to pull away from the sides of the pan. The internal temperature should reach about 190°F.
Can I use coconut sugar instead of brown sugar in cinnamon rolls?
Yes, coconut sugar can be used as a healthier alternative to brown sugar in cinnamon rolls. It has a lower glycemic index and offers a rich flavor, making it a great substitute.
How should I serve gluten-free cinnamon rolls for the best experience?
For the best experience, serve gluten-free cinnamon rolls warm right out of the oven, drizzled with cream cheese icing. Adding chopped nuts or a dusting of cinnamon can enhance the presentation and flavor.