
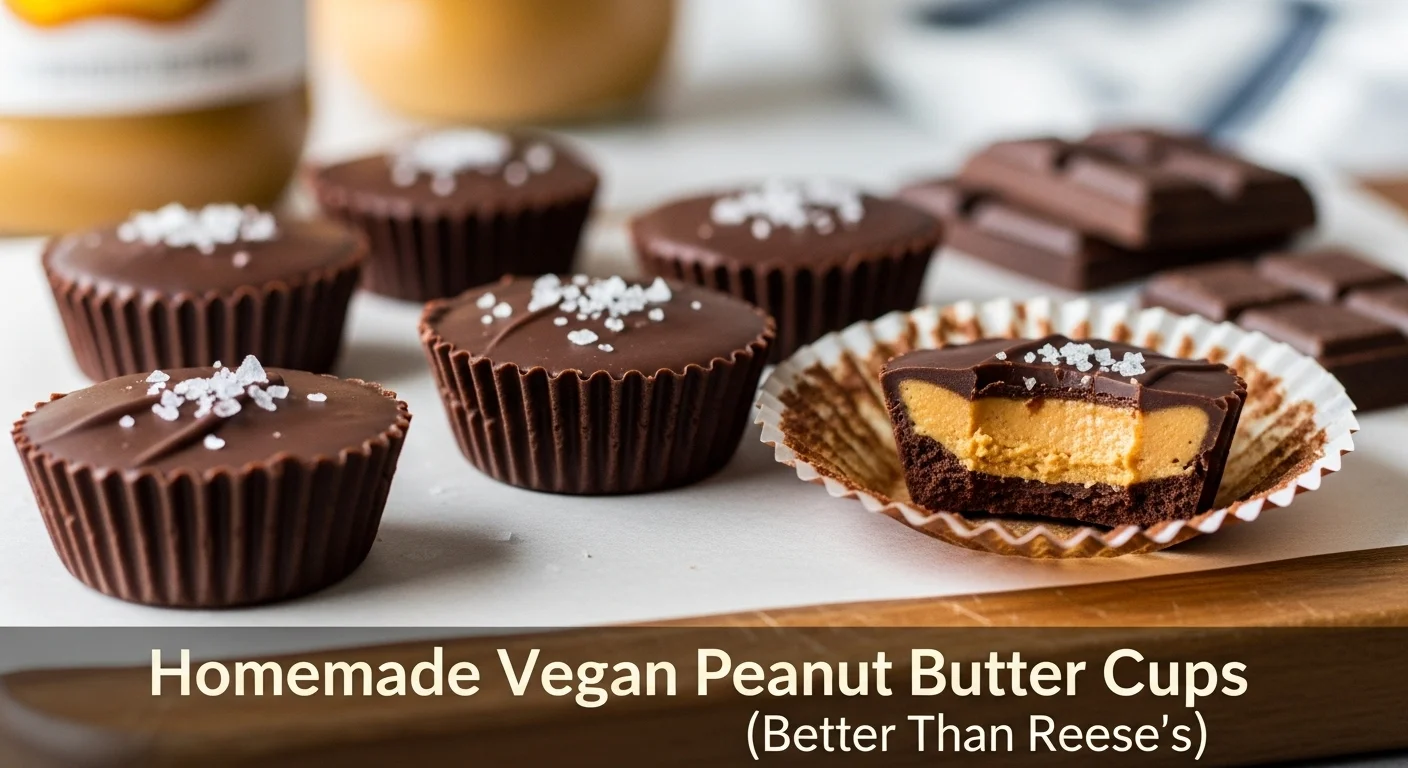
Imagine sinking your teeth into a creamy, sweet, and nutty treat that makes your taste buds dance. Now, imagine that it’s homemade, vegan, and healthier than those store-bought options. Let’s dive into how to create delicious vegan peanut butter cups that are better than Reese’s!
Why Choose Homemade Vegan Peanut Butter Cups?
When I first made the switch to a vegan lifestyle, I found myself longing for the flavors I grew up with—especially those classic peanut butter cups. I decided to take matters into my own hands and create a version that not only satisfied my cravings but also aligned with my health goals. Here’s why I believe homemade vegan peanut butter cups are the way to go.
Health Benefits of Vegan Ingredients
One of the biggest reasons I opted for homemade vegan treats is the health benefits. Store-bought options often contain preservatives, artificial flavors, and unhealthy fats. When I started making my own peanut butter cups, I could control exactly what went into them. Instead of refined sugars, I could use natural sweeteners like maple syrup or coconut sugar. I felt great knowing I was using high-quality ingredients. For instance, natural peanut butter is not just delicious; it’s rich in protein, healthy fats, and essential vitamins. I noticed a significant improvement in my energy levels and felt satisfied without the crash that often follows sugary snacks. Read Interesting article: Easy No-Bake Vegan Cookies (With Oats & Chocolate)
Cost-Effectiveness Compared to Store-Bought
Another benefit I discovered was the cost-effectiveness of making my own treats. While the initial investment in ingredients may seem higher, I realized that I could make multiple batches of peanut butter cups for far less than the price of a single box at the store. I calculated the cost per cup, and it blew my mind! It was a win-win—healthier and more budget-friendly. Plus, making them at home allows me to experiment with different flavors and quantities, so I never get bored!
Customization Options for Dietary Needs
One of the most exciting aspects of creating my own vegan peanut butter cups is the ability to customize them to fit various dietary needs. For example, if I have friends over who are gluten-free, I can easily ensure that all the ingredients I use are safe for them. I can also adjust the sweetness to my liking—sometimes I crave a sweeter treat, while other times I want something less sugary. Being able to control the ingredients meant I could cater to different tastes and preferences, making it a fun experience for everyone involved.
Ingredients You’ll Need
Now that we’ve explored why making homemade vegan peanut butter cups is such a great idea, let’s talk about the ingredients you’ll need. I remember the first time I gathered everything; it felt like preparing for a mini adventure in my kitchen!
Vegan Chocolate Options
The star of the show is, of course, the chocolate. I found that there are several vegan chocolate options available, from dark chocolate chips to cocoa powder. My personal favorite is using high-quality dark chocolate chips, which melt beautifully and give the cups a rich flavor. Just make sure to read the labels to confirm they’re dairy-free. I’ve tried different brands, and I recommend looking for brands that use minimal ingredients.
Natural Peanut Butter: Types and Brands
When it comes to peanut butter, the options are endless! I often gravitate towards natural peanut butter that contains only peanuts and maybe a hint of salt. I’ve experimented with various brands, and I’ve found that the texture can vary a lot. Some are smoother, while others are chunkier. Both work great, but I prefer the smooth variety for a creamier filling. It’s essential to choose one that suits your taste and preference.
Sweeteners: Coconut Sugar vs. Maple Syrup
Selecting the right sweetener can make a world of difference in your peanut butter cups. I’ve used both coconut sugar and maple syrup, and each brings its unique flavor. Coconut sugar has a caramel-like taste that I enjoy, while maple syrup adds a lovely, natural sweetness. The choice often comes down to what I have on hand, but I find that both work beautifully in my recipes! Read Interesting article: Fluffy Vegan Banana Muffins (A One-Bowl Recipe)
Additional Flavorings: Sea Salt, Vanilla Extract, etc.
To elevate the flavor of my homemade cups, I love adding a pinch of sea salt or a splash of vanilla extract. Sea salt enhances the sweetness and gives that perfect sweet-and-salty balance that I crave. Vanilla extract adds depth to the flavor, making my peanut butter cups taste even more indulgent. These little extras might seem small, but they truly make a huge difference in the final product.
Step-by-Step Recipe for Homemade Vegan Peanut Butter Cups
Now that we have all our ingredients gathered, it’s time to roll up our sleeves and get to work! I remember how satisfying it felt to transform simple ingredients into something delicious. This step-by-step guide will help you create your own vegan peanut butter cups effortlessly. Let’s dive in!
Preparation: Tools and Equipment
Before starting, let’s make sure we have all the tools we need. Here’s a list of what I find helpful when making my peanut butter cups:
- Mixing bowls: I usually use one for the chocolate and another for the peanut butter filling.
- Double boiler or microwave-safe bowl: This is essential for melting the chocolate smoothly. I often use a glass bowl over a pot of simmering water, but a microwave works just as well.
- Silicone molds or cupcake liners: These will shape our cups. I prefer silicone molds because they make it easy to pop the cups out once set.
- Spatula: This helps with mixing and spreading the chocolate and peanut butter.
- Measuring cups and spoons: Precision is key in baking, so I always measure my ingredients carefully.
Once I have everything ready, I feel more organized and excited to start the process!
Making the Chocolate Shell
The first step is creating the chocolate shell. I love this part because the aroma of melting chocolate is heavenly! Here’s how I do it:
- Start by breaking your vegan chocolate into small pieces and placing them in your double boiler or microwave-safe bowl.
- If using a double boiler, heat the water to a gentle simmer. Stir the chocolate as it melts until it becomes smooth and glossy. If you’re using a microwave, heat in short bursts of about 20-30 seconds, stirring in between until melted.
- Once the chocolate is fully melted, I usually let it cool for a minute or two to avoid burning my fingers when spreading it into the molds.
- Using a spoon or a small spatula, scoop the melted chocolate into your molds, coating the bottom and a bit up the sides. Aim for a nice even layer. I typically like to make the shell about a quarter-inch thick, but you can adjust this based on your preference.
Preparing the Peanut Butter Filling
While the chocolate is setting in the fridge, it’s time to prepare the peanut butter filling. This part is so easy and fun! Here’s what I like to do:
- In a mixing bowl, add your natural peanut butter. If it’s too thick, I sometimes warm it slightly in the microwave to make it easier to mix.
- Add your sweetener (either coconut sugar or maple syrup) to the peanut butter. I usually go with two tablespoons of sweetener, but you can adjust according to your taste.
- Mix in a pinch of sea salt and any additional flavorings—like a splash of vanilla extract—until everything is combined. The filling should be creamy and slightly sweet. I often taste it at this stage to ensure it’s just right!
Assembling the Cups
Now comes the fun part—assembling our cups! I always feel a sense of accomplishment at this stage. Here’s how I do it:
- Take the molds out of the fridge, where the chocolate should be somewhat firm but not completely hard.
- Using a spoon, scoop a dollop of the peanut butter filling into each chocolate shell. I usually try to keep it centered and leave a little space at the top for more chocolate.
- Once all the cups have their filling, it’s time to cover them with the remaining melted chocolate. I pour a bit on top of each one, spreading it to encapsulate the peanut butter filling completely.
Cooling and Setting Instructions
After assembling the cups, I place them back in the fridge to cool and set. I typically let them chill for about 30 minutes, but sometimes I get impatient and take them out a bit early! When they’re firm to the touch, I know they’re ready.
Once they’re set, I carefully pop them out of the molds. If you used silicone molds, you might find it’s super easy. I can’t wait to take that first bite of my homemade vegan peanut butter cups—it’s such a rewarding feeling to know I made them from scratch!
Tips for Perfecting Your Vegan Peanut Butter Cups
Now that I’ve shared how to create those delicious vegan peanut butter cups, I thought it would be helpful to talk about some tips that have really made a difference for me in perfecting the process. I’ve learned a lot through trial and error, and I’m excited to share what works best!
Avoiding Common Mistakes
When I first started making these cups, I made a few mistakes that I learned from. One of the biggest things I noticed was the importance of properly melting the chocolate. If it’s overheated, it can seize up and become grainy. I recommend melting it slowly, either in a double boiler or in short bursts in the microwave, stirring frequently. Another mistake I made was not letting the chocolate cool slightly before adding the filling. If the chocolate is too hot, it can melt the peanut butter filling, making a mess of your beautiful cups! Trust me, allowing the chocolate to cool for a couple of minutes before assembling will save you a lot of trouble.
Another tip is to make sure you’re using the right ratio of chocolate to peanut butter filling. I experimented with different amounts, and I found that a thicker chocolate shell leads to a more satisfying bite. For me, a quarter-inch thickness for the shell works perfectly, but you can adjust it based on your preference. If you find the filling too sweet, consider reducing the amount of sweetener in the filling. I’m all about balancing flavors, so I often taste as I go!
Storage Tips for Freshness
After all the hard work of making these treats, you’ll want to ensure they stay fresh and delicious. I usually store my vegan peanut butter cups in an airtight container in the fridge. They last for about a week, but I can assure you they rarely stick around that long in my house! If you want to keep them longer, you can also freeze them. Just make sure to layer them with parchment paper so they don’t stick together. When I’m craving something sweet, I love pulling a couple out of the freezer and letting them sit for a few minutes to soften. It’s like having a little sweet treat ready whenever I want!
Serving Suggestions and Pairings
When it comes to enjoying these peanut butter cups, I’ve found that presentation and pairings can elevate the experience even more. Sometimes, I like to serve them on a beautiful plate with fresh fruit or a sprinkle of sea salt on top. It adds a nice touch! They also pair wonderfully with a cup of herbal tea or a glass of almond milk. I’ve even crumbled a few on top of nice cream for a decadent dessert. The options are endless, and it’s all about what you enjoy most.
Another fun idea is to get creative with toppings. I’ve drizzled melted chocolate or even a bit of peanut butter on top after they’ve set for an extra layer of flavor. You could also roll them in crushed nuts or shredded coconut before they harden for a fun twist. These little details always make the experience feel special!
Variations to Try
If you’re feeling adventurous, I encourage you to try some variations! This is one of the most exciting parts of making your own treats. I have experimented with a few different twists on my classic recipe that I think you’ll love.
Nut-Free Options: Using Sunflower Seed Butter
For those who have nut allergies or just want to try something different, sunflower seed butter is an excellent alternative. I remember the first time I swapped out peanut butter for sunflower seed butter; it gave the cups a unique flavor that was just as satisfying. Just make sure to adjust the sweetness since sunflower seed butter can have a different taste compared to peanuts. This way, everyone can enjoy a delicious treat, regardless of dietary restrictions!
Flavor Infusions: Adding Coconut or Almond Extract
If you want to enhance the flavor of your peanut butter cups, consider adding a drop or two of coconut or almond extract to the peanut butter filling. I’ve found that almond extract adds a lovely warmth and richness that pairs beautifully with chocolate. Coconut extract brings a tropical twist! Experimenting with these flavors turned my peanut butter cups into a delightful surprise each time.
Alternative Sweeteners for Health-Conscious Bakers
For those looking to switch it up even further, you can try using alternative sweeteners like agave syrup or stevia. I’ve used agave in a pinch, and it blends well with the peanut butter. Just be mindful of how sweetening agents interact with the other ingredients, as some may require further adjustments in the recipe. It’s all about finding what works best for your taste and health preferences!
Frequently Asked Questions (FAQs)
Can I Use Different Types of Nut Butters?
Absolutely! One of the joys of making homemade vegan peanut butter cups is the flexibility to experiment with different nut butters. While I tend to stick with peanut butter for that classic taste, I’ve also tried almond butter and cashew butter. Each nut butter brings its own unique flavor and texture. I remember the first time I used almond butter; it added a lovely, slightly sweet note that paired beautifully with the chocolate. Just make sure the nut butter you choose is natural and free from added sugars or oils for the best results.
How Long Do Homemade Vegan Peanut Butter Cups Last?
After all the hard work, I know it’s important to keep track of how long we can enjoy our treats! Typically, I’ve found that homemade vegan peanut butter cups last about a week in the fridge when stored in an airtight container. However, they rarely last that long in my house! If you want them to last longer, freezing is a great option. They can stay fresh in the freezer for up to three months. Just make sure to layer them with parchment paper so they don’t stick together, and you’ll be all set for future cravings!
Can I Make These Gluten-Free?
Definitely! The beauty of homemade vegan peanut butter cups is that you can tailor them to fit various dietary needs, including gluten-free options. Just be mindful of the ingredients you’re using. Most chocolate chips and natural nut butters are gluten-free, but always check the labels to ensure there’s no cross-contamination. I often use gluten-free cupcake liners or silicone molds to keep everything safe for my gluten-sensitive friends. It’s a simple way to make sure everyone can enjoy these delicious treats!
What If I Don’t Have Molds?
If you find yourself without molds, don’t worry! I’ve been there too, and there are plenty of creative alternatives. You can use a mini muffin tin lined with paper liners or even an ice cube tray to make smaller bites. Just make sure to adjust the amount of chocolate and filling accordingly, as the size may vary. I’ve even used a baking dish to create a large slab of peanut butter cups, which I then cut into squares. It’s all about improvising with what you have on hand!
Final Thoughts
Making homemade vegan peanut butter cups has truly been a rewarding experience for me. Not only do I get to enjoy a delicious treat that satisfies my cravings, but I also know exactly what I’m putting into my body. The journey of perfecting my recipe has taught me about the importance of quality ingredients, creativity in the kitchen, and the joy of sharing these treats with friends and family.
Whether you’re indulging in them yourself or sharing with loved ones, I hope you find as much joy in making and enjoying these vegan peanut butter cups as I have. Remember, the kitchen is all about experimentation and fun, so don’t hesitate to make these treats your own with different flavors and variations. Happy cooking! Read Interesting article: Easy Vegan Rice Krispie Treats (A 3-Ingredient Classic)