
If you’re looking to celebrate Mardi Gras with a delicious, gluten-free twist on a classic treat, making a gluten-free King Cake is a fantastic idea! This delightful cake not only honors tradition but also ensures everyone can enjoy a slice.
Understanding King Cake: A Mardi Gras Tradition
King Cake has become synonymous with Mardi Gras celebrations, particularly in New Orleans. I remember the first time I tasted it—soft, sweet dough adorned with vibrant icing and sugars, each bite bursting with a festive spirit. But there’s so much more to this cake than just its delicious flavor. It’s steeped in history and cultural significance that I find fascinating.
History of King Cake
The origins of King Cake can be traced back to ancient Rome and the celebration of Epiphany. It was traditionally a way to mark the arrival of the Three Wise Men to see the baby Jesus. Over the years, this cake evolved into what we now associate with Mardi Gras. I learned that in New Orleans, King Cake is more than just a dessert; it’s a symbol of community and festivity. Each year, from Epiphany to Fat Tuesday, bakeries and homes across the city create beautiful versions of this cake, each with its unique flair.
During my first Mardi Gras celebration, I joined friends at a local bakery where the air was filled with the smell of freshly baked cakes. I felt a sense of unity and excitement as we shared slices and stories. It’s this sense of togetherness that makes King Cake so special. In our case, sharing the cake often leads to friendly competition about who finds the baby figurine hidden inside!
Significance of the Baby Figurine
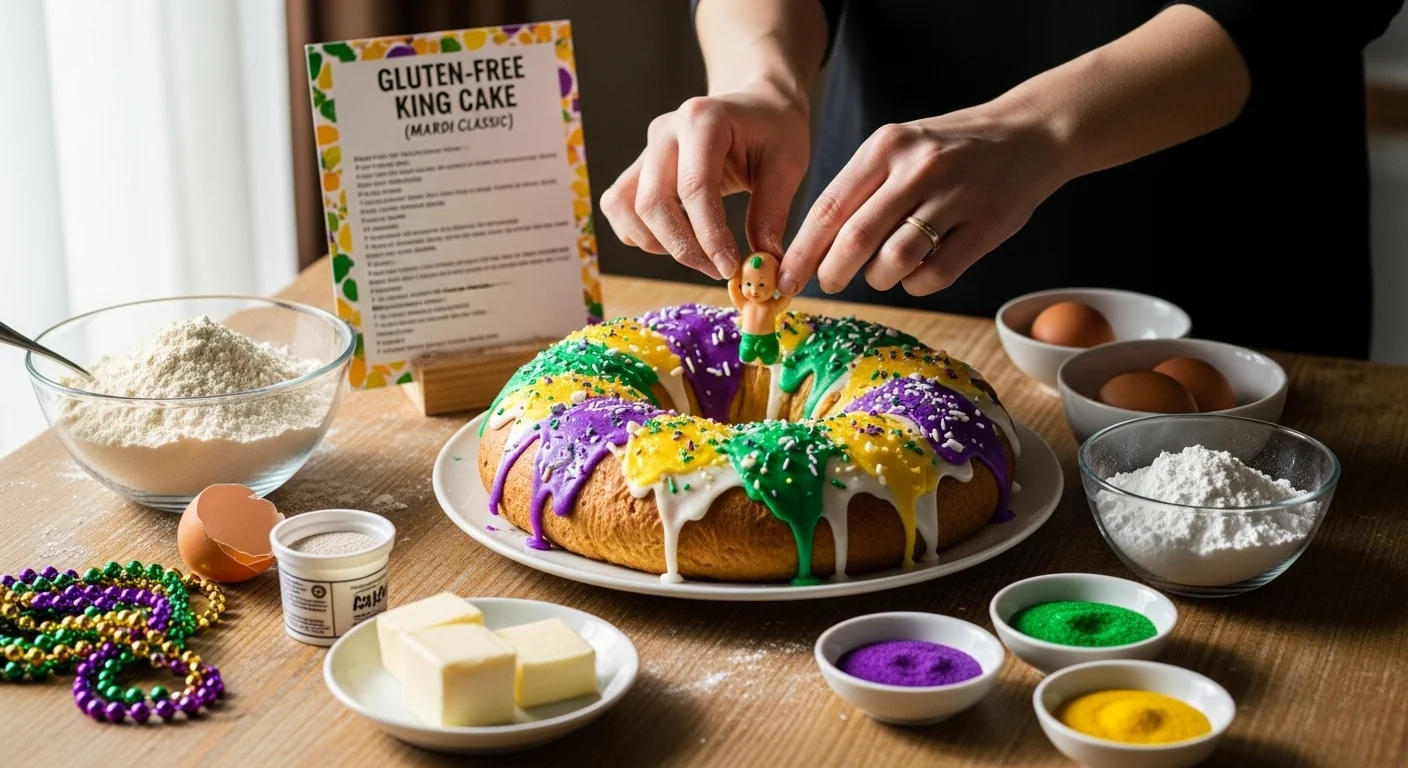
If you’ve ever seen a King Cake, you probably noticed the tiny baby figurine tucked inside. The tradition is that whoever finds the baby is king or queen for the day and must host the next King Cake party. I remember the thrill of digging through the cake at a party, hoping to find the little plastic baby. It added an element of fun and surprise to our gatherings. There’s something magical about the idea of a simple cake bringing people together, making each slice an adventure.
Traditional Ingredients vs. Gluten-Free Alternatives
Traditionally, King Cake is made with all-purpose flour, sugar, eggs, milk, and a variety of spices, often flavored with cinnamon or vanilla. However, for those of us who need to avoid gluten, it’s essential to find suitable alternatives without sacrificing flavor or texture. My journey to create a gluten-free version was an exciting challenge.
When I first tried to make a gluten-free King Cake, I was unsure how to replicate the soft, fluffy texture. I realized that using a blend of gluten-free flours was key. I decided to experiment with almond flour, coconut flour, and gluten-free all-purpose flour blends. I found that each type brought a different texture and taste to the cake. By mixing these together, I could achieve that delightful consistency while keeping the cake light and airy.
Additionally, sweeteners play a big role in flavor. Traditional recipes often call for white sugar, but I’ve found that using a mix of coconut sugar and honey can enhance the depth of flavor while still being gluten-free. My favorite combination includes brown sugar, which adds a hint of caramel flavor, perfect for those rich, festive vibes.
Finally, don’t forget the spices! Cinnamon is a must for that classic King Cake flavor, but I also like to sneak in a bit of nutmeg for warmth. When it comes to the toppings, colors are everything! The vibrant purple, green, and gold icing not only makes for a stunning presentation but also emphasizes the fun and festive spirit of Mardi Gras.
Essential Gluten-Free Ingredients for King Cake
Gluten-Free Flour Options
Finding the right gluten-free flour is crucial for a successful King Cake. I recommend using a blend that contains a mix of gluten-free flour, starches, and xanthan gum to replicate the elasticity of traditional dough. One of my favorite combinations is a pre-mixed gluten-free flour that contains brown rice flour, potato starch, and tapioca flour. This blend creates a light and fluffy cake that holds together beautifully.
Sweeteners and Flavorings
As I mentioned, sweeteners play a significant role in the flavor profile of the cake. Coconut sugar not only adds sweetness but also brings a lovely caramel note. Honey or maple syrup can be great alternatives if you prefer a more natural sweetener. Don’t forget to include vanilla extract! I always add a splash for that warm, comforting flavor that complements the spices. The Easiest Gluten-Free Crepes (Perfect Every Time) is another great recipe that utilizes these ingredients!
Yeast and Rising Agents
Using yeast is essential for the traditional texture of King Cake. I usually opt for active dry yeast. When I first started baking gluten-free, I was a bit intimidated by yeast, but I learned that proofing it correctly is key. I mix it with warm water and a bit of sugar and let it sit until bubbly. This step ensures that my dough rises beautifully, resulting in a cake that is soft and airy.
Colorful Toppings: Icing and Sprinkles
The icing and sprinkles are what make the King Cake visually stunning! I like to prepare a simple icing using powdered sugar and a splash of milk or water, adding food coloring to create the signature Mardi Gras colors. To top it off, I sprinkle coarse sugar over the icing for that festive crunch. Each bite is not just a treat for the taste buds but also a feast for the eyes!
Preparation Steps for Gluten-Free King Cake
Step 1: Preparing the Dough
Getting the dough right is a crucial step in making a gluten-free King Cake. I start by gathering all my ingredients together. It’s much easier to work this way, and I feel more organized. I mix the gluten-free flour blend with sugar, salt, and my spices in a large bowl. Then, I take a moment to warm up some milk and melt a bit of butter—just enough to make the mixture cozy and inviting. I usually let the milk cool slightly before adding my yeast. This is where the magic begins!
After proofing the yeast in the warm milk and sugar, I pour it into the dry ingredients, along with eggs and vanilla extract. I like to use a wooden spoon to mix everything together. At first, it feels a bit dry, but I keep mixing until it starts coming together. Then, I switch to using my hands to knead the dough for a few minutes. It’s quite different from traditional dough, but I find it therapeutic. The dough should feel smooth and slightly tacky, which tells me I’m on the right track.
Step 2: Shaping the Cake
Once the dough is ready, shaping it is one of my favorite parts. I transfer it to a lightly floured surface and gently roll it out into a rectangle. It’s important not to press too hard; I want to keep as much air in the dough as possible. I remember the first time I made this part of the cake—I was nervous about getting it right! I spread a mixture of melted butter, cinnamon, and sugar over the rolled-out dough, watching it transform into something beautiful.
After spreading the filling, I carefully roll the dough into a log, just like rolling up a sleeping bag. I then shape the log into a circle, pinching the ends to seal it. It’s amazing to see how something so simple can start looking like a cake! I place it on a parchment-lined baking sheet, and I can already imagine how wonderful it will be when it’s baked.
Step 3: First Rise and Second Rise
Now comes the waiting game, which can be tough when you’re so excited about the cake! I cover the shaped dough with a clean kitchen towel and let it rise in a warm place. This first rise usually takes about an hour, and I often take this time to clean up my workspace. When I return, I love seeing the dough puff up—there’s something so rewarding about it!
After the first rise, I gently flatten the dough to release some air and then give it a second rise. This time, I cover it again and let it rest for another 30 minutes. This step is essential; it gives the cake that light and airy texture that we all love. I can hardly wait to see how it turns out!
Step 4: Baking the King Cake
When the dough is ready, I preheat my oven to 350°F (175°C). I can feel the anticipation building! After the second rise, I carefully place the King Cake in the oven. The aroma of baking bread fills my kitchen, and it’s impossible not to feel excited. I usually bake it for about 25-30 minutes until it’s golden brown. The moment I take it out of the oven is pure joy; it looks absolutely gorgeous, and I know it will taste even better!
Step 5: Adding the Icing and Decorations
After letting the cake cool, it’s finally time for the best part—the icing! I prepare my icing by mixing powdered sugar with a splash of milk and a few drops of food coloring to create those vibrant purple, green, and gold hues. I drizzle the icing over the top, allowing it to drip down the sides. It’s a bit messy, but that’s part of the fun! I then sprinkle coarse sugar over the icing, creating a colorful and festive look.
As I step back and admire my creation, I can’t help but smile. This gluten-free King Cake is not just a dessert; it’s a celebration of tradition, community, and creativity. I can’t wait to share it with friends and family, knowing that everyone will have a chance to enjoy a slice of this beautiful cake, just like I did when I first discovered this delightful tradition.
Tips for Perfecting Your Gluten-Free King Cake
Achieving the Right Texture
When I set out to make my gluten-free King Cake, I quickly realized that texture can make or break the experience. I wanted that soft, tender crumb that we all associate with the traditional version. One of the most helpful tips I learned was not to overmix the dough once all the ingredients are combined. Overmixing can lead to a denser cake, which is not what we want! Instead, I gently mix until everything is just combined, ensuring I preserve that light and airy consistency.
Another aspect I found crucial is the hydration of the dough. Gluten-free flours often absorb more liquid than their gluten-filled counterparts. I recommend adjusting your liquid ingredients slightly, starting with a little less and adding more as needed. If the dough seems too dry, I sometimes add an extra splash of milk or even a bit of water until it reaches that perfect sticky yet manageable consistency. This trial and error process has really helped in achieving that delightful texture I remember from my first King Cake!
Common Mistakes to Avoid
Throughout my baking journey, I’ve made my fair share of mistakes, especially when it comes to gluten-free recipes. One common pitfall is not allowing enough time for the dough to rise. Patience is key! If we rush the rising process, the cake won’t achieve that fluffy texture we love. I’ve learned to embrace the waiting game, using that time to clean my kitchen or prep my toppings.
Another mistake I made early on was forgetting to check the expiration date on my yeast. Trust me, there’s nothing worse than watching your dough stubbornly refuse to rise because the yeast is old! Always give it a sniff test after proofing; it should smell pleasantly yeasty. If it doesn’t bubble up when mixed with warm water and sugar, it’s time to grab a fresh packet! I also recommend keeping your workspace warm, especially in colder months, as yeast thrives in a cozy environment.
Storage Tips for Freshness
After all the effort of baking my gluten-free King Cake, I certainly didn’t want it to go stale! I’ve found that the best way to store it is to wrap it tightly in plastic wrap and then place it in an airtight container. This method helps maintain its moisture, keeping that lovely texture intact for days. If I know I won’t finish it within a few days, I’ll slice it up and freeze individual pieces, making it easy to pull out a slice whenever I’m in the mood for a treat.
When I take it out of the freezer, I let it thaw at room temperature or give it a quick warm-up in the microwave for a few seconds. It’s like having a little piece of Mardi Gras magic waiting for me whenever I want it! I also like to refresh the icing with a quick drizzle before serving again. It’s a simple trick that makes it feel brand new every time!
Serving Suggestions and Pairings
Best Beverages to Serve with King Cake
No Mardi Gras celebration feels complete without the perfect beverage to accompany your King Cake. I love serving it with a warm cup of coffee, especially a rich, dark roast that complements the sweetness of the cake. The slight bitterness of coffee really enhances the flavors, making it a delightful pairing. Sometimes, I’ll add a splash of cream for a little extra indulgence!
If I’m feeling festive, I might opt for a classic New Orleans-style cocktail, like a Ramos Gin Fizz or a refreshing Sazerac. These drinks have a unique flair that aligns perfectly with the celebratory spirit of Mardi Gras. For a non-alcoholic option, I recommend a zesty lemonade or a sparkling fruit punch, which adds a fun, fizzy contrast to the sweet cake. These pairings create a well-rounded experience, making each bite and sip a joy!
Festive Presentation Ideas
Presentation is everything when it comes to serving my gluten-free King Cake. I love to embrace the vibrant colors of Mardi Gras by using colorful plates or platters. Sometimes I’ll even dust the surface with a bit of edible glitter or confetti to make it feel extra festive. When I drizzle the icing, I like to let some dribble down the sides, creating a beautiful cascade of colors that catches the eye.
To really wow my guests, I’ll place the cake on a decorative stand and surround it with fresh flowers or colorful beads, reminiscent of the Mardi Gras parades. It’s a small touch that adds a fun and festive atmosphere to the table. I’ve noticed that when the presentation is inviting, it encourages everyone to dig in and celebrate together. After all, sharing food is all about creating memories!
Variations on the Classic Gluten-Free King Cake
Flavor Variations: Cinnamon, Cream Cheese, and More
When I think about King Cake, I can’t help but get excited about the endless flavor possibilities. While the traditional cinnamon-sugar filling is a classic, I’ve discovered that there’s so much more to explore. For instance, one of my personal favorites is a cream cheese filling. The creamy texture complements the sweet dough beautifully, and I often add a hint of vanilla extract and a sprinkle of lemon zest to elevate the flavor even more. This variation has become a hit among my friends and family!
Another option I love is adding fruits like berries or even chocolate. I once tried a blueberry filling, which brought a burst of freshness and a delightful contrast to the sweet icing on top. The moment I served it, everyone was raving about how it was a delicious twist on the classic. I recommend experimenting with different flavor combinations to find what resonates with you, whether it’s almond extract for a nutty flavor or a hint of orange zest for a citrusy kick. The beauty of making your own gluten-free King Cake is that you can tailor it to your taste!
Vegan Gluten-Free King Cake Options
If you’re looking for a vegan twist on the gluten-free King Cake, I’ve got you covered! Making a vegan version is easier than I initially thought. Instead of eggs, I use flaxseed meal mixed with water as a binding agent. The ratio I find most effective is one tablespoon of flaxseed meal combined with two and a half tablespoons of water, letting it sit until it thickens. This simple swap keeps the cake moist while making it suitable for everyone!
For the dairy components, I substitute regular milk with almond milk or coconut milk, which adds a unique flavor. I’ve even experimented with coconut oil instead of butter, giving the cake a subtle tropical twist. The first time I served this vegan gluten-free King Cake at a gathering, it was a huge hit! It’s a great way to include those who may have dietary restrictions while still enjoying the festive spirit of Mardi Gras.
Frequently Asked Questions (FAQs)
Can I make King Cake ahead of time?
Absolutely! I often prepare my gluten-free King Cake a day or two in advance. Once it’s baked and cooled, I wrap it tightly in plastic wrap and store it at room temperature. This allows the flavors to meld, and it tastes just as delightful when served later. Just remember to add the icing and decorations right before serving to ensure they look fresh and vibrant!
How do I store leftover King Cake?
Storing leftover King Cake is quite simple. I recommend wrapping it in plastic wrap and placing it in an airtight container. It stays fresh for about three to five days at room temperature. If you want to keep it for a longer time, slice it up and freeze individual pieces. I find that this way, I can enjoy a slice whenever I crave it, and it retains its flavor and texture beautifully.
What if I can’t find gluten-free flour?
If you can’t find gluten-free flour blends at your local store, making your own is a great option! A simple mix of brown rice flour, tapioca flour, and potato starch can work wonders. I recommend using a 2:1:1 ratio, respectively. This homemade blend has worked well for me in various gluten-free baking adventures, including my King Cake. Just make sure to include xanthan gum to help with the binding and texture!
What is the significance of the baby figurine in King Cake?
The tradition is that whoever finds the baby figurine hidden inside the King Cake is king or queen for the day and must host the next King Cake party, adding an element of fun and surprise to gatherings.
What are some essential gluten-free ingredients for King Cake?
Essential gluten-free ingredients include a blend of gluten-free flours, sweeteners like coconut sugar and honey, yeast for rising, and spices like cinnamon and nutmeg. Toppings such as colorful icing and sprinkles are also important for the festive presentation.
What are some common mistakes to avoid when making gluten-free King Cake?
Common mistakes include not allowing enough time for the dough to rise, not checking the expiration date on yeast, and overmixing the dough, which can lead to a denser cake.
How can I achieve the right texture in my gluten-free King Cake?
To achieve the right texture, avoid overmixing the dough once all ingredients are combined and adjust the liquid ingredients as gluten-free flours absorb more liquid. The dough should feel sticky yet manageable.
What are some festive presentation ideas for serving King Cake?
Festive presentation ideas include using colorful plates, dusting the surface with edible glitter, and placing the cake on a decorative stand surrounded by fresh flowers or colorful beads to enhance the celebratory atmosphere.
Can I make a vegan version of gluten-free King Cake?
Yes! A vegan version can be made by using flaxseed meal mixed with water as a binding agent instead of eggs, and substituting regular milk with almond or coconut milk. Coconut oil can also replace butter for added flavor.
What flavors can I use in my gluten-free King Cake?
In addition to the traditional cinnamon-sugar filling, you can experiment with flavors like cream cheese, fruits such as berries, chocolate, or even different extracts like almond or orange zest to create unique variations.
Final Thoughts
Creating a gluten-free King Cake has been a wonderful journey for me, filled with experimentation and joy. I’ve learned so much about adapting traditional recipes to fit dietary needs without sacrificing flavor or fun. Whether you choose to stick with the classic cinnamon filling or get creative with the flavors, the most important part is to celebrate together. Each slice of this beautiful cake brings a piece of the Mardi Gras spirit, allowing us to connect with friends and family. I hope you find as much joy in making and sharing your gluten-free King Cake as I have!
Read Interesting article: The Ultimate Gluten-Free Lemon Bars (Tangy & Sweet)
Read Interesting article: Gooey Gluten-Free Chocolate Lava Cakes (For Two)