
Creating a sourdough starter from scratch is an exciting journey into the world of baking. Over the next week, I’ll guide you through each step to cultivate your very own starter, full of flavor and vitality!
Understanding Sourdough Starter
What is Sourdough Starter?
When I first heard about sourdough starter, I was intrigued by the idea of making my own bread without commercial yeast. A sourdough starter is essentially a mixture of flour and water that captures wild yeast and beneficial bacteria from the environment. This magical concoction ferments over time, creating a natural leavening agent. Unlike conventional yeast, the wild yeast in sourdough gives bread a unique flavor and a delightful texture. It’s like nurturing a little pet, where with daily feeding, your starter grows and becomes stronger—each bubble it forms is a sign of its health and readiness to bake.
Importance of Sourdough Starter in Baking
For me, the importance of sourdough starter goes beyond just baking; it’s about connecting with the craft of bread-making. Using a starter allows me to create loaves that are tangy, chewy, and aromatic. The fermentation process enriches the dough, making it easier to digest and even enhancing its nutritional profile. When I bake with my starter, I can taste the care and time I’ve invested in nurturing it. Plus, it’s incredibly satisfying to know that the starter I created at home is what makes my bread rise beautifully. I believe that every loaf tells a story, and my starter is the starting point of that tale. If you encounter issues with rising, check out Sourdough Starter Troubleshooting (Why Isn’t It Rising?) for tips.
Key Ingredients for a Sourdough Starter
Creating a sourdough starter is simple, but it does require a few key ingredients. For me, the essential components are:
- Flour: I prefer using all-purpose flour, but whole wheat flour can also work wonders, as it contains more nutrients for the yeast. You might even find that mixing both types gives an interesting flavor.
- Water: I usually opt for filtered or bottled water, as chlorine in tap water can hinder the growth of yeast. The temperature of the water matters too; I like it to be lukewarm, around room temperature, to help kickstart the fermentation.
- Time & Patience: While it’s not a physical ingredient, patience is crucial. Sourdough starter takes time to develop, and each day brings new changes that are exciting to observe.
Once I have these ingredients ready, I feel the anticipation building. It’s amazing how just flour and water can transform into something so flavorful and special.
Day-by-Day Guide to Making Sourdough Starter
Day 1: Initial Mixture of Flour and Water
On the first day, I mix equal parts flour and water in a clean jar. I typically start with 100 grams of flour and 100 grams of water. As I stir the mixture together, it feels so satisfying to see everything come together into a thick, paste-like consistency. I cover the jar loosely with a lid or cloth to allow air to circulate while keeping out any unwanted pests. Placing it in a warm spot (around 70°F to 75°F) helps kick off the fermentation process. It’s a small step, but I can’t help but feel excited about what’s to come!
Day 2: First Signs of Activity
On the second day, I check my starter with eager anticipation. I remember peering into the jar, hoping to see some bubbles or a slight rise. Sometimes, I’d find little bubbles forming on the surface, which was a sure sign that wild yeast was starting to take hold. Even if I don’t see much activity, I don’t worry. I give the mixture a gentle stir, adding another 100 grams of water and flour, and then cover it again. This daily feeding is crucial for nurturing the yeast and bacteria.
Day 3: Feeding the Starter
By day three, I’ve noticed more bubbles and perhaps a slight increase in volume. It’s so thrilling! I feed the starter again with the same ratio of flour and water. Here’s where I started to understand the importance of developing a feeding schedule. Every 24 hours, I keep feeding my starter, and I feel like I’m building a little community of microorganisms. The aroma changes too, becoming a bit tangy, which is a good sign that fermentation is happening!
Day 4: Observing Bubbles and Aroma
On day four, my starter is starting to show more noticeable bubbles, and the smell is becoming even more pronounced. I remember feeling proud, as it felt like my little science experiment was working! I continue to feed it and notice that it’s getting thicker. It’s during this time that I learned to trust my senses—both sight and smell—because they tell me so much about how healthy my starter is becoming.
Day 5: Increasing Feedings and Consistency
When day five rolled around, I decided to up my game by feeding my starter twice a day. I’ve read that more frequent feedings help develop a stronger starter. I noticed it was rising higher and had a nice, bubbly texture. It’s fascinating to think that each feeding brings new life to this mixture. I also began to play around with the flour types, sometimes adding a bit of rye flour to see how it changed the flavor and vitality.
Day 6: Ready for Baking? Testing the Starter
Day six has arrived, and I’m finally ready to test if my starter is ready for baking. I perform the “float test,” where I take a small spoonful of the starter and drop it into a glass of water. If it floats, it’s ready! I remember the excitement of seeing it float, knowing I could soon bake my first loaf of sourdough bread. If it doesn’t float, I just continue with the feedings for another day.
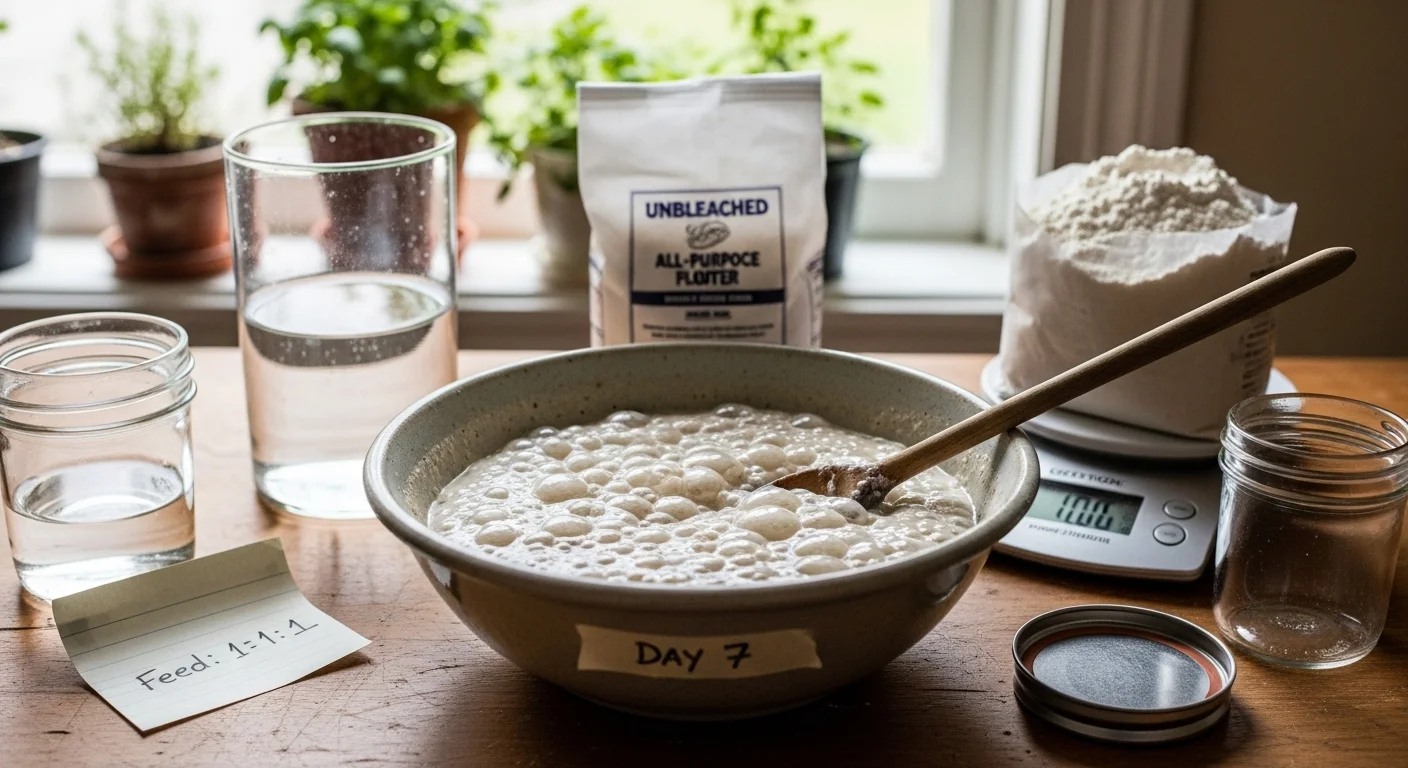
Day 7: Finalizing Your Sourdough Starter
By the seventh day, my starter has transformed beautifully. It’s bubbly, fragrant, and has a lovely rise. I feel a sense of achievement as I prepare to use it in my first bake. As I reflect on this week-long journey, I realize how much I’ve learned about patience, care, and the art of sourdough baking. Now, with my starter ready, I can’t wait to turn that mixture into something delicious!
Maintenance and Storage of Sourdough Starter
How to Store Your Sourdough Starter
Now that my sourdough starter is thriving, I’ve learned that proper storage is key to keeping it healthy. I like to store it in the refrigerator, especially if I’m not planning to bake every day. This way, it can slow down the fermentation process while still remaining active. I use a clean glass jar with a lid that’s not too tight—allowing some air to flow in is important. When I take it out, I give it a good stir and check for any signs of separation or discoloration. If it looks good, I can go ahead and feed it. Just remember, when you’re ready to bake again, it’s best to take the starter out of the fridge a day or two in advance to allow it to wake up and build up its strength again.
Feeding Schedule for Long-Term Use
For long-term maintenance, I’ve found that feeding my starter once a week works well for me. This involves taking it out of the fridge, discarding half (to keep the population of yeast manageable), and then adding equal parts of flour and water, just like I did in the initial days. If I know I’ll be baking more frequently, I switch to feeding it every two to three days, keeping it out on the counter. It’s a bit like having a pet—you have to make sure to give it regular attention. This schedule helps ensure that my starter stays lively and ready for action whenever I decide to bake. For a detailed feeding schedule, check out The Ultimate Sourdough Starter Feeding Guide (With Schedule).
Signs Your Starter is Healthy
Over time, I’ve learned to recognize the signs of a healthy sourdough starter. The most obvious is the presence of bubbles throughout the mixture, indicating active fermentation. I also look for a pleasant, slightly tangy aroma; it’s a sign that the wild yeast and bacteria are thriving. When I feed my starter, I expect it to rise and fall predictably. If it doubles in size within a few hours after feeding, that’s a great indication that it’s ready for baking. However, if I notice a layer of liquid on top (called hooch), it’s a sign that my starter is hungry and needs to be fed. I’ve learned to keep an eye on these signs to ensure that my starter remains robust and effective.
How to Revive a Neglected Starter
Life sometimes gets busy, and there have been moments when I’ve neglected my starter for a little too long. If I find myself in that situation, I don’t panic! Reviving a neglected starter is usually possible. First, I take it out of the fridge and let it come to room temperature. Then, I discard half of it and give it a good feeding with fresh flour and water. I usually repeat this feeding process every 12-24 hours until I see those familiar bubbles and the rise that tells me it’s coming back to life. I’ve found that sometimes it takes a couple of days to fully revive a starter that’s been left unattended, but patience pays off in the end!
Common Questions About Sourdough Starters
How do I know if my starter is ready?
Determining if my sourdough starter is ready for baking has become second nature for me. The best way I gauge its readiness is through the float test—if a spoonful of the starter floats in water, it’s good to go! Besides this test, I also look for a strong, pleasant aroma and a bubbly texture. If it has risen significantly and maintains those qualities, I feel confident that it’s ready to help me create some amazing bread.
What types of flour can I use?
I’ve experimented with various types of flour while making my sourdough starter. While all-purpose flour is my go-to, I’ve had great success using whole wheat flour and even rye flour. These flours contain more nutrients, which can help jumpstart the fermentation process, especially in the early days. I enjoy mixing different flours to see how they affect the flavor and fermentation. It’s fun to play around and discover what works best for me!
Can I use bottled water for my starter?
Yes, I often use bottled water for my sourdough starter, especially if I’m concerned about chlorine in tap water. Bottled water can be a safer option, as it typically doesn’t contain additives that might hinder the growth of my starter. I also like to use filtered water to stay on the safe side. The key is to make sure the water is at room temperature to create the best environment for the wild yeast to flourish.
What to do if my starter smells bad?
If I ever notice a foul smell coming from my starter, I take it seriously. A healthy starter usually has a pleasant, tangy aroma. If it smells off, I check for signs of mold or separation. If mold is present, I toss the starter and start over. If I see separation but no mold, I can try feeding it again to freshen it up. Sometimes, a neglected starter just needs a little extra love and attention to get back on track!
Can I make sourdough starter in a warmer climate?
I’ve learned that making sourdough starter in a warmer climate can actually be beneficial! The warmer temperatures can speed up the fermentation process, which means I might see bubbles and rise more quickly. However, I’ve also discovered that it’s important to monitor my starter closely, as warmer conditions can lead to over-fermentation. If I’m in a hot climate, I tend to adjust my feeding schedule and keep an eye on the aroma and texture to ensure my starter remains healthy and balanced.
Tips for Successful Sourdough Baking
Best Practices for Using Your Sourdough Starter
Now that I have a thriving sourdough starter, I want to make the most of it when it comes time to bake. One of my best practices is to always feed my starter the night before I plan to bake, ensuring it’s at its peak activity. I also like to prepare my dough early in the day, as sourdough often requires longer rising times compared to traditional bread. Patience is key! I’ve also found it helpful to keep a baking journal to note my successes and failures, as it helps me refine my techniques and recipes.
Common Mistakes to Avoid
Along my sourdough journey, I’ve definitely made my fair share of mistakes. One common pitfall is not giving the starter enough time to rise before using it in a recipe. I’ve rushed the process, only to end up with dense loaves. Another mistake I’ve made is neglecting to maintain a consistent feeding schedule, which can weaken the starter. I’ve learned to respect the process and allow for the natural rhythms of sourdough baking.
Recipes to Try Once Your Starter is Ready
With my starter ready, I’m excited to dive into some delicious recipes! One of my favorites is a classic sourdough bread recipe, which yields a crusty, flavorful loaf. I also love experimenting with sourdough pancakes and waffles for breakfast; they have a wonderful flavor and fluffy texture. Another fun recipe I’ve tried is sourdough hamburger buns, which adds a unique twist to our pizza nights. The options seem endless, and I can’t wait to explore more recipes in my sourdough baking adventures!
Tips for Successful Sourdough Baking
Best Practices for Using Your Sourdough Starter
Now that I have a robust sourdough starter, I’ve discovered some best practices that really enhance my baking experience. First, I always make sure to refresh my starter the night before I plan to use it. This way, it’s at peak activity and ready to give my dough that much-needed lift. I typically mix in equal parts of flour and water, just like I did during the initial feeding, and leave it at room temperature overnight. The next morning, I can see the bubbles and feel pretty confident it’s ready to go.
I also like to prepare my dough early in the day. Sourdough can take a bit longer to rise compared to bread made with commercial yeast, so starting early gives me plenty of time. I often set aside a few hours for bulk fermentation, where I let the dough rise before shaping it. I’ve learned that being patient during this stage pays off; it’s amazing to see how much the dough can expand when given the time it needs!
Another tip I’ve found helpful is to keep a baking journal. I jot down notes about each bake—what went well, what didn’t, and any changes I made to the recipe. This not only helps me keep track of my progress but also allows me to refine my techniques. It’s like having a little roadmap of my sourdough journey, and I love reflecting on how far I’ve come!
Common Mistakes to Avoid
Throughout my sourdough adventure, I’ve certainly stumbled upon a few mistakes that I wish I could have avoided. One of the biggest pitfalls has been not allowing my starter enough time to rise before using it. I’ve been too eager to bake, which resulted in dense, heavy loaves. Now, I make a point to be patient and ensure my starter is bubbling and has risen significantly before I incorporate it into my dough.
Another mistake I made early on was neglecting my feeding schedule. I learned the hard way that a weak starter can lead to disappointing results. Keeping a consistent feeding routine has become crucial for me. I also remind myself to check on my starter regularly, especially if I’m storing it in the fridge. A little neglect can lead to a sad, sluggish starter, and I’ve become much more attentive since realizing this!
Lastly, I’ve overlooked the importance of proper dough hydration. When I first started, I often stuck to very stiff doughs, thinking it would be easier to handle. However, I’ve found that wetter doughs can produce a more open crumb and better structure. Now, I embrace the stickiness and use a bench scraper to help manage it. This change has made a delightful difference in the texture of my bread!
Recipes to Try Once Your Starter is Ready
With my starter finally ready, I can’t contain my excitement about the recipes I want to try! One of my all-time favorites is the classic sourdough bread recipe. There’s something incredibly rewarding about shaping the dough, letting it rise, and then baking it to perfection. The crust is crispy, and the inside is soft and chewy—exactly what I dream of in a loaf!
I also love whipping up sourdough pancakes for breakfast. They have this delightful tanginess that pairs perfectly with maple syrup. I typically mix my starter with a bit of milk, flour, and eggs to create a batter that’s fluffy yet packed with flavor. It’s such a treat to enjoy pancakes made from my own starter!
Another fun recipe I’ve explored is sourdough hamburger buns. It adds a unique depth of flavor to our pizza nights, and the crispy edges are simply irresistible. I often experiment with different toppings, but the base made from my starter always steals the show. Each bite is a testament to the journey I’ve taken to cultivate my starter.
As I dive deeper into sourdough baking, I’m excited to try even more recipes, like sourdough bagels or artisanal loaves with various seeds and grains. The possibilities seem endless, and I feel a sense of adventure every time I open my baking journal to jot down new ideas!
Frequently Asked Questions
What is a sourdough starter?
A sourdough starter is a mixture of flour and water that captures wild yeast and beneficial bacteria from the environment. It ferments over time, creating a natural leavening agent that gives bread a unique flavor and texture.
What are the key ingredients for making a sourdough starter?
The essential ingredients for a sourdough starter are flour (all-purpose or whole wheat), water (preferably filtered or bottled), and the time and patience needed for fermentation to occur.
How do I know if my sourdough starter is ready for baking?
You can determine if your sourdough starter is ready by performing the float test—if a spoonful of the starter floats in water, it’s ready. You should also look for a strong aroma and a bubbly texture.
How often should I feed my sourdough starter?
For long-term maintenance, feeding your sourdough starter once a week works well if stored in the refrigerator. If baking frequently, you may feed it every two to three days while keeping it out on the counter.
What should I do if my sourdough starter smells bad?
If your starter has a foul smell, check for signs of mold or separation. If mold is present, it’s best to discard the starter. If there’s only separation, try feeding it again to refresh it.
Can I use bottled water for my sourdough starter?
Yes, using bottled water is a safe option for your sourdough starter, as it usually doesn’t contain additives that could hinder yeast growth. Filtered water is also a good choice.
What types of flour can I use to make a sourdough starter?
While all-purpose flour is commonly used, whole wheat flour and rye flour are also excellent choices as they contain more nutrients that help jumpstart fermentation.
How do I store my sourdough starter?
Store your sourdough starter in the refrigerator in a clean glass jar with a loosely fitting lid. This slows down fermentation while keeping it active. Always remember to stir and feed it before using it again.
What are some common mistakes to avoid when making sourdough starter?
Common mistakes include not allowing the starter enough time to rise before using it, neglecting the feeding schedule, and not monitoring the dough hydration properly.
Can I make a sourdough starter in a warmer climate?
Yes, making a sourdough starter in a warmer climate can speed up fermentation, but it’s important to monitor it closely to prevent over-fermentation.