
Creating beautiful sourdough focaccia art is not only fun but also surprisingly easy! With the right ingredients and a little creativity, you can impress your friends and family with stunning and delicious bread. If you’re looking for a simple method to start your sourdough journey, check out The Easiest No-Knead Sourdough Bread (A Simple Method).
Understanding Sourdough Focaccia
What is Sourdough Focaccia?
Sourdough focaccia is a delightful bread that combines the traditional character of focaccia with the unique tanginess of sourdough. The dough is rich in flavor, soft, and has a crisp crust when baked. What sets sourdough focaccia apart is the use of a sourdough starter, which gives it that extra depth of flavor and chewy texture. When I first tried making it, I was amazed at how the sourdough starter transformed a simple bread into something so much more complex and delicious.
History and Origin of Focaccia
Focaccia has a rich history, dating back to ancient Rome, where it was known as “panis focacius,” meaning “hearth bread.” It was originally baked on the hearth, which is how it got its name. Over the years, various regions in Italy have put their own spin on focaccia, resulting in a variety of styles and flavors. For me, learning about its history added a layer of appreciation each time I baked it. The connection to the past made every bite feel special.
Benefits of Using Sourdough
Using sourdough in focaccia not only enhances the flavor but also offers several health benefits. The fermentation process involved in making sourdough breaks down gluten and makes it easier to digest. Additionally, sourdough has a lower glycemic index compared to bread made with commercial yeast, making it a healthier option for many. I’ve noticed that I feel more satisfied after eating it, likely due to the complex flavors and the wholesome ingredients that go into it. Plus, there’s something immensely satisfying about nurturing a sourdough starter and watching it grow.
Essential Ingredients for Sourdough Focaccia
Types of Flour (Bread Flour, All-Purpose Flour)
The choice of flour can significantly impact the texture and flavor of your focaccia. Bread flour is often recommended due to its higher protein content, which helps create a chewier texture. However, I’ve had great results using all-purpose flour too, especially when I wanted a lighter focaccia. Mixing the two can also be an excellent option for those who want to experiment. It’s all about finding what works best for your taste preferences!
Importance of Sourdough Starter
Your sourdough starter is the heart and soul of sourdough focaccia. It’s essentially a mixture of flour and water that captures wild yeast and bacteria from the environment. I found that maintaining a healthy starter not only leads to delicious bread but also provides a sense of accomplishment. Feeding it regularly and watching it bubble and grow is like nurturing a little pet. Plus, the flavor it imparts to your focaccia is unparalleled.
Other Key Ingredients (Water, Olive Oil, Salt, Toppings)
Aside from flour and starter, other essential ingredients include water, olive oil, and salt. Hydration is crucial for focaccia, so I like to use room-temperature water to help activate the starter. Olive oil adds richness and flavor, while salt enhances the overall taste of the bread. When it comes to toppings, the possibilities are endless! I love using fresh herbs, olives, cherry tomatoes, or even thinly sliced vegetables. The toppings not only add flavor but also make the focaccia visually stunning. For a great beginner-friendly recipe, check out Easy No-Knead Sourdough Focaccia (Beginner Friendly).
Tools and Equipment Needed
Baking Equipment (Oven, Baking Sheet, Parchment Paper)
Having the right equipment makes the process smoother and more enjoyable. A reliable oven is crucial, as it needs to maintain a consistent temperature for baking. I recommend using a baking sheet lined with parchment paper for easy transfer and cleanup. The parchment paper helps create a nice crust without sticking to the pan, which has saved me from many potential disasters!
Mixing Tools (Bowls, Dough Scraper)
For mixing the dough, I prefer using a large bowl and a dough scraper. The bowl should be big enough to accommodate the dough as it rises. A dough scraper is invaluable for handling sticky dough and helps in shaping the focaccia once it’s ready. It’s one of those tools that I didn’t realize I needed until I started baking more seriously.
Decorative Tools (Cookie Cutters, Stencils)
If you’re diving into focaccia art, having some decorative tools can elevate your creations. Cookie cutters can help you cut shapes from your dough or toppings, while stencils can be used to create patterns with flour or other toppings on the surface. I remember the first time I used a stencil; it was like stepping into the world of edible art! The joy of creating something visually appealing made the whole experience even more rewarding.
Step-by-Step Guide to Making Sourdough Focaccia
Preparing the Sourdough Starter
Before diving into making sourdough focaccia, it’s essential to prepare your sourdough starter. I recommend starting this process at least a day in advance. First, make sure your starter is bubbly and active. If it’s been sitting in the fridge, I usually take it out and feed it a good amount of flour and water the night before I plan to bake. Watching it rise and become frothy always fills me with excitement—it’s like a little science experiment happening right in my kitchen! Once it’s doubled in size, you’re ready to go.
Mixing the Dough
With your starter prepped, it’s time to mix the dough. In a large bowl, combine your active starter with water. I like to use a whisk to mix them together until they’re well combined. Then, gradually add in your flour and salt, mixing with a wooden spoon or your hands. The dough will be quite sticky at first, which can feel a bit daunting, but don’t worry—that’s perfectly normal! I remember the first time I made it, I thought I had messed up because it was so messy, but that’s just how it is. Embrace the stickiness! Once you’ve mixed it all together, cover the bowl with a damp cloth and let it rest for about 30 minutes. This resting phase allows the flour to hydrate and starts the gluten development.
First Rise: Understanding Fermentation
After the dough has rested, it’s time for the first rise, which typically lasts around 4 to 6 hours, depending on the temperature in your kitchen. This period is crucial for fermentation—it’s when the magic happens! I often place my bowl in a warm spot, and occasionally, I take a peek to see the dough bubbling and growing. I like to stretch and fold the dough a couple of times during this rise. It’s really simple: wet your hands, grab one side of the dough, stretch it up, and fold it over itself. Repeat this on all four sides. It’s a fun way to build strength in the dough and helps create that chewy texture we all love.
Shaping the Focaccia
Once the dough has risen and is full of air bubbles, it’s time to shape it. I gently pour the dough onto a well-oiled baking sheet. The dough will be quite soft, so I use my fingers to gently spread it out to fill the pan. I love how it naturally takes shape, almost like it knows where to go! If it resists, I let it rest for a few minutes before trying again. I find that the more relaxed the dough is, the easier it is to shape. Once it’s in place, I make deep dimples all over the surface with my fingers. This not only creates a beautiful texture but also helps hold any toppings I plan to add later.
Second Rise: Achieving the Perfect Texture
The second rise is just as important as the first. I cover the shaped focaccia with a kitchen towel and let it rise for another 30 minutes to an hour. During this time, I often find it helpful to preheat my oven to get it nice and hot for baking. This rise gives the focaccia that airy crumb texture we’re all aiming for. I usually check the dough’s response—if it’s puffy and has grown in size, I know we’re on the right track!
Baking the Focaccia
When the oven is hot and the dough has risen beautifully, it’s time to bake. I drizzle a generous amount of olive oil on top of the focaccia and sprinkle it with coarse salt. This step is one of my favorites because it adds so much flavor! I pop the baking sheet into the oven and bake it for about 20 to 25 minutes, until it’s golden brown and the edges are crisp. The aroma that fills my kitchen during this time is simply heavenly. Once it’s out of the oven, I let it cool for a few minutes before cutting into it. The first slice is always a moment to savor—there’s nothing like that warm, soft, and crusty focaccia fresh from the oven!
Creating Beautiful Focaccia Art
Choosing and Preparing Toppings
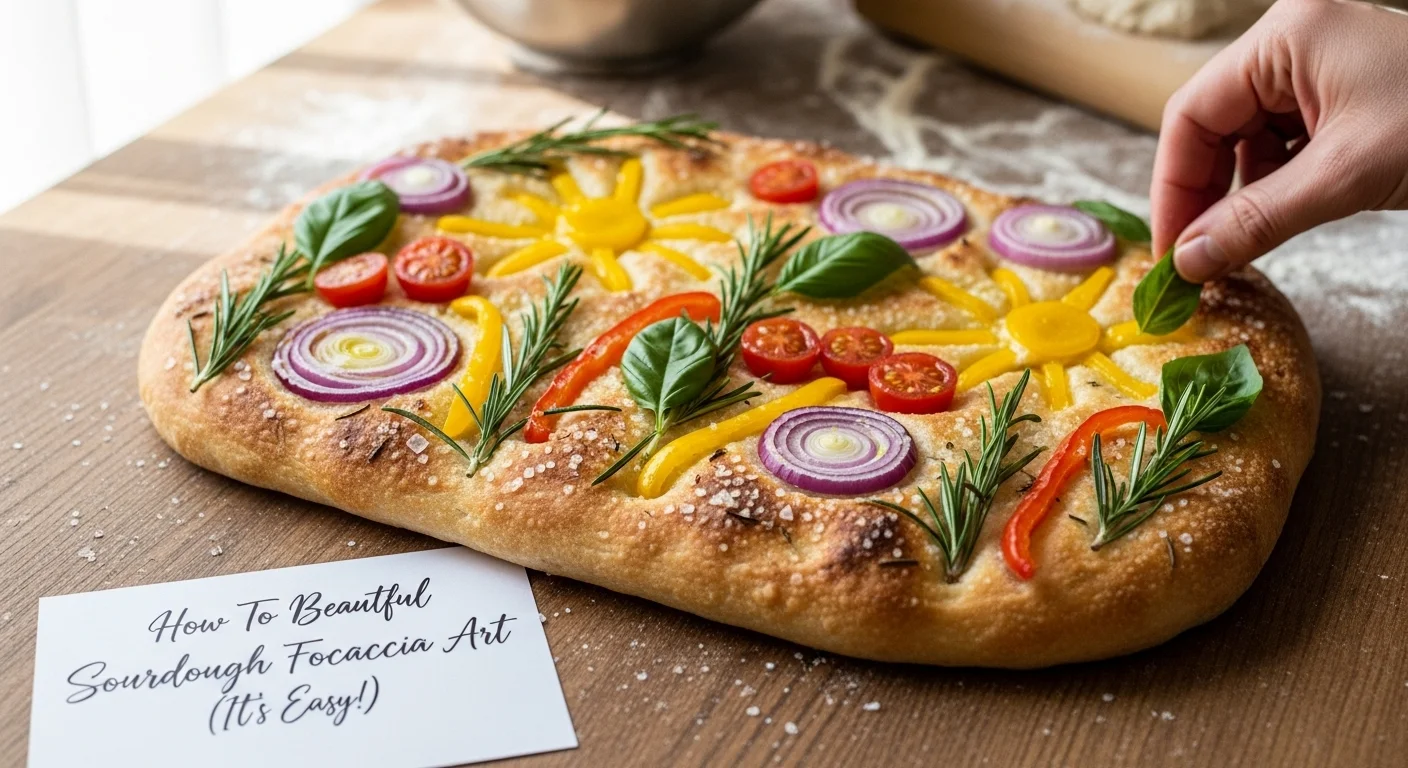
When it comes to creating focaccia art, choosing the right toppings is key. I love to use a mix of colors and textures to make my focaccia visually stunning. Fresh herbs, like rosemary and thyme, not only add flavor but also a lovely green hue. Cherry tomatoes, olives, and bell peppers can add vibrant reds and yellows. I remember the first time I used edible flowers; it felt like I was painting a canvas with food! Before applying any toppings, I usually wash and dry them thoroughly. For instance, I’ll slice cherry tomatoes in half and pat them dry to avoid excess moisture making the dough soggy. The prep is half the fun, and it gives me a chance to get creative in the kitchen.
Design Ideas for Focaccia Art
There are truly endless possibilities when it comes to designing your focaccia. I’ve experimented with various patterns and themes based on the season or occasion. For example, during the fall, I love to arrange thinly sliced zucchini and squash in a spiral pattern, resembling a flower. In the summer, I might create a sunburst design with colorful tomatoes and herbs. I’ve also tried making a heart shape with the toppings for special occasions; it adds a personal touch that’s always appreciated. I find that sketching out my design on paper first can help me visualize how I want it to look before I start decorating the dough.
Techniques for Arranging Toppings
Arranging the toppings is where the fun really begins! I like to start by laying down the larger ingredients first, such as halved tomatoes or sliced onions. Then, I fill in the gaps with smaller toppings, like olives or herbs. I always remember to press them gently into the dimples of the dough so they adhere well during baking. I’ve learned that the placement of toppings can affect how they cook as well; for instance, if I place tomatoes too close to the edge, they can burn easily. So, I try to keep a little space around the edges for a nice, crispy crust. It’s like a puzzle, and I love finding the perfect spot for each piece!
Using Natural Ingredients for Color and Texture
For those of us who enjoy a more natural approach, incorporating ingredients that offer both color and texture can elevate focaccia art. I’ve found that using things like beet puree or spinach juice can create stunning swirls or patterns. For example, a simple swirl of beet puree can add a deep red hue that contrasts beautifully with the greens of fresh herbs. Not only do these ingredients enhance the visual appeal, but they also introduce unique flavors. Just remember to use these purees sparingly; a little goes a long way! I’ve made the mistake of being too generous and ended up with a color that was a bit overpowering. It’s all about balance!
Tips for Perfecting Your Sourdough Focaccia Art
Common Mistakes to Avoid
As I’ve dabbled in focaccia art, I’ve learned a few things the hard way. One common mistake is not allowing the dough to rise enough before adding toppings. If the dough isn’t well-aerated, it can lead to a denser bread that doesn’t hold the toppings as well. Another pitfall I fell into was overloading the focaccia with too many toppings. While it can be tempting to go all out, sometimes less is more. I’ve found that a few well-placed ingredients can make a stronger visual impact than a pile of everything I could find in my fridge!
Texture and Flavor Enhancements
To take my focaccia to the next level, I often experiment with different types of oils and seasonings. For instance, before baking, I love to drizzle a flavored olive oil over the dough—rosemary or garlic-infused oil can really amp up the taste. I also like to sprinkle coarse sea salt or even some grated Parmesan cheese on top right before it goes in the oven. These little enhancements can add a delightful crunch and depth of flavor that makes each bite a little more exciting. I’ve noticed that when I invest a bit of time in these details, it really pays off in the final product.
Storing and Reheating Focaccia
After all that hard work, I want to make sure my focaccia stays fresh! I typically store any leftovers in an airtight container at room temperature for a few days. If I need to keep it longer, I’ll slice it and freeze the pieces, which makes it easy to reheat later. When I’m ready to enjoy it again, I pop it in a preheated oven at 350°F for about 10 minutes. This way, it comes out warm and slightly crispy, just like when it was freshly baked. I’ve had occasions where I’ve reheated it in a skillet for a lovely crusty base, which adds a different texture altogether. Enjoying focaccia art even days later is a real treat!
Frequently Asked Questions (FAQs)
Can I make Focaccia without a Sourdough Starter?
Absolutely! While sourdough starter adds a unique flavor and texture, you can make focaccia using commercial yeast instead. It’s a great option if you’re short on time or haven’t yet ventured into the world of sourdough. Just mix active dry yeast with warm water and follow the same basic steps. I remember my first focaccia made this way; it turned out fluffy and delicious, proving that there are multiple paths to the same tasty end. Just keep in mind that the flavor will differ slightly from the sourdough version.
How long does Sourdough Focaccia last?
Once baked, I’ve found that sourdough focaccia is best enjoyed within the first few days. At room temperature, it stays fresh for about 2 to 3 days when stored in an airtight container. If you don’t finish it within that time, you might notice it starting to harden. I personally love to toast slices for breakfast or use them for sandwiches later in the week. The toasting gives it a new life! For longer storage, consider freezing it.
Can I freeze Sourdough Focaccia?
Yes, freezing focaccia is a fantastic way to preserve it! I typically slice it before freezing, which makes it easier to grab a piece whenever I’m craving it. Wrap each slice tightly in plastic wrap and then place them in a freezer bag. When you’re ready to indulge again, simply thaw it at room temperature or reheat it directly from the freezer in a preheated oven. I’ve found that this method keeps the focaccia tasting fresh while saving me from wasting any leftovers!
What are some popular toppings for Focaccia?
The beauty of focaccia is that you can get as creative as you want with toppings. Some of my all-time favorites include classic rosemary and sea salt, which is simple yet packed with flavor. I also love using roasted garlic, caramelized onions, or even a mix of cheeses like feta and mozzarella for a decadent twist. For a sweet variation, I’ve experimented with sliced figs and honey, which make for a delightful contrast. The options are truly endless, and part of the fun is discovering new combinations that excite your taste buds! If you’re interested in more creative ideas, check out Everyone’s Recreating This Cheesy Veg Panini and I Get It.
Final Thoughts
Creating sourdough focaccia art has become one of my favorite culinary adventures. Each step of the process is not only rewarding but also allows for endless creativity. I’ve learned that even if things don’t go perfectly, there’s always something delicious to enjoy at the end. Whether you’re making it for a special occasion or just because you want to brighten your day, the joy that comes from baking and sharing focaccia art is incomparable. So, grab your ingredients, unleash your creativity, and let your focaccia journey begin!
Frequently Asked Questions
What is Sourdough Focaccia?
Sourdough focaccia is a delightful bread that combines the traditional character of focaccia with the unique tanginess of sourdough. It has a rich flavor, soft texture, and a crisp crust when baked, thanks to the use of a sourdough starter.
What are the benefits of using sourdough in focaccia?
Using sourdough enhances the flavor and offers health benefits, such as easier digestion due to gluten breakdown and a lower glycemic index compared to commercial yeast breads. This can lead to increased satisfaction after eating.
What types of flour can be used for Sourdough Focaccia?
Both bread flour and all-purpose flour can be used for sourdough focaccia. Bread flour is recommended for a chewier texture, while all-purpose flour can create a lighter focaccia. Mixing both types of flour is also an option for experimentation.
What other key ingredients are needed for Sourdough Focaccia?
In addition to flour and sourdough starter, essential ingredients include water, olive oil, and salt. Toppings can vary widely and add both flavor and visual appeal to the bread.
What tools and equipment are needed to make Sourdough Focaccia?
Essential tools include a reliable oven, a baking sheet lined with parchment paper, mixing bowls, and a dough scraper. Decorative tools like cookie cutters and stencils can be used for creating focaccia art.
How do you prepare the sourdough starter before making focaccia?
Prepare the sourdough starter at least a day in advance by ensuring it is bubbly and active. If stored in the fridge, feed it flour and water the night before baking. Once it has doubled in size, it is ready to use.
What common mistakes should be avoided when making Sourdough Focaccia?
Common mistakes include not allowing the dough to rise enough before adding toppings and overloading the focaccia with too many toppings. Both can affect the texture and overall success of the bread.
How should Sourdough Focaccia be stored?
Leftover sourdough focaccia should be stored in an airtight container at room temperature for 2 to 3 days. For longer storage, it can be sliced and frozen, then reheated in a preheated oven for best results.
Can I make Focaccia without a Sourdough Starter?
Yes, you can make focaccia using commercial yeast instead of a sourdough starter. This method is quicker and easier for beginners, though the flavor will differ from the sourdough version.
What are some popular toppings for Focaccia?
Popular toppings for focaccia include rosemary and sea salt, roasted garlic, caramelized onions, and various cheeses. Sweet variations can include ingredients like sliced figs and honey, creating delightful flavor contrasts.