
Looking for an easy and flavorful way to enjoy pork chops? You’re in the right place! Let’s dive into the juicy and delicious world of pan-seared pork chops that are sure to impress everyone at your dinner table. Read Interesting article: Quick Chicken Fajitas Recipe (Perfect For Busy Nights)
Understanding Pork Chops
When I first started cooking, I often found myself confused by all the different cuts of pork chops available. I remember standing in the meat section, staring at the options, and wishing I had a guide. Over time, I learned that understanding pork chops is key to cooking them perfectly.
Types of Pork Chops
There are several types of pork chops, each with its own unique flavor and texture. The most common ones you’ll encounter are:
- Bone-in Pork Chops: These come with the bone still attached, which adds flavor and helps keep the meat juicy. I love how they look on a plate, too!
- Boneless Pork Chops: These are easier to cook and eat, making them a popular choice for weeknight dinners. They can sometimes be a bit drier, so I often keep an eye on cooking times.
- Pork Loin Chops: Cut from the back of the pig, these are usually thicker and more tender. They’re perfect for grilling or pan-searing.
- Pork Rib Chops: These are similar to bone-in chops but come from the rib section. They’re extra flavorful!
Choosing the Right Cut
Choosing the right cut of pork chop can make all the difference in your dish. I always look for chops that are at least an inch thick; thinner cuts tend to dry out quickly, especially if you’re using high heat. When I pick pork chops, I also check for a nice layer of fat on the edge—this can help keep the meat moist as it cooks. And don’t be afraid to ask your butcher for recommendations! They can provide insights on what’s fresh and best for cooking methods.
Nutritional Benefits of Pork Chops
Besides their delicious taste, pork chops offer some great nutritional benefits. They’re a good source of protein, which is essential for building and repairing tissues in our bodies. I’ve learned that a 3-ounce serving of pork chop can provide about 25 grams of protein, making it a filling choice for any meal. Plus, they contain important vitamins like B6 and B12, which help keep our energy levels up and support our immune system. I love knowing I’m enjoying a meal that’s not just tasty but also good for me!
Essential Ingredients for Juicy Pork Chops
Now that we’ve covered the types and benefits of pork chops, let’s talk ingredients. The right combination can elevate your dish from ordinary to extraordinary.
Pork Chop Selection
As I mentioned earlier, the cut of the pork chop is crucial. I usually opt for bone-in pork chops because I find they hold moisture better during cooking. When you’re at the store, look for chops that have a nice pink color without excessive browning. This usually indicates freshness. Also, don’t shy away from spending a bit more for high-quality, grass-fed pork. The taste difference is noticeable!
Spices and Seasonings
Seasoning is where you can really get creative. I like to keep it simple with salt, pepper, garlic powder, and a bit of paprika for that extra kick. If I feel adventurous, I might add some rosemary or thyme. The key is to season generously, especially if you’re not marinating the meat. I’ve learned that pork can handle bold flavors really well.
Optional Marinades for Extra Flavor
If you want to take your pork chops to the next level, consider marinating them. A simple mixture of soy sauce, honey, and garlic works wonders. I usually marinate my pork chops for at least 30 minutes, but if I have time, I’ll let them soak for a few hours. This not only adds flavor but also helps tenderize the meat. I remember trying a citrus marinade once, and I couldn’t believe how bright and refreshing the flavors were!
Equipment Needed for Pan-Seared Pork Chops
Before we start cooking, let’s make sure we have the right equipment on hand. Having the right tools can make the cooking process smoother and more enjoyable.
Recommended Cookware
I can’t stress enough how important a good skillet is for pan-searing pork chops. I prefer a cast-iron skillet because it retains heat incredibly well, which is essential for getting that nice sear. Non-stick pans can work too, but I find that the crust doesn’t develop as well. If you’re like me and love a good crust on your meat, go for cast iron!
Essential Utensils
In addition to a skillet, having a pair of tongs is super handy. They’re perfect for flipping the pork chops without piercing the meat. I also keep a spatula nearby for maneuvering the chops if needed. A good knife for portioning the pork after cooking is also a must-have.
Thermometers and Timers
Using a meat thermometer has become a game-changer for me. It takes the guesswork out of cooking. Pork should be cooked to an internal temperature of 145°F for it to be juicy and safe to eat. I also use a timer to keep track of cooking times, especially if I’m working on side dishes at the same time.
Step-by-Step Guide to Cooking Perfect Pan-Seared Pork Chops
Now that we have everything ready—from the right cut of pork chops to the necessary equipment—let’s dive into the cooking process. I find that having a clear step-by-step approach makes the experience more enjoyable and less daunting. Here’s how I make sure my pork chops come out perfectly every time.
Preparation: Seasoning the Pork Chops
Seasoning is where I unleash my creativity! First, I make sure the pork chops are at room temperature by taking them out of the fridge about 30 minutes before cooking. This helps them cook more evenly. While they’re warming up, I prepare my seasoning mix. I usually go for a couple of teaspoons of salt, some freshly cracked pepper, and garlic powder. If I’m feeling adventurous, I might throw in some paprika or a sprinkle of dried herbs like thyme or rosemary.
Once the mixture is ready, I rub it all over both sides of the pork chops. I like to really massage the seasoning into the meat to ensure it penetrates well. This is where I think the flavor truly comes alive! If I’m using a marinade, I’ll pour it over the chops in a resealable bag and let it sit for at least 30 minutes—sometimes longer if I have the time.
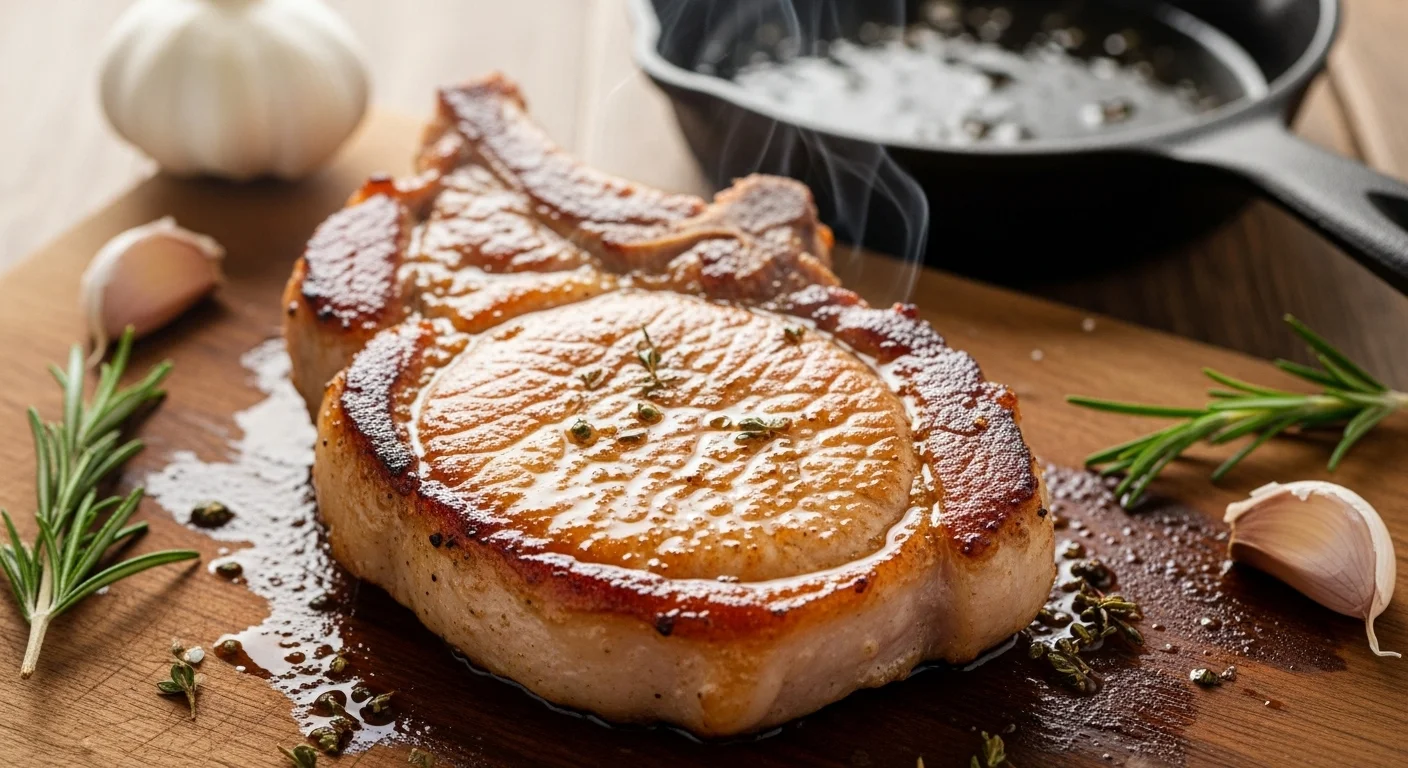
Cooking Technique: Searing the Chops
After seasoning, it’s time to cook! I heat my cast-iron skillet over medium-high heat and add a splash of oil—olive oil or vegetable oil works great. I wait until the oil shimmers, indicating it’s hot enough. Carefully, I place the pork chops in the skillet, making sure not to overcrowd the pan. If the chops are cold when they hit the skillet, it can lower the temperature and ruin that beautiful sear.
I let the chops sear undisturbed for about 4 to 5 minutes on the first side, which allows that delicious crust to form. I remember the first time I tried this; I couldn’t believe how much flavor developed in just those few minutes! Once the crust is golden brown, I flip the chops using my trusty tongs, then reduce the heat slightly and cook for another 3 to 4 minutes on the other side.
Achieving the Perfect Internal Temperature
Now comes the part where my meat thermometer saves the day! I can’t stress enough how important it is to check the internal temperature. I aim for 145°F, which is the sweet spot for juicy and tender pork chops. I insert the thermometer into the thickest part of the chop, avoiding the bone, and check the reading. If I’m not quite there yet, I’ll continue cooking for another minute or two. It’s all about patience and making sure I don’t rush this crucial step.
Once the chops reach that perfect temperature, I like to remove them from the skillet and place them on a plate. I cover them loosely with foil to keep them warm while they rest. This resting period is key; it allows the juices to redistribute throughout the meat, ensuring every bite is succulent.
Resting: Why It Matters
Ah, the resting period! I learned the hard way that skipping this step can lead to dry pork chops. After cooking, I usually let them rest for about 5 to 10 minutes. During this time, I might whip up a quick side dish or prepare a simple sauce. It’s amazing how just a few minutes can enhance the overall quality of the meal! When I finally slice into the chops after resting, I’m always rewarded with juices that flow beautifully instead of spilling out all over the plate. It’s such a satisfying moment!
Serving Suggestions
Now that the pork chops are perfectly cooked and rested, it’s time to think about how I want to serve them. I love to create a complete meal that not only looks good but also pairs beautifully with the flavors of the pork. Here are some of my favorite serving suggestions.
Ideal Side Dishes for Pork Chops
In my experience, pork chops go wonderfully with a variety of side dishes. Some of my go-to options include:
- Roasted Vegetables: I love tossing seasonal veggies like Brussels sprouts, carrots, and sweet potatoes with olive oil, salt, and pepper, then roasting them until they’re caramelized.
- Garlic Mashed Potatoes: Creamy, buttery mashed potatoes are always a hit. I add a hint of garlic for an extra layer of flavor.
- Apple Sauce: A classic pairing! I remember my grandmother making homemade apple sauce, and it’s the perfect sweet contrast to the savory pork.
- Green Salad: A fresh salad with mixed greens, nuts, and a light vinaigrette can add a refreshing touch to the meal.
Complementary Sauces and Condiments
To take my pork chops to the next level, I often serve them with a sauce or condiment. Some favorites of mine include:
- Honey Mustard Sauce: A simple mix of honey and Dijon mustard creates a sweet and tangy balance.
- Chimichurri: This bright and herby sauce adds a burst of flavor that complements the richness of the pork.
- Barbecue Sauce: A smoky BBQ sauce can elevate the meal, especially if I’m going for a more casual vibe.
Common Mistakes to Avoid
As I’ve practiced cooking pork chops, I’ve noticed that certain mistakes can lead to less-than-stellar results. I’ve made my fair share of these errors, and I’d love to share what I’ve learned so that you don’t have to experience the same frustrations.
Overcooking the Pork
One of the most common mistakes is overcooking the pork chops. I remember the first few times I cooked them, I was so worried about undercooking that I ended up with dry, tough meat. Pork can be tricky; it’s easy to get the cooking time wrong. I learned that the best way to avoid this is to use a meat thermometer, as I mentioned earlier. Keeping an eye on the temperature is crucial. Aim for that sweet spot of 145°F. Trust me, your taste buds will thank you! If you don’t have a thermometer, I suggest checking the juices—if they run clear, it’s a good sign that your chop is done. But I still prefer the accuracy of a thermometer!
Insufficient Seasoning
Another mistake I’ve made is not seasoning the pork chops enough. I used to sprinkle a little salt and pepper and call it good, but I soon realized that pork really benefits from bold flavors. I think of seasoning as a chance to really elevate the dish. Don’t be shy! Go for generous amounts of salt, pepper, and your favorite spices. If you’re marinating, let those flavors soak in for a good amount of time. I’ve found that the longer you allow the seasoning to sit, the more flavorful the pork becomes. So, if you can, plan ahead and give your pork chops some time to soak up all those delicious flavors!
Skipping the Resting Period
Lastly, I can’t emphasize enough how important the resting period is after cooking. I’ve made the mistake of slicing into my pork chops immediately after cooking, and I was always disappointed to see the juices running out onto the plate. This is where patience pays off! After you’ve cooked your chops, let them rest for at least 5 to 10 minutes. I usually cover them loosely with foil during this time. It might feel tempting to dig in right away, but taking this brief pause allows the juices to redistribute throughout the meat. The result? Juicy, tender pork chops that are bursting with flavor!
FAQs About Pork Chops
With so many cooking tips and tricks, I often find myself getting questions about pork chops. Here are some common FAQs that I’ve encountered throughout my cooking journey.
How do I know when pork chops are done?
In my experience, the best way to tell if pork chops are done is by using a meat thermometer. I aim for an internal temperature of 145°F. If you don’t have a thermometer, you can check the juices. If they run clear, it’s a good indication that your pork is cooked through. Also, the meat should feel firm to the touch and should not be very pink in the middle. Trust your instincts, and remember practice makes perfect!
Can I use boneless vs. bone-in pork chops?
Absolutely! You can use either boneless or bone-in pork chops, depending on your preference. I usually go for bone-in for the extra flavor and moisture, but boneless chops are definitely easier to cook and eat. Just keep in mind that boneless chops may need slightly less cooking time, so adjust accordingly. Whichever you choose, make sure to follow the same cooking techniques for the best results!
What are some good marinades for pork chops?
I love experimenting with marinades! Some of my favorites include a mixture of soy sauce, honey, and garlic for a sweet and savory profile. A citrus marinade with orange juice, lime, and garlic offers a bright flavor that’s refreshing and zesty. I’ve also enjoyed using a simple balsamic vinegar marinade with rosemary and olive oil. The best part is that you can tailor the marinade to your taste preferences—there are endless possibilities! Read Interesting article: Best Thai appetizers recipes
Can I cook pork chops from frozen?
I’ve tried cooking pork chops straight from the freezer, and while it’s possible, it’s not ideal. If you’re in a pinch, you can cook them from frozen, but you’ll need to increase the cooking time by about 50%. I’ve found that thawing them in the fridge overnight is the best way to ensure even cooking. If you can plan ahead, that’s the way to go for juicy, perfectly cooked pork chops!
Variations on the Basic Recipe
Once you’ve mastered the basic pan-seared pork chop recipe, the fun really begins! I love to experiment with different flavor profiles and techniques to keep things exciting. Here are a few variations that I’ve enjoyed and think you might too.
Asian-Inspired Pork Chops
If I’m in the mood for something a bit different, I love making Asian-inspired pork chops. I marinate the chops in a mixture of soy sauce, ginger, garlic, and a splash of sesame oil. After searing, I serve them with a sprinkle of sesame seeds and chopped green onions. The flavors are vibrant and delicious, and they pair perfectly with steamed rice and stir-fried vegetables.
Herb-Crusted Pork Chops
For a fresh twist, I often opt for herb-crusted pork chops. I mix breadcrumbs with fresh herbs like parsley, thyme, and oregano, then coat the chops before searing. This creates a crunchy, flavorful crust that adds a wonderful texture. I like to serve these with a side of roasted potatoes and a light salad.
Barbecue-Glazed Pork Chops
When summer rolls around, I can’t resist barbecue-glazed pork chops. After searing, I brush the chops with my favorite barbecue sauce and let them cook for a few more minutes until the sauce is caramelized and sticky. The smoky, sweet flavor is always a crowd-pleaser, especially when served with coleslaw and corn on the cob!
Storing and Reheating Leftover Pork Chops
After a delicious meal, you might find yourself with some leftover pork chops. Here’s how I store and reheat them to keep that juicy flavor intact.
Proper Storage Techniques
To store leftover pork chops, I like to let them cool to room temperature before placing them in an airtight container. Make sure to separate any sauce to avoid sogginess. I usually keep them in the fridge for up to 3 to 4 days. If I want to save them for longer, I’ll wrap them tightly in plastic wrap and then in aluminum foil before freezing. This way, they can last for up to 2 to 3 months.
Best Methods for Reheating
When it comes to reheating, I prefer using the oven or a skillet to maintain the moisture. If I’m using the oven, I preheat it to 350°F, place the chops on a baking sheet, and cover them with foil to keep them from drying out. I’ll heat them for about 10 to 15 minutes, or until warmed through. If I’m using a skillet, I add a splash of broth or water and cover it, allowing the chops to steam gently until heated. I find this method helps retain their juiciness and keeps them flavorful!
Frequently Asked Questions
What is the ideal thickness for pork chops?
Look for pork chops that are at least an inch thick. Thinner cuts tend to dry out quickly, especially if using high heat.
What spices and seasonings work well with pork chops?
Simple seasonings like salt, pepper, garlic powder, and paprika work well. For more flavor, consider adding herbs like rosemary or thyme. Generous seasoning helps enhance the dish’s overall flavor.
Why is resting important after cooking pork chops?
Resting allows the juices to redistribute throughout the meat, ensuring every bite is juicy and flavorful. It’s recommended to let them rest for about 5 to 10 minutes after cooking.
What type of skillet is best for pan-searing pork chops?
A cast-iron skillet is preferred because it retains heat well, which is essential for achieving a good sear. Non-stick pans can work, but they may not develop as nice of a crust.
How should I store leftover pork chops?
Let leftover pork chops cool to room temperature before placing them in an airtight container. They can be stored in the fridge for up to 3 to 4 days or wrapped tightly and frozen for 2 to 3 months.
What are some ideal side dishes for pork chops?
Some great side dishes include roasted vegetables, garlic mashed potatoes, apple sauce, and a fresh green salad. These pair well with the flavors of the pork.