
If you’re looking for a dessert that’s rich, creamy, and oh-so-satisfying without turning on the oven, you’ve come to the right place! This no-bake vegan chocolate tart is not only easy to whip up but also decadently delicious. Read Interesting article: No-Bake Vegan Peanut Butter Bars (An Easy, Addictive Treat)
Overview of No-Bake Vegan Chocolate Tart
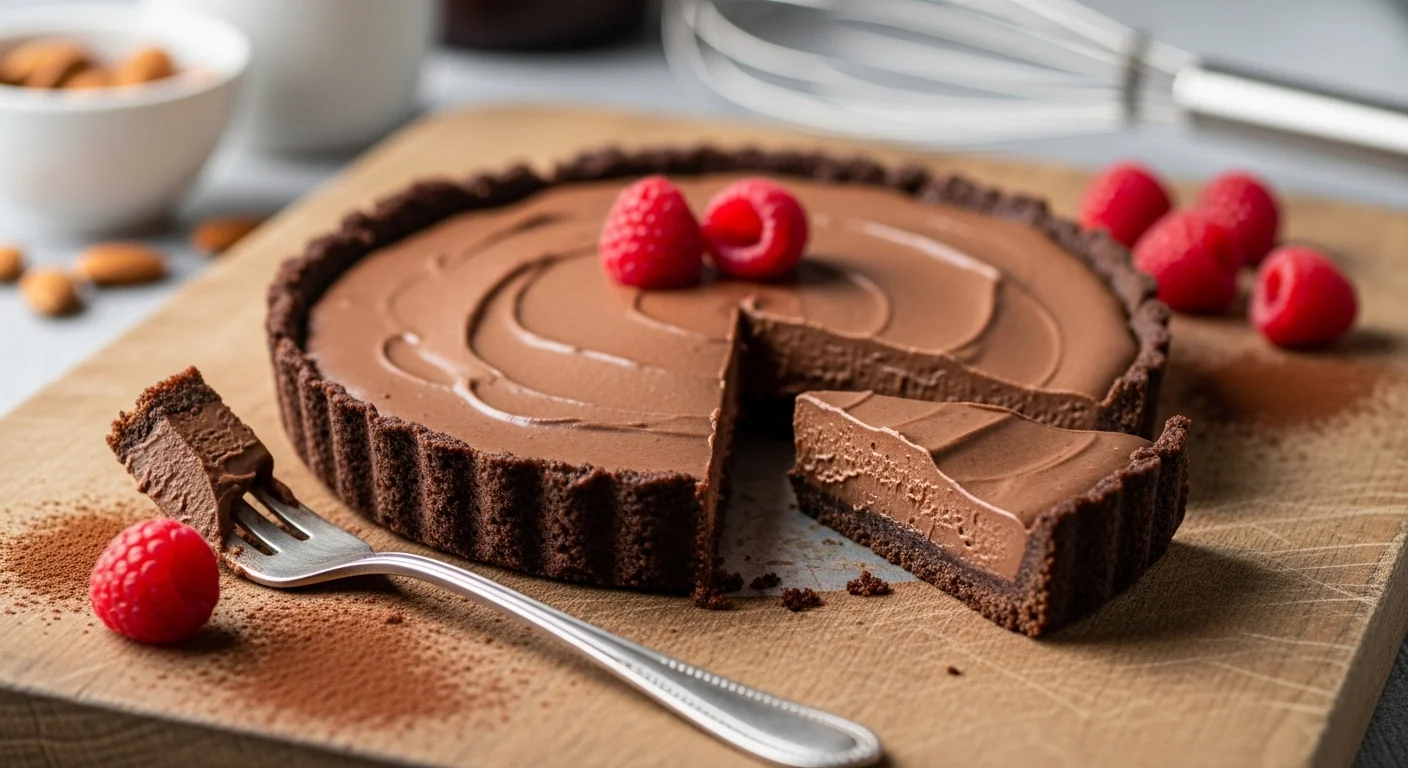
What is a No-Bake Vegan Chocolate Tart?
When I first stumbled upon the idea of a no-bake vegan chocolate tart, I was immediately intrigued. This dessert is a delightful blend of a crumbly nut base, a smooth chocolate filling, and the best part? It requires no baking! It’s perfect for warm days when the last thing you want to do is heat up the kitchen. Imagine a tart that’s rich and satisfying, yet made entirely from plant-based ingredients. It’s a dessert that feels indulgent but is surprisingly simple to create at home.
Benefits of No-Bake Desserts
No-bake desserts hold a special place in my heart. For one, they are incredibly quick to prepare. You can usually throw everything together, pop it in the fridge, and forget about it until it’s time for dessert. I love how I can make this tart ahead of time, freeing up my evening for other activities or just to relax. Plus, no-bake desserts often require fewer ingredients than their baked counterparts. This means less fuss and fewer dishes to wash, which is always a win in my book!
Another fantastic benefit is that no-bake desserts tend to retain more nutrients compared to baked goods. Since we’re using raw ingredients like nuts and dates in this tart, you’re not only treating your taste buds but also giving your body a little boost of energy and nutrition. I’ve found that many people appreciate the lighter feel of these desserts, especially after a hearty meal. Read Interesting article: No-Bake Vegan Energy Balls (A Healthy, Easy Snack)
Vegan vs Traditional Chocolate Tarts
Let’s talk about the difference between vegan and traditional chocolate tarts. Traditionally, chocolate tarts rely heavily on butter, cream, and eggs to achieve that rich, creamy texture. For a long time, I thought that meant I had to sacrifice flavor and texture to enjoy a vegan version. But with a bit of creativity, I discovered that vegan ingredients can create equally delicious desserts. In this no-bake vegan chocolate tart, we use coconut cream or silken tofu to get that creamy consistency without any animal products. Trust me, you won’t miss the dairy!
Another major difference I noticed is how vegan desserts can cater to various dietary restrictions. As someone who has friends with lactose intolerance and egg allergies, having a dessert that everyone can enjoy feels great. I’ve brought this tart to gatherings, and it’s always a hit, even among non-vegans. The rich chocolate flavor speaks for itself, and I love watching people enjoy something they didn’t even realize was vegan!
Key Ingredients for No-Bake Vegan Chocolate Tart
Base Ingredients
The base of this tart is where the magic begins. I usually start with a mix of nuts and dates. This combination not only gives the crust a delicious flavor but also holds everything together beautifully.
Nuts (Almonds, Walnuts)
Almonds and walnuts are my go-to choices for the nut base. Almonds give a lovely crunch and a mild flavor, while walnuts bring in a rich, earthy taste. You can also experiment with other nuts based on your preference. Just make sure to blend them until they form a fine crumb before adding in the dates.
Dates and Sweeteners
Dates are nature’s candy! They add natural sweetness and stickiness, helping to bind the crust together. I usually use Medjool dates for their soft texture and caramel-like flavor. If you find that you need a bit more sweetness, feel free to add a splash of maple syrup or agave nectar. I’ve learned that balancing the sweetness is key to achieving that perfect crust.
Chocolate Filling
Now, let’s get to the star of the show—the chocolate filling. This is where I get really excited because it’s so easy to make but tastes so divine.
Cocoa Powder
I always use high-quality cocoa powder to ensure a rich chocolate flavor. You can even try using raw cacao powder for a healthier option. The key is to mix it well with your other ingredients to avoid clumps and get that silky smooth texture.
Coconut Cream or Silken Tofu
For creaminess, I often use coconut cream. It’s thick, velvety, and adds a subtle hint of coconut flavor that pairs beautifully with chocolate. On days when I want a lower-fat option, I’ve also used silken tofu. It blends up perfectly and gives that creamy texture without adding too much fat. I love how versatile this filling can be!
Toppings and Garnishes
Finally, we can’t forget about the toppings! Once your tart is set, I recommend adding some fresh fruits or a dollop of vegan whipped cream. Berries, bananas, or even a sprinkle of nuts can elevate the dessert and add a pop of color. I often play around with the presentation because, to me, eating with our eyes is just as important as the taste!
Fresh Fruits
Fresh fruits not only add color but also a refreshing contrast to the rich chocolate filling. Strawberries and raspberries are my favorites, but feel free to use whatever is in season.
Vegan Whipped Cream
A dollop of coconut whipped cream on top makes the tart feel extra special. It’s light, fluffy, and adds a creamy touch that complements the chocolate perfectly. I remember the first time I served it this way; everyone was asking for seconds!
Step-by-Step Recipe for No-Bake Vegan Chocolate Tart
Preparing the Tart Base
Let’s dive into the fun part: making the tart itself! First, I gather my ingredients for the base, which includes my favorite nuts and dates. I usually start by placing the nuts in a food processor. I love the sound of them crunching as they get broken down, and it always brings back memories of making other desserts with my family. Once they’ve turned into a fine crumb, I add the pitted dates.
After that, I pulse the mixture until it starts to clump together. It’s important to check the texture; you want it to be sticky enough to hold when pressed but not too wet. If it feels too crumbly, I often drop in a bit of water, a teaspoon at a time, until it reaches that perfect consistency. Once it’s ready, I press the mixture into the bottom of a tart pan. I like to use the back of a measuring cup to get it nice and even. It’s a bit therapeutic, honestly!
Making the Chocolate Filling
With the crust ready, it’s time to make the chocolate filling. This is my favorite part because it’s so simple but incredibly satisfying. I start by blending the coconut cream (or silken tofu) with cocoa powder in a high-speed blender. If you’re using coconut cream, I recommend chilling it beforehand so it’s nice and thick. This step is crucial for achieving that luscious, creamy texture.
Next, I add in a splash of vanilla extract and a sweetener—usually maple syrup—because who doesn’t love a bit of extra sweetness? I blend everything until it’s smooth and creamy. I love watching the transformation as it goes from separate ingredients to a silky mixture. Sometimes, I take a quick taste test to ensure the flavors are just right. It’s hard to resist licking the spoon! If it needs a bit more sweetness or a punch of flavor, I adjust it at this stage.
Assembling the Tart
Once the filling is ready, I carefully pour it over the crust. I usually start from the center and let it flow to the edges, ensuring it fills every nook and cranny. I like to use an offset spatula to smooth it out, creating a beautiful, polished surface. If I’m feeling fancy, I might even make swirls or patterns with the spatula just to make it look extra special.
At this point, I often sprinkle a few extra chocolate shavings or chopped nuts on top for a little extra flair. It’s a fun way to add texture and a visual element that impresses everyone. Then, I cover the tart with plastic wrap and pop it into the fridge to chill. It’s tough to wait, but the anticipation makes it all the more rewarding!
Chilling and Setting Time
Patience is key here. I usually let the tart chill for at least four hours, but if I can, I leave it overnight. This time allows the filling to set up perfectly, making the tart easier to slice. I remember the first time I made this tart; I was so eager to dig in that I didn’t wait long enough, and it fell apart a bit when I served it. Now, I always try to remind myself that good things come to those who wait!
Once it’s set, I take it out of the fridge, and the moment I slice into that tart is pure bliss. The crust crumbles just right, and the filling is so creamy and rich. Each bite is a reminder of why I love making this dessert. The best part? I get to share it with friends and family, and I always love seeing their smiles when they take that first bite. It’s a no-bake wonder that never ceases to impress!
Variations and Customizations
Flavor Variations
One of the things I adore about this no-bake vegan chocolate tart is how versatile it is. Once you master the basic recipe, you can have so much fun experimenting with different flavors!
Mint Chocolate Tart
If you’re a fan of mint and chocolate, this variation is a must-try! I simply add a few drops of peppermint extract to the chocolate filling. The fresh mint flavor really brightens up the dessert and adds a refreshing twist. I remember serving this at a holiday gathering, and it was a hit!
Peanut Butter Chocolate Tart
For a nutty twist, I often incorporate some peanut butter into the filling. Just swirl in a few tablespoons of natural peanut butter right before pouring it onto the crust. The combo of chocolate and peanut butter is a classic for a reason, and it’s always a crowd-pleaser. Sometimes, I even garnish it with crushed peanuts on top for an extra crunch.
Ingredient Substitutions
Not only can you play with flavors, but you can also customize ingredients based on dietary needs or personal preferences.
Nut-Free Options
If you’re looking for a nut-free version, I recommend using seeds like sunflower seeds or pumpkin seeds instead of nuts for the crust. They provide a similar texture while keeping it allergen-friendly. Just make sure to adjust the blending time since seeds can be a bit tougher.
Sugar Alternatives
For those who want to cut back on sugar, you can use mashed bananas or unsweetened applesauce in your filling. They add natural sweetness and moisture, making for a deliciously creamy tart. I’ve tried this out when I had a friend visiting who was watching their sugar intake, and it was a great success!
Serving Suggestions for No-Bake Vegan Chocolate Tart
Pairing with Beverages
When it comes to serving my no-bake vegan chocolate tart, I love thinking about what drinks can complement its rich flavors. I usually reach for a nice cup of herbal tea, especially peppermint or chamomile, which adds a refreshing contrast to the dessert’s indulgence. I remember one dinner party where I served the tart alongside some homemade chai tea. The spices in the chai paired wonderfully with the chocolate, creating a warm and inviting atmosphere.
If you’re in the mood for something a little stronger, a glass of red wine—like a Merlot or a Cabernet Sauvignon—can enhance the chocolate’s richness. I’ve found that the tannins in the wine add depth to each bite. For those who prefer non-alcoholic options, a rich almond or oat milk hot chocolate can be divine. Again, it ties back to the chocolate theme, but in a cozy, comforting way. It’s all about finding that perfect balance of flavors!
Portion Sizes and Presentation Tips
Serving this tart can be just as fun as making it! I typically cut it into small slices because a little goes a long way with this dessert. The richness is intense, so smaller portions allow everyone to enjoy a piece without feeling overwhelmed. I often aim for about 12 slices from one tart, which makes it perfect for gatherings or family dinners.
Presentation is key, and I enjoy getting creative with it. I like to plate each slice on a decorative plate and add a garnish of fresh berries or a drizzle of vegan chocolate sauce. Sometimes, I even sprinkle a bit of sea salt on top of the chocolate filling to provide a beautiful contrast and enhance the flavors. I’ve noticed that people eat with their eyes first, so making the tart visually appealing always seems to impress my guests!
For a more festive touch, I might add edible flowers or a dusting of powdered sugar on top. It transforms a simple dessert into something that feels extravagant. I remember hosting a birthday celebration once where I decorated the tart with fresh raspberries and mint leaves, and it looked stunning on the table. Everyone was raving about how beautiful it was, and that made me feel proud of my creation.
Storage and Shelf Life
Best Storage Practices
After all that hard work, you might be wondering how to store any leftovers (if there are any!). I’ve learned that the best way to store this tart is in an airtight container in the refrigerator. This keeps it fresh and delicious while preventing it from absorbing any odors from other foods. If you have a pie or cake dome, that works beautifully too! It helps maintain its shape and presentation.
I’ve also experimented with freezing the tart for longer storage. Just slice it first before freezing, wrapping each piece individually in plastic wrap and then placing them in a freezer-safe container. When I’m in the mood for a treat, I can just pull a slice out and let it thaw in the fridge for a few hours. It’s a fantastic way to always have a little indulgence waiting for me!
How Long Does It Last?
This no-bake vegan chocolate tart can last in the refrigerator for about 5 to 7 days, though I’ve found it tends to disappear much quicker than that! When frozen, it can last for about 2 to 3 months. Just remember to label your containers with the date so you can keep track of when you made it. I’ve had friends over who’ve been pleasantly surprised to find I had a slice tucked away in the freezer; it’s like having a little gift for myself waiting for a rainy day!
Keeping track of storage times and conditions is key to enjoying this dessert at its best. I always try to plan my dessert-making around gatherings or special occasions, so it’s fresh and ready to impress! After all, there’s nothing quite like sharing a homemade dessert with loved ones and seeing their smiles. It’s truly one of my favorite parts of cooking.
Frequently Asked Questions
What is a No-Bake Vegan Chocolate Tart?
A no-bake vegan chocolate tart is a dessert made from a crumbly nut base and a smooth chocolate filling, requiring no baking. It is made entirely from plant-based ingredients, making it a rich and satisfying treat perfect for warm days.
What are the benefits of no-bake desserts?
No-bake desserts are quick to prepare, often requiring fewer ingredients than baked goods, which means less fuss and fewer dishes to wash. They also tend to retain more nutrients from raw ingredients, providing a lighter feel after meals.
How does a vegan chocolate tart differ from a traditional one?
Vegan chocolate tarts use plant-based ingredients like coconut cream or silken tofu instead of butter, cream, and eggs. This allows for a rich, creamy texture without any animal products, catering to various dietary restrictions.
What are the key ingredients for the base of the tart?
The base of the tart typically includes a mix of nuts (such as almonds and walnuts) and dates, which provide flavor and help bind the crust together.
What ingredients are used in the chocolate filling?
The chocolate filling is made using high-quality cocoa powder, coconut cream or silken tofu, a splash of vanilla extract, and a sweetener, usually maple syrup.
What toppings can be added to the no-bake vegan chocolate tart?
Recommended toppings include fresh fruits like strawberries or raspberries, a dollop of vegan whipped cream, and a sprinkle of nuts for added texture and visual appeal.
How long does the tart need to chill to set properly?
The tart should chill for at least four hours, although leaving it overnight is ideal for the filling to set perfectly, making it easier to slice.
What are some variations of the no-bake vegan chocolate tart?
Some popular variations include a mint chocolate tart by adding peppermint extract and a peanut butter chocolate tart by swirling in natural peanut butter before pouring it onto the crust. Read Interesting article: Chewy Vegan Oatmeal Raisin Cookies (A Classic, Perfected)
What are the best storage practices for the tart?
The tart should be stored in an airtight container in the refrigerator to keep it fresh. It can also be frozen in individual slices wrapped in plastic wrap for longer storage.
How long does the no-bake vegan chocolate tart last?
This tart can last in the refrigerator for about 5 to 7 days and can be frozen for 2 to 3 months. It’s advisable to label containers with the date for tracking purposes.