
Get ready to enjoy a delightfully easy and delicious no-knead gluten-free focaccia bread! With its rich olive oil flavor and aromatic herbs, this bread is sure to impress your family and friends. Read Interesting article: This Creamy Cheesy Veg Bake Is All Over My Feed
Understanding No-Knead Bread Techniques
What is No-Knead Bread?
No-knead bread is a simple method of making bread that requires minimal effort and time. Instead of the traditional method, which involves kneading the dough to develop gluten, no-knead bread relies on a long fermentation process. This slow rising allows the dough to gain structure and flavor without the need for vigorous mixing. I first came across this technique a few years ago, and I was amazed at how easy it was to create a crusty, airy loaf without all the hard work. It’s like a little miracle in a bowl! When it comes to gluten-free no-knead bread, the method remains the same, but we use gluten-free flours to achieve that delightful texture and taste.
Benefits of No-Knead Techniques
One of the biggest benefits of the no-knead method is the convenience it offers. I remember my initial apprehension about making bread—kneading seemed so intimidating! But with no-knead bread, all you have to do is mix the ingredients and let it sit. The slow fermentation creates a lovely, tangy flavor that’s hard to beat. Plus, you don’t have to worry about overworking the dough. This technique is also perfect for gluten-free baking, as gluten-free doughs can often be tricky. With this approach, I discovered I could achieve a light and fluffy focaccia without the traditional kneading process. Read Interesting article: The Internet Is Freaking Out Over This Veg Curry Hack
How Gluten-Free Bread Differs
Gluten-free bread differs from regular bread mainly because it lacks gluten, the protein that gives traditional bread its structure. In my experience, gluten-free flours behave differently, requiring some adjustments in recipes. For instance, they often need more moisture and sometimes a binding agent, like xanthan gum, to help mimic the properties of gluten. When I first started experimenting with gluten-free focaccia, I had to learn how various flours, like almond or rice flour, would affect the texture and taste. The beauty of no-knead gluten-free focaccia lies in its ability to rise beautifully without the typical gluten structure, making it a wonderful option for those with dietary restrictions.
Essential Ingredients for Gluten-Free Focaccia
Gluten-Free Flour Options
Choosing the right gluten-free flour is crucial for making a successful focaccia. I’ve tried various blends, and my favorites usually include a combination of almond flour, brown rice flour, and tapioca flour. Each flour brings its unique flavor and texture to the table. Almond flour gives a nutty richness, while brown rice flour adds a bit of chewiness, and tapioca flour helps create that airy texture we all love. If you’re looking for a ready-made option, many stores now offer gluten-free all-purpose blends that work well in no-knead recipes. Just make sure it contains a binding agent to help hold everything together.
Choosing the Right Olive Oil
Olive oil plays a significant role in the flavor of focaccia, so I always opt for a high-quality extra virgin olive oil. The rich, fruity notes in good olive oil enhance the bread’s flavor, making it more delightful. When I drizzle olive oil over the dough before baking, it creates that beautiful golden crust everyone loves. You can also add infused oils for an extra kick—think garlic or chili-infused varieties. Trust me, the flavor really elevates the overall experience!
Herbs and Seasonings for Flavor
Herbs and seasonings are where you can get creative. I firmly believe that focaccia is a blank canvas for your favorite flavors. Classic choices include rosemary, thyme, and oregano. I often sprinkle fresh or dried herbs on top of the dough before baking to infuse that aromatic scent into the bread. For a twist, I’ve also experimented with za’atar or even some spicy red pepper flakes. The combination of herbs with olive oil creates a wonderful aroma that fills the kitchen, making it hard to resist diving in right after it comes out of the oven.
Additional Ingredients (e.g., Salt, Yeast, Water)
Don’t overlook the basics! You’ll need salt, yeast, and water—simple ingredients that make a world of difference. I usually use active dry yeast, which is readily available and easy to use. With the right yeast, the dough rises beautifully, creating that lovely airy texture. Salt, on the other hand, enhances the flavors and balances the bread’s richness. I generally mix the salt in with the dry ingredients to ensure even distribution. Lastly, the water needs to be warm—not too hot or too cold—to activate the yeast effectively. Getting these basic ingredients right is key to achieving that perfect focaccia.
Step-by-Step Guide to Making No-Knead Gluten-Free Focaccia
Preparing the Dough
Getting started on our no-knead gluten-free focaccia is an exciting part of the process. First, I gather all my ingredients and tools. I like to use a large mixing bowl to give the dough plenty of room to rise. I start by combining the gluten-free flour blend, salt, and yeast in the bowl, making sure everything is well mixed. Then, I make a little well in the center and pour in warm water and olive oil. It’s important to use warm water because it helps activate the yeast—too hot, and you risk killing the yeast, too cold, and it won’t do much at all. I gently stir everything together with a wooden spoon until a shaggy dough forms. It’s okay if it looks a bit messy at this stage; it will come together beautifully as it rests.
Fermentation Process
Once the dough is mixed, I cover the bowl with a clean kitchen towel or plastic wrap and place it in a warm spot in my kitchen. This part is magic! The dough needs to ferment for at least 8 to 12 hours, or even up to 24 hours if I’m feeling patient. I’ve found that longer fermentation really enhances the flavor and texture of the focaccia. As the hours pass, I can almost feel the excitement building in the kitchen as the dough starts to rise and bubble. Just imagine the lovely aroma that will soon fill your home! When it’s ready, the dough should be sticky and doubled in size.
Shaping the Focaccia
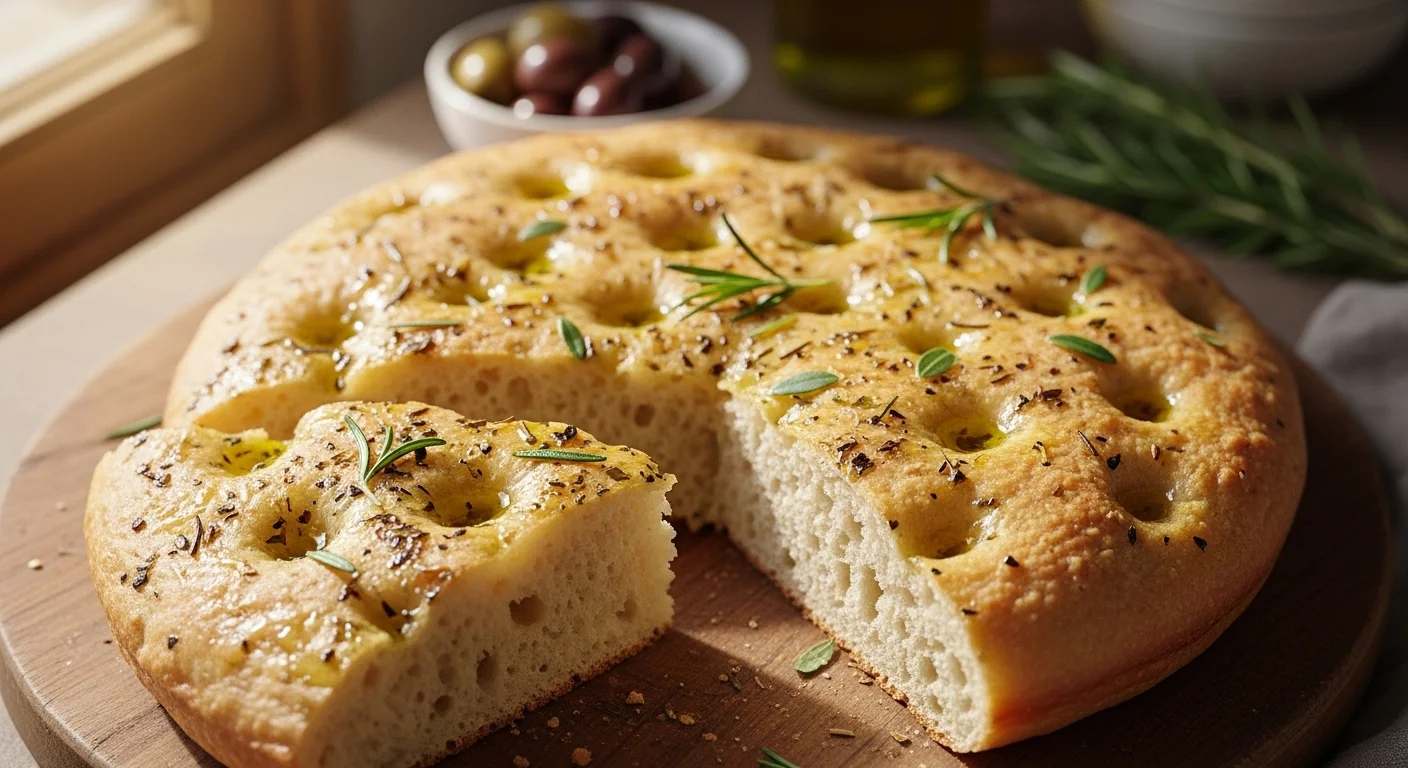
After the fermentation is complete, it’s time to shape the focaccia. I prepare a baking pan by generously greasing it with olive oil—don’t be shy, you want that crispy crust! I gently scrape the dough out of the bowl onto the pan, being careful not to deflate it too much. Using my hands, I spread the dough out to fit the size of the pan. If it’s a little sticky, I find that wetting my fingertips helps prevent it from sticking to me. Once the dough is shaped, I use my fingers to create those signature dimples all over the surface. This is not only decorative, but it also holds the olive oil and seasonings beautifully, adding flavor and texture.
Baking Techniques and Tips
Now for the best part—baking! I preheat my oven to 425°F (220°C) while I finish preparing the focaccia. Just before it goes in, I drizzle extra olive oil over the top and sprinkle on my favorite herbs and seasonings. I usually go for a good pinch of flaky sea salt, which adds an irresistible crunch and enhances the flavors. Once the oven is hot, I place the focaccia inside and let it bake for about 20 to 25 minutes. I keep an eye on it, as ovens can vary. When it’s golden brown and the house smells heavenly, I know it’s done! Letting the focaccia cool in the pan for a few minutes before transferring it to a wire rack helps it maintain its texture. It’s so hard to wait, but trust me, it’s worth it.
Flavor Variations and Add-Ins
Herb Combinations (e.g., Rosemary, Thyme)
Once I mastered the basic focaccia, I couldn’t help but experiment with different herb combinations, and that’s where the fun truly begins! Rosemary is a classic choice that I adore; its woodsy aroma pairs so well with the olive oil. I also love to sprinkle fresh thyme on top for a hint of floral notes. Sometimes, I mix and match herbs to create unique blends. For instance, a combination of rosemary and oregano gives a lovely Italian twist that transports me straight to a sunny café in Italy. Don’t be afraid to go wild with the herbs—it’s all about what flavors you love!
Incorporating Vegetables (e.g., Tomatoes, Olives)
Vegetables can add so much character to your focaccia! I’ve had great success with adding cherry tomatoes, which burst and release their juices while baking, creating pockets of flavor. I also love to scatter sliced olives over the dough; their briny flavor perfectly complements the bread. Another favorite of mine is roasted garlic. Just a few cloves mixed into the dough or placed on top elevates the taste to a whole new level! The key is to make sure any vegetables you add are well-drained or cooked beforehand so they don’t introduce too much moisture to the dough.
Cheese and Other Toppings
Cheese is a game-changer for focaccia! I often sprinkle crumbled feta or mozzarella on top before baking. The gooey melted cheese creates a delightful contrast against the crunchy crust. For a bit of a kick, I’ve experimented with spicy cheeses, like pepper jack. If I’m feeling indulgent, I might even add a drizzle of balsamic reduction after baking for that perfect finishing touch. The combination of flavors makes every bite a little celebration. Remember, focaccia is versatile, so feel free to mix and match your favorite toppings!
Serving Suggestions and Pairings
Best Accompaniments (e.g., Dips, Spreads)
When it comes to serving my gluten-free focaccia, I love to get creative with dips and spreads. One of my go-to accompaniments is a simple olive oil and balsamic vinegar mix. Just a drizzle of good-quality olive oil with a splash of balsamic creates an irresistible dip that complements the bread perfectly. I often add some freshly cracked black pepper or a sprinkle of sea salt to elevate the flavors even more.
Another fantastic option is a garlic herb spread. I usually blend softened butter with minced garlic, fresh herbs, and a pinch of salt. Spreading this on warm focaccia is pure bliss! If you’re looking for something lighter, a yogurt dip with herbs like dill or mint works wonders. It’s refreshing and pairs beautifully with the bread’s rich flavors. You can also try hummus or baba ganoush for a Mediterranean twist, which adds a lovely depth of flavor.
For those who enjoy a little heat, I recommend a spicy red pepper spread. The kick adds an exciting dimension to the focaccia, making it a hit at gatherings. I’ve noticed that serving a variety of dips encourages everyone to get creative and mix flavors, which makes for a fun and interactive experience around the table.
Using Focaccia in Meals (e.g., Sandwiches, Bruschetta)
My favorite way to enjoy focaccia, aside from simply tearing off a piece and savoring it on its own, is to use it in meals. It makes a fantastic base for sandwiches! I often slice a piece in half and fill it with my favorite ingredients. One combination I absolutely love is roasted vegetables, fresh mozzarella, and a drizzle of pesto. The warm focaccia complements the creamy cheese and flavorful veggies beautifully.
Sometimes, I go for a classic Italian-inspired sandwich with prosciutto, arugula, and a touch of fig jam. The sweetness of the jam paired with the salty prosciutto is just divine! I’ve even made breakfast sandwiches with scrambled eggs and avocado, which is a hearty way to start the day.
Focaccia also shines as a base for bruschetta. I love to top it with a mixture of diced tomatoes, garlic, fresh basil, and a drizzle of balsamic reduction. This combination is not only delicious but also looks stunning on a platter. It’s always a crowd-pleaser at parties or family gatherings, and it’s so easy to put together!
Another fun idea is to cut it into small squares and serve it as an appetizer with various toppings—think charcuterie board style! Pairing it with cheeses, olives, and cured meats creates a delightful tasting experience.
Storage and Reheating Tips
How to Store No-Knead Focaccia
After enjoying my focaccia, I often wonder how to store any leftovers. If I happen to have some left (which is rare!), I generally let it cool completely before storing it. I find that wrapping it tightly in plastic wrap or placing it in an airtight container helps keep the moisture in, preventing it from becoming stale. For me, the focaccia usually stays fresh for a couple of days at room temperature. However, if I know I won’t eat it in that time, I prefer to freeze it.
To freeze, I slice the focaccia into portions, making it easier to thaw just what I need later. I wrap each piece individually in plastic wrap and then place them in a freezer-safe bag. This way, it stays fresh for up to a month. When I’m ready to enjoy it again, it’s just a matter of thawing it at room temperature or in the fridge overnight.
Best Methods for Reheating
Reheating focaccia is a breeze! I’ve found that the best method is to use the oven, as it helps restore that lovely crust. I simply preheat my oven to 350°F (175°C) and place the focaccia directly on the oven rack or on a baking sheet for about 10-15 minutes. This method revives the texture beautifully, making it crispy on the outside and soft on the inside.
If I’m in a hurry, I’ll also use a toaster oven. Just a few minutes on the toast setting does wonders! Alternatively, I sometimes microwave it for a quick fix, but I make sure to wrap it in a damp paper towel to prevent it from drying out. However, I find that this method doesn’t give the same satisfying texture as the oven or toaster oven.
Whether I’m enjoying it fresh out of the oven or reheated, gluten-free focaccia always brings a smile to my face. It’s versatile, delicious, and a true labor of love that’s worth every bite!
Common Questions About Gluten-Free Focaccia
Can I Make This Recipe Vegan?
Absolutely! I’ve experimented with vegan versions of my no-knead gluten-free focaccia, and it works beautifully. Instead of using eggs or any dairy products, I simply replace the olive oil with an equal amount of a plant-based oil, like avocado or canola oil. For the liquid, water or a plant-based milk (like almond or oat milk) works perfectly. The key is to ensure you maintain the same proportions of wet to dry ingredients to keep the dough’s consistency just right. I think you’ll find that the flavor remains delightful, and the focaccia still has that lovely texture we all love!
How Can I Adjust for Allergies?
When it comes to allergies, I always recommend being cautious. For those allergic to nuts, I advise steering clear of almond flour and opting for a blend that includes rice flour, oat flour, or chickpea flour instead. If you’re avoiding certain seeds or grains, there are plenty of gluten-free flours available that can provide great results. I’ve even had success using a blend of sorghum flour and tapioca flour for a nut-free option. Always read labels carefully, especially when using pre-mixed gluten-free flour blends, as they may contain allergens. It’s all about finding what works for you, and with a little experimentation, I’m sure you can create a focaccia that suits your needs!
What to Do if the Dough is Too Sticky?
Ah, the dreaded sticky dough! I’ve been there, and it can be frustrating. If your dough feels too sticky after mixing, don’t worry! First, let it rest for a bit; sometimes, the flour just needs time to absorb the moisture. If it’s still too sticky after resting, you can try adding a little more gluten-free flour—just a tablespoon at a time—until it reaches a more manageable consistency. I’ve found that wetting my hands when handling sticky dough also helps immensely. This way, I can shape it without it clinging too much. Remember, a little stickiness is normal with gluten-free dough, so don’t stress too much about it. Embrace the process, and you’ll be rewarded with a delicious focaccia!
Final Thoughts
Making no-knead gluten-free focaccia has truly been a game-changer for me. It’s a delightful blend of simplicity and flavor, and I love how adaptable it is to different tastes and dietary needs. Whether you’re enjoying it fresh out of the oven, using it in a sandwich, or sharing it with friends and family, there’s something special about this bread. I encourage you to experiment and find your favorite combinations of herbs, vegetables, or toppings—each batch can be a new adventure. Remember, baking is as much about the journey as it is about the final product. So roll up your sleeves, have fun, and enjoy every delicious bite of your homemade focaccia. I can’t wait to hear about your experiences and what variations you come up with! Read Interesting article: I Tried the TikTok Chicken Alfredo Lasagna—WOW
Frequently Asked Questions
What is no-knead bread?
No-knead bread is a simple method of making bread that requires minimal effort and time, relying on a long fermentation process instead of traditional kneading to develop gluten. This technique allows the dough to gain structure and flavor without vigorous mixing.
How does gluten-free bread differ from regular bread?
Gluten-free bread lacks gluten, the protein that gives traditional bread its structure. Gluten-free flours behave differently, often requiring more moisture and sometimes a binding agent like xanthan gum to mimic gluten’s properties.
What gluten-free flours work best for focaccia?
Successful focaccia can be made using a combination of almond flour, brown rice flour, and tapioca flour. These flours contribute unique flavors and textures. Many stores also offer gluten-free all-purpose blends that work well in no-knead recipes.
How should olive oil be selected for focaccia?
Choosing a high-quality extra virgin olive oil is essential, as it enhances the flavor of the focaccia. Infused oils, such as garlic or chili-infused varieties, can also be used to elevate the overall taste.
What is the fermentation process for no-knead focaccia?
The dough needs to ferment for at least 8 to 12 hours, or up to 24 hours for enhanced flavor and texture. The dough should be covered and placed in a warm spot, allowing it to rise and bubble during this time.
How should focaccia be shaped before baking?
After fermentation, the dough is gently scraped onto a greased baking pan and spread to fit its size. Dimples are created on the surface using fingers, which hold olive oil and seasonings, adding flavor and texture.
What are some suggested toppings or add-ins for focaccia?
Herbs like rosemary and thyme, vegetables such as cherry tomatoes and olives, and cheeses like feta or mozzarella can be added to enhance flavor. Mixing and matching these ingredients allows for creative variations.
How should leftover focaccia be stored?
Leftover focaccia should be cooled completely, then wrapped tightly in plastic wrap or stored in an airtight container to keep moisture in. It typically stays fresh for a couple of days at room temperature or can be frozen for up to a month.
What are the best methods for reheating focaccia?
The best method for reheating focaccia is in the oven at 350°F (175°C) for 10-15 minutes, which helps restore its crust. A toaster oven can also be used, or it can be microwaved wrapped in a damp paper towel, although this method may not achieve the same texture.
Can this focaccia recipe be made vegan?
Yes, the recipe can be made vegan by replacing olive oil with a plant-based oil and using water or plant-based milk instead of dairy. Maintaining the same proportions of wet to dry ingredients is key to preserving the dough’s consistency.