
There’s something magical about soft and fluffy sourdough sandwich bread that elevates any meal. This isn’t just a recipe; it’s a journey into the art of bread-making that transforms our daily sandwiches into delightful culinary experiences. If you’re looking for an easy start, check out The Easiest No-Knead Sourdough Bread (A Simple Method).
Understanding Sourdough Bread
What is Sourdough?
Sourdough is more than just bread; it’s a celebration of natural fermentation. At its core, sourdough relies on wild yeast and lactic acid bacteria to create a tangy flavor and chewy texture. Unlike commercial yeast, which provides quick results, sourdough takes its time—sometimes even days! This slow process not only develops complex flavors but also enhances the bread’s texture. I remember the first time I tasted homemade sourdough, with its crusty exterior and soft, airy inside. It was a revelation, and since then, I’ve been hooked.
History of Sourdough Bread
Sourdough has a rich history that dates back thousands of years. In ancient civilizations like Egypt, bakers discovered that letting dough sit out allowed it to ferment naturally, leading to a rise in the bread. This method became the foundation for sourdough bread, which has been enjoyed across cultures ever since. I love imagining the early bakers, with their simple ingredients, creating something so delicious and enduring. Sourdough has seen a resurgence in recent years, with many home bakers embracing this age-old technique. It’s not just about bread; it’s about connecting with our culinary heritage.
Benefits of Sourdough Bread
One of the reasons I adore sourdough is the health benefits it offers. The fermentation process breaks down gluten, making it easier for some people to digest. Plus, the natural acids produced during fermentation help preserve the bread, allowing it to last longer without preservatives. I often find myself reaching for sourdough over other types of bread, knowing it’s not only delicious but also a bit kinder to my body. Additionally, the probiotics present can support gut health, making sourdough a more nutritious choice compared to conventional bread. Each slice feels like a step toward a healthier lifestyle, and I appreciate that so much.
Key Ingredients for Soft & Fluffy Sourdough Sandwich Bread
Flour Types: All-Purpose vs. Bread Flour
The choice of flour plays a significant role in how our sourdough bread turns out. I’ve experimented with both all-purpose and bread flour, and I’ve noticed distinct differences. Bread flour, with its higher protein content, yields a chewier texture and better rise, which is essential for that soft and fluffy sandwich bread we crave. When I opt for bread flour, the dough feels more elastic and holds its shape beautifully. However, using all-purpose flour can still produce lovely bread, and it’s a great option if that’s what you have on hand. I recommend starting with bread flour for the best results, but don’t be afraid to experiment! If you’re interested in whole grain options, consider trying Hearty Whole Wheat Sourdough Bread (A Wholesome Loaf).
Importance of Starter: What is a Sourdough Starter?
A sourdough starter is the heart and soul of sourdough bread. It’s a mixture of flour and water that captures wild yeast and bacteria from the environment. I remember the excitement of creating my first starter, feeding it daily, and watching it bubble and grow. It’s like nurturing a little pet! Keeping the starter alive can be a commitment, but it’s incredibly rewarding. I’ve found that a well-fed starter not only helps the bread rise but also contributes to its depth of flavor. The tanginess that comes from a mature starter is what sets sourdough apart from other types of bread.
Water Quality and Temperature Considerations
Water might seem like a simple ingredient, but its quality and temperature can significantly impact our bread. I’ve learned to use filtered water whenever possible, as chlorine can inhibit yeast activity. Additionally, the temperature of the water can affect fermentation. I usually aim for lukewarm water, around 80°F, which helps activate the yeast while avoiding overheating. If I’ve ever used cold water straight from the tap, I noticed my dough took longer to rise, which can be frustrating when I’m eager for fresh bread. Finding the right balance with water has made a noticeable difference in my baking.
Salt: Role and Importance in Sourdough
Salt is another critical component in sourdough bread. Beyond flavor, it strengthens the gluten structure and controls fermentation. I’ve made the mistake of skimping on salt in the past, thinking it wouldn’t matter much. Let me tell you, it does! Bread made without enough salt can taste flat and lack character. I find that adding salt not only enhances the flavor but also creates a more balanced loaf. When I mix in the salt during the dough preparation, it feels like I’m giving my bread the final touch it needs to shine. It’s a small step, but it makes a big difference!
Essential Equipment for Baking Sourdough Sandwich Bread
Baking Tools You Need
When I first started my sourdough baking journey, I realized that having the right tools made all the difference. While you don’t need to break the bank, there are a few essentials that I find invaluable. First, a good mixing bowl is crucial. I prefer a large glass or stainless-steel bowl, as they’re easy to clean and help me see how the dough is developing. Next, a bench scraper is a game changer. It’s perfect for shaping the dough and transferring it from the work surface to the baking pan. I can’t tell you how many times I’ve struggled with sticky dough, and having that scraper at hand has saved me from a messy kitchen! A kitchen scale is also a must-have in my toolbox. Measuring ingredients by weight ensures accuracy and consistency, which is key in baking. I remember the first time I tried to measure flour using cups; I ended up with way too much flour, and my bread turned out dense. Once I switched to a scale, my results improved significantly. Lastly, I recommend investing in a good thermometer. This helps me monitor both the dough temperature and the water temperature, ensuring everything is just right for fermentation. It’s these little things that really elevate the whole baking experience.
Oven Setup: Using a Dutch Oven vs. Baking Stone
The way I set up my oven has a big impact on how my sourdough turns out. One of my favorite methods is using a Dutch oven. It creates a mini-steam environment, which helps the bread rise beautifully and develop that desirable crust. When I place my dough inside the preheated Dutch oven, I can almost hear it singing as it bakes, releasing the most wonderful aroma that fills my kitchen. If you don’t have a Dutch oven, a baking stone is another fantastic option. I’ve used both methods, and I’ve found that a baking stone can produce an incredible crust as well. Just remember to preheat it for at least half an hour before baking, as this will ensure a nice oven spring. I usually place a pan with water at the bottom of the oven to create steam, which mimics the Dutch oven effect. Whichever method you choose, the goal is to create a hot and steamy environment to help our dough rise and develop its crust. I’ve learned that small adjustments in my oven setup can make a noticeable difference in the final loaf.
Step-by-Step Guide to Making Soft & Fluffy Sourdough Sandwich Bread
Preparing the Sourdough Starter
Before diving into making the actual bread, I always make sure my sourdough starter is in tip-top shape. A healthy starter is the key to a successful loaf. I typically feed mine the night before I plan to bake, ensuring it’s bubbly and active by the morning. It’s like a little pet that I take care of, and seeing it rise and bubble gives me such joy! I’ve learned that the ratio of flour to water can influence how my starter performs. I usually stick to a 1:1 ratio for feeding, but I’ve experimented with different flours, like whole wheat or rye, for added flavor and activity. Just remember to keep an eye on it; if it doubles in size within a few hours, you know it’s ready to go!
Mixing Ingredients
Once my starter is ready, the real fun begins! I gather my ingredients: flour, water, salt, and of course, my bubbly starter. I’ve found that mixing by hand is the most satisfying way to feel the dough come together. I start by combining the starter with the water in a large bowl, letting the starter dissolve. Then I gradually add the flour, mixing with my hands until everything is well combined. This is the moment I often find myself getting a bit messy, and I love it! The dough may seem shaggy at first, but I trust the process. After mixing, I let it rest for about 30 minutes to allow the flour to hydrate. This step, known as autolyse, really helps with the dough’s texture.
Autolyse: Why It’s Important
Autolyse is one of those magical steps that I’ve learned to appreciate. It allows the flour to fully absorb the water, which softens the dough and makes it easier to knead later on. I usually set a timer for 30 minutes and use this time to clean up my workspace or just enjoy a cup of coffee while I wait. It feels like a well-deserved break amidst the excitement of baking! After the autolyse period, I sprinkle the salt over the dough and mix it in. I’ve noticed that this method helps distribute the salt evenly, which is essential for flavor. Plus, it gives me a chance to feel the dough’s changing texture as the gluten begins to develop.
Bulk Fermentation Process
Now comes the bulk fermentation stage, and this is where the magic really happens. I usually cover my bowl with a damp cloth and let the dough rise for about 4-6 hours at room temperature. During this time, I like to stretch and fold the dough every 30 minutes for the first couple of hours. This technique helps build strength in the dough, and I can see it puffing up each time I check on it. I find this part of the process so gratifying. Watching the dough grow and change is like witnessing a little miracle unfold right before my eyes. Once it’s doubled in size and looks airy, I know it’s time to move on to shaping!
Shaping the Dough
Shaping is one of my favorite parts. I gently turn the dough out onto a floured surface and use a bench scraper to divide it into two portions. As I shape each piece, I try to create tension in the dough, which helps it hold its shape during the final proof. I’ve learned that being gentle yet firm is key here. After shaping, I place the dough into greased loaf pans, making sure it’s snug but not too tight. The anticipation builds as I cover them and let them rest for another hour or so before the final proof. I often find myself peeking under the cloth, eager to see how much they’ve risen.
Final Proofing Techniques
The final proof is essential for achieving that soft and fluffy texture we all crave. I typically let my shaped dough rise until it has roughly doubled in size. This can take anywhere from 1 to 2 hours at room temperature, depending on the warmth of my kitchen. If I’m feeling impatient, I sometimes place it in a slightly warm oven (turned off) to encourage a faster rise. I’ve also experimented with cold proofing in the fridge overnight, which can enhance the flavor and texture. There’s something so rewarding about waking up to a perfectly proofed dough, ready to bake!
Baking the Bread
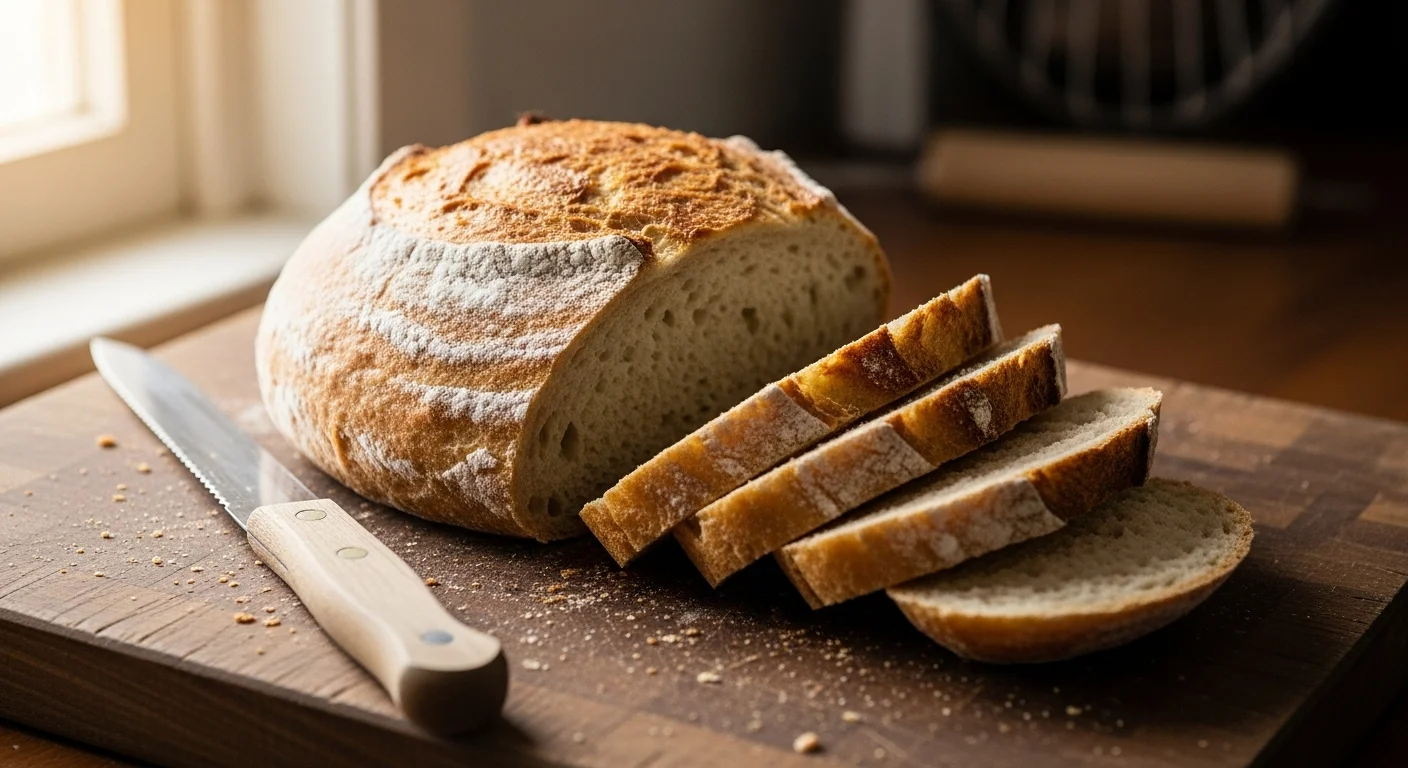
Finally, the moment I’ve been waiting for arrives: baking! I preheat my oven to 450°F and place my Dutch oven inside to heat up. Once it’s ready, I carefully transfer the dough into the pot, using parchment paper for easy lifting. I like to score the top with a sharp blade, which allows for controlled expansion during baking. The aroma that fills my kitchen as the bread bakes is pure bliss. I usually bake it covered for the first 30 minutes to trap steam, then remove the lid for the last 15-20 minutes to achieve that gorgeous golden crust. When the timer goes off, I can hardly contain my excitement!
Cooling and Storing Your Bread
After pulling the bread from the oven, I let it cool on a wire rack. This step is crucial, as slicing into hot bread can lead to a gummy texture. I try to be patient, but the smell is almost too tempting! Once it’s cooled, I usually slice into it and enjoy my first piece with a pat of butter. There’s nothing quite like that first bite of warm, homemade sourdough. For storing, I’ve found that keeping it in a paper bag at room temperature helps maintain the crust. If I have leftovers, I wrap them in a clean kitchen towel or store them in an airtight container to keep them fresh longer. I’ve learned that sourdough bread freezes beautifully, too. Just slice it and place it in a freezer bag for future sandwiches!
Common Issues and Troubleshooting
Dense Texture: Causes and Solutions
One of the most common issues I’ve faced while baking sourdough is a dense texture. It can be quite disappointing after all the time and effort put into the process. From my experience, several factors can lead to this problem. First and foremost, under-proofing can be a culprit. If the dough hasn’t risen adequately before baking, it won’t have the airiness we desire. I’ve learned to be patient and give my dough the time it needs to rise properly.
Another reason for dense bread could be the flour. Using a flour with lower protein content can affect the gluten development, leading to a heavy loaf. That’s why I always stick to bread flour for a lighter, fluffier result. Additionally, if I’ve added too much water during mixing, it can lead to a sticky dough that can collapse while baking. I make sure to measure carefully and adjust my hydration levels based on the flour I’m using. If I find my bread coming out dense, I take a moment to reflect on these factors and adjust accordingly next time.
Crust Too Hard: Adjusting Baking Techniques
Another challenge I’ve encountered is a crust that’s too hard or thick. While a nice crust is essential for sourdough, it shouldn’t feel like I’m biting into a rock! I’ve discovered that the baking time and temperature can play a significant role here. If I bake at too high a temperature for too long, it can result in an overly tough crust. I typically lower the temperature slightly or reduce the baking time if I notice this happening.
Also, the use of steam during the initial baking phase is vital. If I forget to use a Dutch oven or create steam in the oven, the crust can harden too much. To avoid this, I recommend placing a pan of boiling water at the bottom of the oven or using a spray bottle to mist the inside of the oven during the first few minutes of baking. This moisture helps create a crisp but tender crust, which is what we all want!
Flavor Issues: Improving Sourdough Taste
Sometimes, the flavor of my sourdough isn’t as vibrant as I hoped. I’ve realized that the key to a delicious sourdough loaf lies in the starter. A healthy, well-fed starter contributes significantly to the bread’s flavor profile. If my bread tastes bland, it could mean my starter wasn’t active enough. I always feed my starter regularly and make sure it’s bubbly and at its peak before using it.
Another factor is the fermentation time. I’ve experimented with longer bulk fermentation, and I’ve found that allowing the dough to rise more slowly can develop deeper flavors. I sometimes even opt for a cold fermentation in the fridge overnight, which enhances the taste and creates a more complex flavor profile. I encourage you to taste your starter and bread throughout the process; it’s a delightful way to learn and adjust as you go!
Variations and Add-Ins for Sourdough Sandwich Bread
Herb and Cheese Variations
One of my favorite ways to elevate sourdough is by adding herbs and cheese. I love the aroma that fills my kitchen when I incorporate fresh herbs like rosemary or thyme into the dough. They add a lovely flavor and make the bread a standout. When I’m feeling indulgent, I sometimes mix in shredded cheese, like cheddar or mozzarella, as well. The melty cheese creates pockets of flavor that make every bite a delight. I remember the first time I made a herbed cheese loaf; it was gone within hours!
Whole Grain vs. White Sourdough Bread
Another delicious variation I’ve enjoyed experimenting with is the choice between whole grain and white sourdough bread. I find that using whole wheat flour adds a nutty flavor and a slightly denser texture, which can be really satisfying. However, I still love the lightness of white sourdough. I often blend the two by using a portion of whole wheat flour with bread flour, which gives me the best of both worlds. This way, I enjoy the benefits of whole grains while still achieving that soft and fluffy texture I crave. If you’re curious about making bagels, check out How To Make Chewy Sourdough Bagels (A Step-By-Step Guide).
Sweet Additions: Raisins, Nuts, and Seeds
Sometimes, I want to add a touch of sweetness to my sourdough. I’ve found that adding raisins or dried fruits can create a delightful contrast to the tanginess of the bread. I like to soak them in warm water first to plump them up before folding them into the dough during the mixing stage. Nuts and seeds also make fantastic additions. I often toss in sunflower seeds or walnuts, which add crunch and flavor. It’s incredible how these little add-ins can transform a basic loaf into something special, perfect for breakfast or a snack.
Frequently Asked Questions
What is sourdough bread?
Sourdough is a type of bread that relies on natural fermentation using wild yeast and lactic acid bacteria. This process creates a tangy flavor and chewy texture, taking longer than commercial yeast methods to develop complex flavors and enhance texture.
What are the health benefits of sourdough bread?
The fermentation process in sourdough bread breaks down gluten, making it easier to digest for some people. It also contains natural acids that preserve the bread without preservatives and probiotics that can support gut health, making it a nutritious choice compared to conventional bread.
What type of flour is best for sourdough sandwich bread?
Bread flour is recommended for sourdough sandwich bread due to its higher protein content, which yields a chewier texture and better rise. However, all-purpose flour can also be used and still produce good results.
What is a sourdough starter?
A sourdough starter is a mixture of flour and water that captures wild yeast and bacteria from the environment. It is essential for making sourdough bread, as a well-fed starter helps the bread rise and contributes to its flavor.
Why is water quality important in sourdough baking?
Water quality is crucial because chlorine in tap water can inhibit yeast activity. It is recommended to use filtered water and to aim for lukewarm water around 80°F to help activate the yeast during fermentation.
What role does salt play in sourdough bread?
Salt is important in sourdough bread as it enhances flavor, strengthens the gluten structure, and controls fermentation. Insufficient salt can lead to bland-tasting bread.
What essential equipment is needed for baking sourdough sandwich bread?
Essential equipment includes a large mixing bowl, a bench scraper for shaping and transferring dough, a kitchen scale for accurate measurements, and a thermometer to monitor dough and water temperatures.
How can I improve the texture of my sourdough bread?
To improve texture, ensure the dough is properly proofed before baking, use bread flour for better gluten development, and carefully measure water to avoid a sticky dough that collapses while baking.
What variations can be made to sourdough bread?
Variations include adding herbs and cheese for flavor, using whole grain flour for a nuttier taste, or incorporating sweet ingredients like raisins, nuts, or seeds for added texture and flavor.
What should I do if my sourdough bread has a dense texture?
A dense texture can result from under-proofing, using flour with low protein content, or adding too much water. To resolve this, ensure proper proofing, use bread flour, and measure hydration carefully.