
If you’ve ever made sourdough bread, you know the frustration of dealing with that leftover sourdough discard. But what if I told you that it could lead to some of the most delicious, chewy gingersnaps you’ve ever tasted? Let’s dive into the world of spicy sourdough discard gingersnaps!
Understanding Sourdough Discard
What is Sourdough Discard?
When I first started baking sourdough bread, I was captivated by the process of fermentation and the incredible flavors it brought to my loaves. However, like many new bakers, I was perplexed by the need to discard a portion of the starter during feedings. This leftover portion is what we call sourdough discard. Essentially, it’s a mixture of flour and water that hasn’t been used in baking yet but still retains some of the beneficial wild yeast and bacteria from the sourdough culture.
Sourdough discard is often seen as a waste product, but I quickly learned it’s anything but! It has a tangy flavor that can enhance baked goods. Instead of tossing it out, I started looking for ways to incorporate it into my baking, which led me to create these delightful gingersnaps. For more ways to use up your ingredients, check out these summer fruit recipes!
Benefits of Using Sourdough Discard in Baking
Using sourdough discard in baking has become one of my favorite kitchen hacks. Not only does it help reduce waste, but it also brings unique flavors and textures to my recipes. One of the biggest benefits is moisture; the discard adds a soft, chewy texture that makes cookies like gingersnaps irresistible.
Additionally, the natural fermentation in sourdough discard can contribute to a more complex taste profile. I’ve noticed that recipes using discard often have a depth of flavor that you just can’t achieve with traditional baking methods alone. Plus, the acidity from the sourdough can help balance sweetness in desserts, making it perfect for spicing up classic recipes like gingersnaps.
How to Store Sourdough Discard
Storing sourdough discard is simple and can be done in a few different ways, depending on how quickly you plan to use it. If you’re like me and bake frequently, keeping it in the refrigerator is ideal. I usually transfer my discard to an airtight container and store it in the fridge, where it can last for about 1 to 2 weeks. Just remember to label the container with the date so you don’t lose track!
If you find you have too much discard and don’t plan to use it right away, you can freeze it as well. I’ve done this when I’ve had a particularly productive sourdough baking week. Just pour it into a freezer-safe bag or container, and it can last for several months. When you’re ready to bake, simply thaw it overnight in the fridge before using it in your recipes.
Ingredients for Spicy Sourdough Discard Gingersnaps
Main Ingredients
When it comes to making spicy sourdough discard gingersnaps, the ingredients are quite straightforward, yet they pack a punch in flavor. Here’s what I typically use:
- Sourdough Discard: This is the star of the show! I recommend using discard that has been fed at least once for the best flavor.
- Butter: I prefer unsalted butter for better control over the salt in the dough. Plus, the richness it adds is delightful.
- Brown Sugar and Granulated Sugar: Using both gives the cookies a deep, caramel-like sweetness. I often adjust the ratios based on my mood!
- Molasses: This ingredient is crucial for that classic gingersnap taste. It brings warmth and adds to the cookie’s chewiness.
- Egg: This binds the ingredients together and adds moisture.
Spice Variations for Gingersnaps
The spices are where the magic happens! I love experimenting with different spice combinations for my gingersnaps. The traditional spices like ground ginger, cinnamon, and cloves are a must, but I’ve also played around with cardamom and even a hint of black pepper for an unexpected kick. The warmth from these spices creates a cozy, inviting aroma that fills my kitchen and makes it hard to resist sneaking a taste of the dough!
Alternative Sweeteners
Sometimes I like to switch things up and experiment with alternative sweeteners. Honey or maple syrup can work in place of molasses for a different flavor profile. I’ve even tried coconut sugar for a more caramel-like sweetness. Just keep in mind that these alternatives might alter the texture slightly, so I always adjust the flour accordingly.
Choosing the Right Flour
Flour is another essential element in gingersnap cookies. I generally stick to all-purpose flour for my gingersnaps, as it provides the perfect balance between chewiness and structure. However, I’ve also dabbled with whole wheat flour for a nuttier flavor and a bit more nutrition. You can even use a gluten-free blend if you want to cater to dietary restrictions—just make sure to follow a recipe suited for gluten-free baking.
In my experience, the flour you choose can greatly affect the final texture, so don’t be afraid to experiment until you find the perfect balance for your taste buds!
Preparation Steps for Gingersnaps
Mixing the Dough
Once I’ve gathered all my ingredients, it’s time to mix the dough, which is one of the most satisfying parts of the process. I start by creaming the unsalted butter and sugars together in a large mixing bowl. The goal here is to achieve a light and fluffy mixture, which usually takes about 2-3 minutes of mixing. I love watching the sugars dissolve into the butter, creating a beautiful base for the cookies.
Next, I add in the molasses and the egg, mixing until everything is well combined. This is where the magic of flavor really begins to develop. The dark, rich molasses adds a deep color and a warm aroma that fills my kitchen. After that, I gently fold in the sourdough discard. I’ve found that using a spatula for this part helps ensure I don’t overmix, which can lead to tough cookies.
Now, it’s time to incorporate the dry ingredients. In a separate bowl, I whisk together the flour, baking soda, and spices. I usually sift them to avoid any lumps, especially since ground ginger and cinnamon can clump together. Then, I gradually add the dry mixture to the wet ingredients, combining everything until no dry flour remains. I personally love the moment when the dough starts to come together, and I can see the flecks of spice throughout—it’s like a promise of the delightful cookies to come!
Chilling the Dough: Importance and Techniques
Chilling the dough is a step I never skip. I’ve learned that allowing the dough to rest in the refrigerator for at least an hour helps the flavors meld together beautifully and firms up the mixture. This not only enhances the taste but also makes it much easier to handle when shaping the cookies. I typically wrap my dough in plastic wrap or place it in an airtight container, making sure it’s well-sealed to prevent drying out.
Sometimes, I’ll prepare the dough the night before and let it chill overnight. This is a great time-saver, especially if I’m planning to bake cookies for a gathering or just want a fresh batch on a cozy weekend morning. When I take the dough out of the fridge, I let it sit at room temperature for about 10-15 minutes to soften slightly, making it easier to shape.
Shaping the Cookies
Shaping the cookies is where I can really get creative! I usually start by preheating the oven and lining my baking sheets with parchment paper. Then, I scoop out portions of the chilled dough—about a tablespoon each. I love using a cookie scoop for uniformity, but if I’m feeling adventurous, I just use my hands.
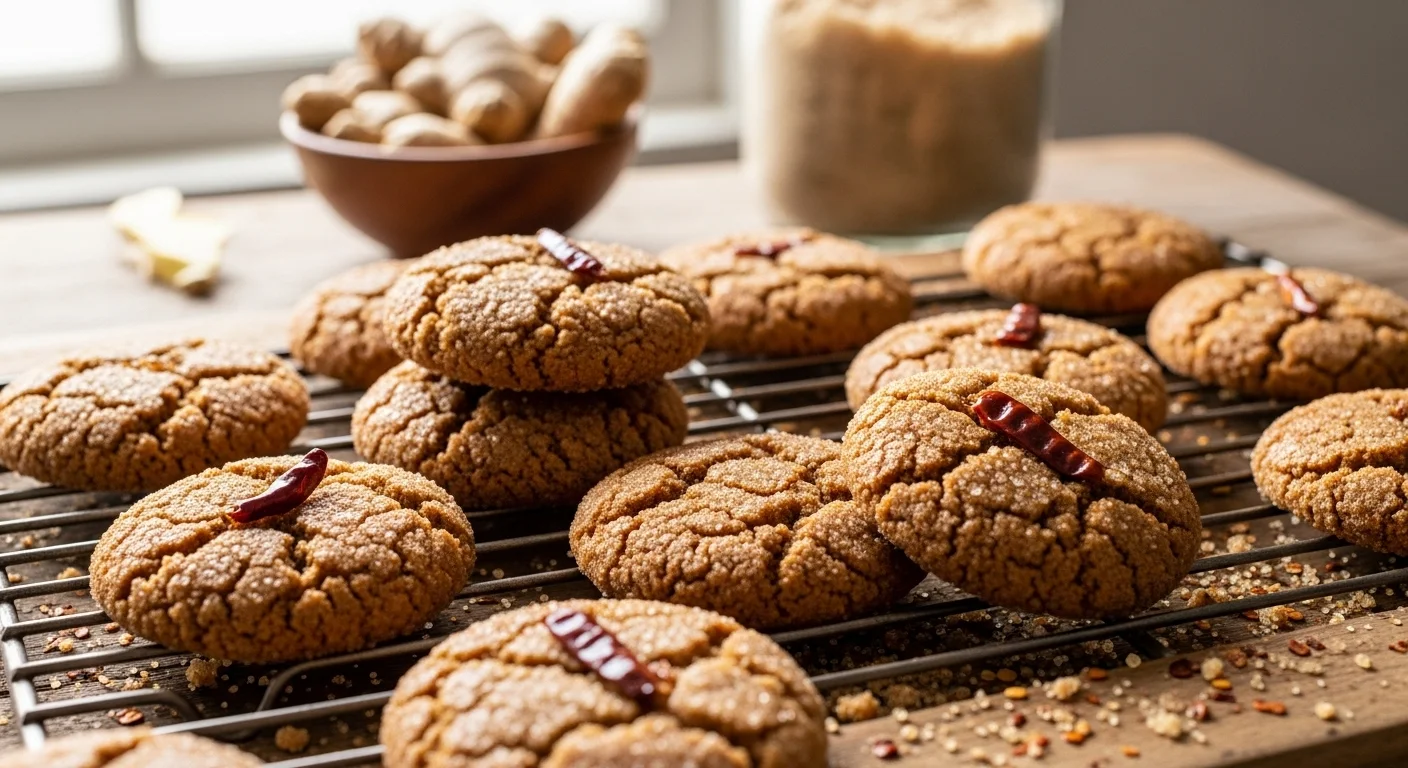
Once I have the dough balls, I roll them in granulated sugar before placing them on the baking sheet. This step adds a nice crunch to the outside of the gingersnaps and gives them that classic look. I like to leave enough space between the cookies, about two inches, to allow for spreading during baking.
If I want to add a bit more flair, I sometimes press a fork or my fingers gently on top of the dough balls to create a unique pattern. It’s a simple touch that makes them look homemade and inviting. I’ve even experimented with sprinkling extra spices or coarse sugar on top at this stage, depending on my mood!
Baking Techniques for Perfect Gingersnaps
Oven Temperature and Baking Time
The baking stage is where all the hard work pays off. I preheat my oven to 350°F (175°C), which I find is ideal for gingersnaps. Once it’s heated, I place the cookie sheets in the oven, usually one at a time to ensure even baking. I bake them for about 10-12 minutes. I’ve learned that every oven behaves a little differently, so I keep an eye on them. The cookies should be set around the edges but still soft in the center when I take them out.
After baking, I let them cool on the baking sheet for a few minutes before transferring them to a wire rack. This step is crucial because the cookies continue to firm up as they cool. I’ve made the mistake of moving them too soon, resulting in a few broken cookies—and trust me, that’s a hard lesson to learn!
How to Achieve Chewy Texture
For me, the perfect gingersnap is chewy on the inside with a slight crisp on the outside. To achieve this texture, I’ve found that using a combination of baking time and the right ingredients makes all the difference. The higher moisture content from the sourdough discard, combined with the sugars, helps create that chewy bite I adore.
I also make sure not to overbake them. If I see a little shine in the center, I know they’re probably perfect. They’ll continue to cook a bit on the baking sheet after I take them out, which leads to that delightful chewiness. I’ve also experimented with adding an extra tablespoon of butter to the dough, which can enhance the chew factor even more!
Cooling and Storing Tips
Once the cookies have cooled completely, I store them in an airtight container at room temperature. I like to add a slice of bread or a small piece of apple to the container to help maintain their moisture. This trick helps keep those gingersnaps soft and chewy for days. If they last that long, of course—sometimes they disappear faster than I can store them!
If I ever have leftovers (rare, I know!), I also freeze them in a freezer-safe bag. I can pull them out and let them thaw at room temperature or pop them in the microwave for a few seconds for a warm, comforting treat. There’s something special about enjoying a homemade gingersnap, especially when it’s made with that precious sourdough discard!
Flavor Enhancements and Serving Suggestions
Pairing Gingersnaps with Beverages
When I take a batch of my spicy sourdough discard gingersnaps out of the oven, one of my favorite things to do is pair them with the perfect beverage. There’s something magical about the combination of flavors that elevates both the cookies and the drink. Personally, I love enjoying them with a steaming cup of chai tea. The spices in the tea complement the warm flavors of the gingersnaps beautifully, creating a cozy moment that’s hard to beat.
If I’m in the mood for something a little stronger, a classic hot cocoa works wonders too. The rich chocolate taste enhances the spiciness of the cookies, and the warmth of the cocoa feels like a big hug on a chilly day. I’ve also found that a simple glass of cold milk is always a timeless choice. There’s something delightful about dunking a gingersnap into a cold glass of milk, watching it soften just enough without falling apart.
Creative Ways to Use Gingersnaps in Desserts
Beyond simply enjoying gingersnaps on their own, I love finding creative ways to incorporate them into other desserts. One of my favorite things to do is to crush them up and use them as a crust for cheesecakes or tarts. The spicy and sweet notes of the cookies provide a fantastic contrast to the creamy fillings. It’s an easy way to elevate a dessert and surprise my guests!
Another fun idea I’ve tried is making a gingersnap ice cream sandwich. I take two freshly baked cookies and fill them with a scoop of vanilla or ginger ice cream. The combination of textures and flavors is incredible! It’s a perfect treat for hot summer days or any time I want to impress friends with something unique. For more delicious dessert ideas, check out these dinner recipes!
If I want to keep things simple, I sometimes just crumble gingersnaps over a bowl of vanilla yogurt for a quick and tasty snack. It adds a delightful crunch and spice that turns a plain snack into something special.
Common Mistakes to Avoid
Overmixing the Dough
One mistake I’ve made in the past is overmixing the dough. When I first started baking, I thought that mixing longer would ensure everything was well combined. But I learned the hard way that overmixing can lead to tough cookies. When it comes to gingersnaps, I’ve found that mixing just until the ingredients come together results in a much softer, more tender cookie. It’s all about that perfect balance!
Incorrect Baking Times
Another common pitfall is misjudging baking times. I remember one time I got distracted while baking and left the cookies in just a couple of minutes too long. Instead of the chewy, tender texture I love, I ended up with hard gingersnaps that weren’t enjoyable at all. I’ve learned that every oven is different, so I always set the timer for the minimum baking time and keep an eye on them. Looking for that slight shine in the center has become my go-to cue for knowing when they’re done.
Not Chilling the Dough
Lastly, I can’t stress enough the importance of chilling the dough. I used to skip this step when I was in a hurry, thinking it wouldn’t make a big difference. But after trying it both ways, I can confidently say that chilling the dough not only helps with flavor but also with texture. It makes the dough easier to handle and results in beautifully shaped cookies. I’ve found that planning ahead and allowing the dough to chill has totally transformed my baking experience.
FAQs About Spicy Sourdough Discard Gingersnaps
Can I Use Different Spices?
Absolutely! One of the best parts about making gingersnaps is the flexibility with spices. While I love the classic combination of ginger, cinnamon, and cloves, I’ve experimented with many variations. Sometimes I throw in a bit of nutmeg or allspice for an extra depth of flavor. Even a hint of cayenne can add a surprising kick! The key is to find the combination that excites your palate.
How Long Do They Last?
In my experience, these gingersnaps can last for about a week when stored properly in an airtight container. If you want to keep them even longer, freezing them is a great option. I’ve had some success keeping them in the freezer for up to three months without sacrificing flavor. Just remember to let them thaw at room temperature before enjoying them again!
Can I Freeze the Dough?
Yes, definitely! Freezing the dough is one of my favorite tricks for having fresh cookies on hand. After shaping the dough into balls, I place them on a baking sheet to freeze individually. Once they’re solid, I transfer them to a freezer-safe bag. When I’m ready to bake, I can pop them in the oven straight from the freezer; just add a minute or two to the baking time. It’s like having a batch of homemade cookies ready whenever the craving strikes!
Frequently Asked Questions
What is sourdough discard?
Sourdough discard is the portion of the sourdough starter that is not used in baking and is typically discarded during feedings. It is a mixture of flour and water that retains some beneficial wild yeast and bacteria from the sourdough culture, adding a tangy flavor to baked goods.
How should I store sourdough discard?
You can store sourdough discard in the refrigerator in an airtight container for about 1 to 2 weeks. If you have too much discard and don’t plan to use it right away, you can freeze it in a freezer-safe bag or container, where it can last for several months.
What are the main ingredients for spicy sourdough discard gingersnaps?
The main ingredients include sourdough discard, unsalted butter, brown sugar, granulated sugar, molasses, and an egg. These ingredients work together to create flavorful and chewy gingersnaps.
Can I use alternative sweeteners in the gingersnap recipe?
Yes, you can experiment with alternative sweeteners like honey or maple syrup instead of molasses. Keep in mind that using these alternatives might slightly alter the texture, so you may need to adjust the flour accordingly.
Why is chilling the dough important?
Chilling the dough is crucial because it helps the flavors meld together and firms up the mixture, making it easier to handle when shaping the cookies. It also enhances the taste and texture of the final cookies.
What should I do to achieve a chewy texture in gingersnaps?
To achieve a chewy texture, ensure you use a higher moisture content from the sourdough discard and avoid overbaking. Look for a slight shine in the center of the cookies when they are done baking, as they will continue to cook slightly on the baking sheet after being removed from the oven.
How can I creatively use gingersnaps in other desserts?
You can crush gingersnaps to use as a crust for cheesecakes or tarts, make gingersnap ice cream sandwiches, or crumble them over vanilla yogurt for a quick and tasty snack.
What are some common mistakes to avoid when making gingersnaps?
Common mistakes include overmixing the dough, misjudging baking times, and skipping the chilling step. Avoiding these pitfalls will help ensure that your gingersnaps are tender and chewy.
How long do spicy sourdough discard gingersnaps last?
When stored properly in an airtight container, gingersnaps can last for about a week. If you freeze them, they can last up to three months without losing flavor.
Can I freeze the gingersnap dough?
Yes, you can freeze the gingersnap dough. After shaping it into balls, freeze them individually on a baking sheet, then transfer to a freezer-safe bag. You can bake them straight from the freezer, adding a minute or two to the baking time.