
There’s something magical about a stunning red velvet cake, especially when it’s gluten-free! This delightful dessert not only looks beautiful but also tastes incredible, making it a true showstopper for any occasion. Read Interesting article: 12 Lovely Baking Recipes for Holiday House Guests
Understanding Gluten-Free Baking
When I first ventured into gluten-free baking, I was both excited and a bit intimidated. The idea of creating delicious treats without traditional flour was a challenge, but I was determined to make it work. I quickly realized that understanding gluten-free baking was the key to my success, especially when it came to replicating the rich texture and flavor of classic recipes like red velvet cake. Basic Recipes Every Home Cook Should Know can provide helpful insights into foundational baking techniques.
The Importance of Gluten-Free Ingredients
Gluten is a protein found in wheat, barley, and rye, which gives baked goods their structure and chewiness. When baking gluten-free, we need to find alternatives that can mimic these properties. I remember my first attempt at gluten-free baking; I used the wrong blend and ended up with a dense, crumbly mess. It was a learning experience, to say the least! I came to understand that choosing the right gluten-free ingredients is crucial for achieving the best results.
Common Gluten-Free Flour Alternatives
Over time, I discovered several gluten-free flour alternatives that worked wonders in my baking. Some of my favorites include:
- Almond flour: This nut-based flour adds a lovely moisture and a hint of nuttiness to baked goods.
- Coconut flour: A little goes a long way with this absorbent flour, and it’s great for adding fiber.
- Rice flour: Often used as a base in gluten-free blends, it provides a neutral flavor.
- Oat flour: Made from ground oats, it’s fantastic for adding a slightly sweet flavor and works well in cakes.
- Gluten-free all-purpose flour blends: These are often pre-mixed and can be a lifesaver, as they usually contain a combination of flours and starches designed to mimic all-purpose flour.
Experimenting with these flours has been a fun journey for me, and I often mix a few together to create the perfect texture for my red velvet cake.
How to Achieve the Right Texture
One challenge I faced in gluten-free baking is achieving that classic cake texture—light and fluffy, yet moist. Through trial and error, I learned a few tricks. For instance, adding a binding agent like xanthan gum or guar gum helps to mimic the elasticity that gluten provides. I’ve found that using a combination of different flours can also make a huge difference. For my red velvet cake, I typically use a blend of almond flour and gluten-free all-purpose flour, which strikes the right balance.
Another tip I learned is to pay close attention to the wet and dry ingredients. Gluten-free batters can sometimes be drier, so I like to adjust the moisture levels by adding an extra egg or using more liquid ingredients. I also make sure to incorporate ingredients that add moisture, like buttermilk or yogurt. This ensures my red velvet cake remains soft and decadent, even without gluten.
What is Red Velvet Cake?
Red velvet cake is one of those desserts that has a bit of a mystique around it. It’s not just the color that stands out; there’s a unique flavor profile that makes it irresistible. I remember the first time I tried red velvet cake at a friend’s birthday party. The rich, velvety texture and the hint of cocoa were something I’d never experienced before, and I was hooked.
History and Origins of Red Velvet Cake
The origins of red velvet cake are quite fascinating. Some stories trace it back to the 1920s, when it gained popularity in the Southern United States. It’s said that the cake’s striking color was originally brought about by a reaction between cocoa powder and acidic ingredients like buttermilk and vinegar. I love the idea that this cake has such a rich history behind it, adding to the experience of baking and sharing it with others.
Traditional Ingredients and Flavor Profile
A classic red velvet cake typically includes a mix of flour, cocoa powder, sugar, buttermilk, vinegar, and eggs, along with a generous amount of red food coloring. The flavor is a delightful combination of chocolate and vanilla, with a hint of tanginess from the buttermilk. When I bake my gluten-free version, I aim to preserve this unique flavor while ensuring the texture is just as delightful. It’s all about finding the right balance of ingredients!
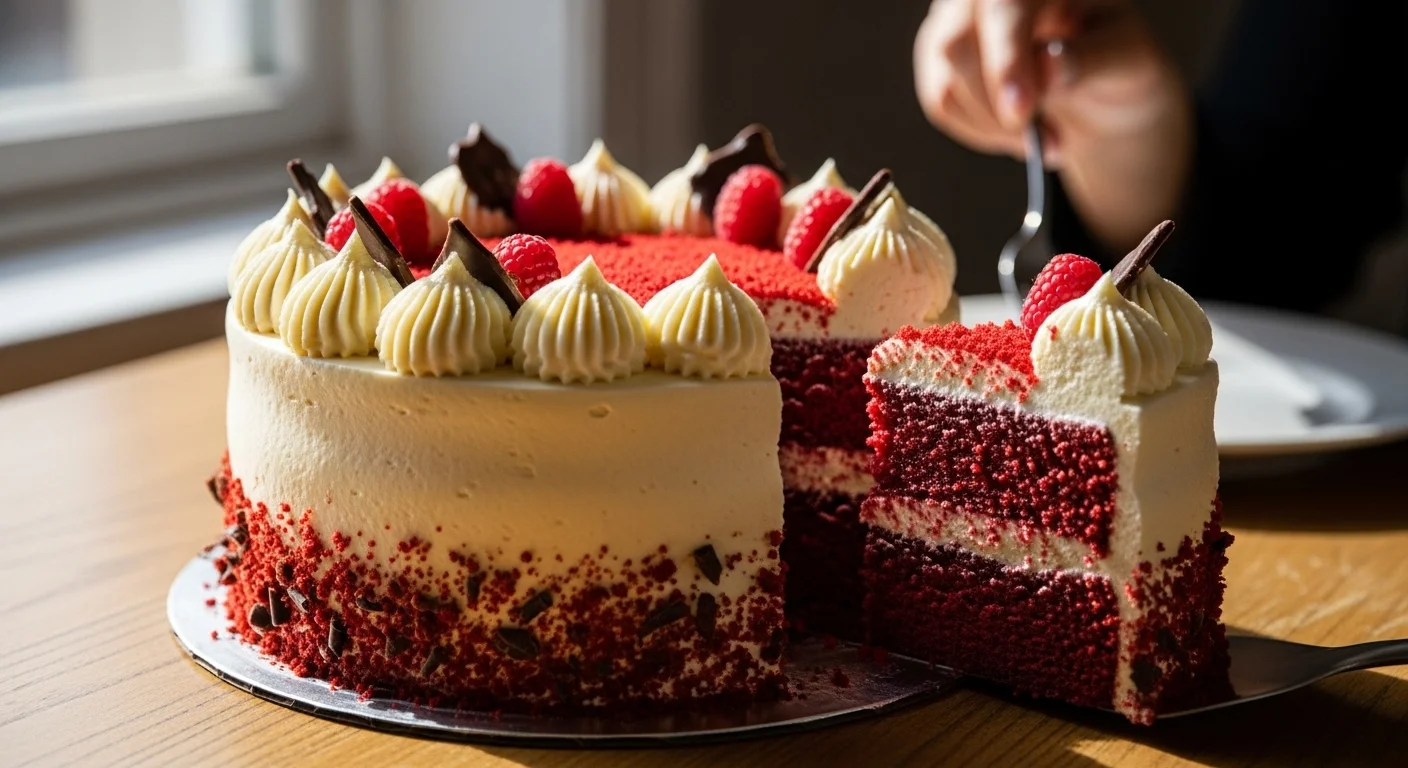
Why Red Velvet Cake is a Showstopper
What makes red velvet cake a true showstopper is not just its vibrant color but also its rich flavor and creamy frosting. The contrast between the deep red cake and the white cream cheese frosting is visually stunning, making it a centerpiece for any occasion. I’ve used this cake for birthdays, anniversaries, and even holiday gatherings, and it never fails to impress. Every time I bring it out, I can see the excited looks on my friends’ faces, and it brings me so much joy. The combination of its beauty and taste creates an experience that’s hard to forget, and I believe that’s what makes it a beloved classic.
Key Ingredients for a Stunning Gluten-Free Red Velvet Cake
When it comes to baking a gluten-free red velvet cake, the ingredients play a crucial role in achieving that perfect taste and texture. I’ve spent a lot of time experimenting with different components, and I’ve learned that each ingredient contributes something special to the final product. Here’s a breakdown of the key ingredients I consider essential for my gluten-free red velvet cake.
Gluten-Free Flour Options
The gluten-free flour you choose can make or break your cake. I’ve found that a blend of flours often works best, as it mimics the properties of traditional wheat flour. For my red velvet cake, I typically use a mix of almond flour and a good-quality gluten-free all-purpose flour blend. Almond flour gives a nice moist texture, while the all-purpose blend provides the structure I need. I also like to add a bit of coconut flour for extra moisture and fiber, but it’s essential to balance these flours so that the cake doesn’t turn out too dry or too dense.
Cocoa Powder and Its Role
Cocoa powder is another key player in creating that signature red velvet flavor. I prefer using unsweetened cocoa powder because it has a deep, rich flavor that enhances the cake without adding any extra sweetness. I remember the first time I used high-quality cocoa powder in my baking; it completely transformed the taste of my cakes! The cocoa adds not just flavor but also contributes to the cake’s moisture. I’ve learned that the quality of the cocoa can significantly influence the final result, so I always opt for a brand I trust.
Natural Colorants vs. Food Coloring
One of the most iconic aspects of red velvet cake is its vibrant color. While I love the traditional red food coloring, I’m always on the lookout for natural alternatives. I’ve experimented with beet juice, which gives a lovely hue without the artificial additives. It’s a fun way to keep things a bit healthier while still achieving that stunning red color. However, I’ve found that achieving the exact shade of red can be tricky with natural colorants, so I often mix a little bit of both for the best outcome. It’s all about finding that balance that works for you!
Eggs and Dairy Substitutes for Dietary Needs
In my gluten-free baking adventures, I’ve learned that eggs are vital for providing structure and moisture. However, if I’m baking for someone with an egg allergy or if I want to make my cake vegan, I have some egg substitutes that work well. Flaxseed meal mixed with water creates a gel-like consistency that mimics eggs in baking, and I’ve had success with applesauce as well. Each substitute has its unique properties, so I recommend experimenting to see which one you prefer in your red velvet cake.
Adding Moisture: Oils and Buttermilk Alternatives
Moisture is key in gluten-free baking, and I’ve learned that choosing the right oil can make a big difference. I often use vegetable oil or melted coconut oil in my red velvet cake recipe. They help keep the cake moist and tender. As for buttermilk, I like to create my own substitute by mixing dairy or plant-based milk with a bit of vinegar or lemon juice. This adds the tanginess that’s characteristic of red velvet cake while also ensuring that the batter remains smooth and luxurious. I’ve found that using buttermilk alternatives keeps my cake from drying out and enhances its overall flavor.
By carefully selecting and balancing these key ingredients, I’ve been able to create a gluten-free red velvet cake that not only looks gorgeous but also tastes amazing. It’s a rewarding experience to bake something that everyone can enjoy, regardless of their dietary restrictions. Now that we’ve covered the ingredients, let’s dive into the step-by-step recipe for making this delightful cake!
Step-by-Step Recipe for Gluten-Free Red Velvet Cake
Now that we’ve covered the essential ingredients, it’s time to get into the fun part—baking the cake! I remember the first time I followed a recipe for red velvet cake, and the excitement was palpable. There’s something so rewarding about mixing ingredients and watching them transform into a beautiful cake. Here’s how I make my gluten-free red velvet cake, step by step.
Tools and Equipment You’ll Need
Before diving into the recipe, it’s important to gather all your tools and equipment. Here’s what I usually have on hand:
- Mixing Bowls: I like to use a few different sizes to separate wet and dry ingredients.
- Electric Mixer: A hand mixer works great, but a stand mixer can make the process easier.
- Measuring Cups and Spoons: Accurate measurements are essential for baking success.
- Spatula: A rubber spatula is perfect for scraping down the sides of the bowl and folding ingredients together.
- 9-inch Round Cake Pans: I prefer using two pans for even baking and easy layering.
- Parchment Paper: This helps prevent the cake from sticking to the pans.
- Cooling Rack: Allowing the cake to cool properly is key to achieving the right texture.
Preparing the Cake Batter
With everything ready, let’s dive into preparing the cake batter. I love how the kitchen gets filled with the sweet aroma of baking. Here’s how I do it:
- Preheat the Oven: I start by preheating my oven to 350°F (175°C). This ensures it’s at the right temperature when I’m ready to bake.
- Prepare the Pans: I line the bottom of my cake pans with parchment paper and lightly grease the sides with cooking spray or butter. This little step makes it so much easier to remove the cakes later.
- Mix the Dry Ingredients: In a medium bowl, I whisk together my gluten-free flours, cocoa powder, baking powder, baking soda, and salt. This helps evenly distribute the leavening agents throughout the flour mix.
- Mix the Wet Ingredients: In a large mixing bowl, I combine sugar, eggs, vegetable oil, and buttermilk (or my buttermilk substitute). I beat these together until it’s smooth and creamy. I also add in the vanilla extract and vinegar at this stage, which gives the cake its signature tang.
- Combine the Mixtures: Slowly add the dry mixture to the wet ingredients, mixing just until combined. I’ve learned that over-mixing can lead to a dense cake, so I stop as soon as I don’t see any flour streaks.
- Add the Food Color: Finally, I add in the red food coloring (or beet juice if I’m using a natural alternative) and gently fold it into the batter. This is when the magic happens—the color transforms the batter into a rich, vibrant red!
Baking Instructions
Now that the batter is ready, it’s time to bake! I pour the mixture evenly into my prepared cake pans, making sure to smooth the top with my spatula for an even rise. Then, I place the pans in the preheated oven.
The baking time usually ranges from 25 to 30 minutes, but I like to set my timer for 25 minutes first and check for doneness. It’s important not to overbake, as gluten-free cakes can dry out quickly.
How to Check for Doneness
Checking for doneness is one of my favorite parts. I gently press the top of the cake with my finger; if it springs back, it’s ready. I also use a toothpick or skewer inserted in the center. If it comes out clean or with just a few crumbs attached, I know it’s done! Once baked, I take the cakes out of the oven and let them cool in the pans for about 10 minutes. After that, I carefully remove them from the pans and transfer them to a cooling rack to cool completely.
Once the cakes are fully cooled, they’re ready for frosting and decorating! I can hardly wait to share the finished product, and I think you’ll feel the same excitement when you see your gluten-free red velvet cake come to life.
Frosting Options for Your Cake
Once the cakes are cooled, it’s time for one of my favorite parts: frosting! It’s amazing how the right frosting can elevate a cake from good to absolutely spectacular. I’ve tried various options, and each one brings its own unique touch to the gluten-free red velvet cake. Here are some of my go-to frosting choices.
Classic Cream Cheese Frosting Recipe
The traditional pairing of red velvet cake is cream cheese frosting, and for a good reason. The tangy flavor complements the sweetness of the cake beautifully. Here’s how I make my cream cheese frosting:
- Ingredients: 8 oz of cream cheese (softened), ½ cup of unsalted butter (softened), 4 cups of powdered sugar, and 1 teaspoon of vanilla extract.
- Instructions: In a mixing bowl, I beat the cream cheese and butter together until it’s smooth and creamy. Then, I slowly add the powdered sugar and vanilla extract, mixing until well combined. I love how fluffy and light this frosting turns out!
This frosting is rich and creamy, and it spreads beautifully over the layers of my gluten-free red velvet cake.
Dairy-Free Frosting Alternatives
If you’re looking for a dairy-free option, I’ve found some great alternatives that still taste fantastic. One of my favorites is a coconut cream frosting. To make it, I refrigerate a can of full-fat coconut milk overnight. Then, I scoop out the solid cream and whip it with a bit of powdered sugar and vanilla extract until it’s fluffy and light. It adds a tropical twist to the cake, which is surprisingly delightful!
Decorating Tips for a Stunning Presentation
When it comes to decorating, I love to let my creativity shine! A simple sprinkle of cocoa powder or a dusting of powdered sugar can add elegance without much effort. I often add fresh berries or edible flowers on top for a pop of color and freshness. I also enjoy using chocolate shavings or crushed nuts for a bit of texture. Whether you go simple or elaborate, the presentation can truly make the cake a masterpiece.
Serving and Storing Your Cake
After all the hard work, it’s finally time to enjoy the fruits of our labor! Serving the cake can be as much fun as baking it. Here’s how I like to do it.
How to Cut and Serve the Cake
When it comes to cutting the cake, I always use a sharp knife to get clean slices. I find that warming the knife slightly under hot water helps it glide through the cake without crumbling. For serving, I like to place a slice on a plate and add a dollop of frosting or a scoop of ice cream on the side. It’s a delightful way to enjoy each bite!
Best Practices for Storing Leftovers
If there are any leftovers (which is rare!), storing them properly is key to maintaining freshness. I usually cover the cake with plastic wrap or place it in an airtight container. It can be stored in the refrigerator for several days. Just be sure to let it sit at room temperature for a bit before serving, so it’s not too cold.
Freezing Your Gluten-Free Red Velvet Cake
I’ve also had success freezing gluten-free red velvet cake. I wrap the cooled cake layers tightly in plastic wrap and then in aluminum foil. When I want to enjoy a slice later, I let it thaw in the fridge overnight and then bring it to room temperature before serving. It’s a great way to prepare ahead for special occasions!
Popular Variations of Gluten-Free Red Velvet Cake
As I’ve experimented with my gluten-free red velvet cake, I’ve discovered some fun variations that I think you might enjoy too! Here are a few of my favorites:
Layered Red Velvet Cake
If you’re feeling adventurous, creating a layered red velvet cake can be a showstopper. I usually bake three layers instead of two and frost each layer with cream cheese frosting. The height adds an impressive touch, and it’s such a treat when you slice into it!
Red Velvet Cupcakes
Cupcakes are another fun way to enjoy the flavors of red velvet cake. I love to make them when I have friends over. They’re easy to serve, and I can top each one with a swirl of cream cheese frosting for individual treats. Plus, they’re perfect for parties!
Red Velvet Cake Pops
For a bite-sized treat, red velvet cake pops are delightful! I bake a batch, crumble the cooled cake, mix it with frosting, and roll it into balls. Then, I dip them in chocolate and add sprinkles for a fun presentation. They’re always a hit at gatherings! Read Interesting article: A 30-Day Anti-Inflammatory Meal Plan to Help You Feel Your Best
Frequently Asked Questions (FAQs)
Can I Make This Cake Vegan?
Absolutely! I’ve substituted eggs with flaxseed meal or applesauce and used plant-based milk and dairy-free butter. It turns out delicious!
How Do I Make It Less Sweet?
If you’re looking to reduce the sweetness, you can cut back on the sugar in both the cake and the frosting. Using unsweetened cocoa powder also provides a nice balance.
What Can I Use Instead of Buttermilk?
A mixture of any plant-based milk with a splash of vinegar or lemon juice works perfectly as a substitute for buttermilk.
How to Fix Common Baking Mistakes
If your cake turns out too dry, you can brush it with a simple syrup or add more frosting to the layers. If it’s too dense, ensure you’re not over-mixing the batter next time. Baking is all about learning and adjusting as we go!
Final Thoughts
Baking a gluten-free red velvet cake has been a rewarding journey for me. Not only does it allow me to enjoy a classic dessert, but it also gives me the opportunity to share it with friends and family who have dietary restrictions. I think the joy of baking lies in the love and care we put into our creations, and this red velvet cake is no exception. Whether it’s for a special event or just a weekend treat, I hope you find as much joy in making it as I do. Happy baking!
Frequently Asked Questions
What makes red velvet cake a showstopper?
Red velvet cake is a showstopper due to its vibrant color, rich flavor, and creamy frosting. The contrast between the deep red cake and the white cream cheese frosting creates a visually stunning centerpiece for any occasion.
What are common gluten-free flour alternatives?
Some popular gluten-free flour alternatives include almond flour, coconut flour, rice flour, oat flour, and gluten-free all-purpose flour blends. These flours can be mixed to achieve the desired texture in gluten-free baking.
How can I achieve the right texture in gluten-free baking?
To achieve the right texture, it’s important to use a binding agent like xanthan gum or guar gum, pay attention to the wet and dry ingredients, and adjust moisture levels by adding extra eggs or liquid ingredients like buttermilk or yogurt.
Can I make the gluten-free red velvet cake vegan?
Yes, you can make the cake vegan by substituting eggs with flaxseed meal or applesauce and using plant-based milk and dairy-free butter. The cake will still turn out delicious!
What is the traditional flavor profile of red velvet cake?
The traditional flavor profile of red velvet cake includes a delightful combination of chocolate and vanilla, with a hint of tanginess from buttermilk. When baking a gluten-free version, it is important to preserve this unique flavor.
How do I store leftovers of gluten-free red velvet cake?
To store leftovers, cover the cake with plastic wrap or place it in an airtight container. It can be stored in the refrigerator for several days. Allow it to sit at room temperature before serving for the best taste.
What are some popular variations of gluten-free red velvet cake?
Popular variations include layered red velvet cake, red velvet cupcakes, and red velvet cake pops. Each variation provides a unique way to enjoy the classic flavors of red velvet cake.
What can I use instead of buttermilk in gluten-free baking?
A mixture of any plant-based milk with a splash of vinegar or lemon juice works perfectly as a substitute for buttermilk in gluten-free baking.
How do I check for doneness when baking the cake?
To check for doneness, gently press the top of the cake; if it springs back, it’s ready. You can also insert a toothpick or skewer in the center; if it comes out clean or with just a few crumbs, the cake is done.
What ingredients are essential for a gluten-free red velvet cake?
Key ingredients for a gluten-free red velvet cake include a blend of gluten-free flours (like almond and gluten-free all-purpose flour), cocoa powder, sugar, eggs, buttermilk (or a substitute), vinegar, and red food coloring.