
There’s something magical about a freshly baked sourdough boule. The aroma fills your kitchen, and that first slice reveals a beautiful crumb and crust. Let’s dive into the essentials of making this classic round loaf!
Understanding Sourdough: The Basics
What is Sourdough Bread?
Sourdough bread is unlike any other type of bread. It’s made through a natural fermentation process using wild yeast and lactic acid bacteria, which gives it that unique tangy flavor. Unlike commercial yeasts, sourdough relies on a symbiotic relationship between these microorganisms to rise and develop flavor. I remember the first time I tasted sourdough; it was so different from the loaves I grew up with. The chewiness of the crust and the airy crumb were a revelation, and I knew I had to learn how to make it myself. Read Interesting article: A Guide To High Hydration Sourdough (For Pros)
The Science Behind Sourdough Fermentation
At the heart of sourdough is fermentation. When you mix flour and water and allow it to sit, wild yeast from the environment begins to feed on the sugars in the flour. This process produces carbon dioxide, which causes the dough to rise. At the same time, lactic acid bacteria create that characteristic sour flavor. I find it fascinating how this natural process can produce such incredible results. The longer you let the dough ferment, the more complex the flavors become, which is something I always keep in mind when baking.
Key Ingredients in Sourdough Boule
To make the perfect sourdough boule, you only need a few basic ingredients: flour, water, salt, and, of course, your sourdough starter. I like to use high-quality bread flour for its high protein content, which helps create that lovely structure in the bread. When selecting your water, aim for filtered or bottled water to avoid chlorine, which can inhibit yeast activity. Salt is essential for flavor and strengthens the gluten structure, ensuring a good rise. These ingredients might seem simple, but together they create something extraordinary.
Essential Tools for Baking Sourdough Boule
Baking Equipment You Need
Before diving into the baking process, it’s essential to gather your tools. I’ve found that having the right equipment can make a significant difference. You’ll need a large mixing bowl, a bench scraper for handling the dough, and a kitchen scale for precise measurements. A proofing basket (banneton) is also helpful—it shapes the dough while it rises and gives it those beautiful lines on the crust. Lastly, a Dutch oven is my go-to for baking sourdough. It traps steam during the first part of baking, which helps create that perfect crust.
Choosing the Right Bakeware
When it comes to bakeware, I highly recommend investing in a heavy-duty Dutch oven. The weight of the pot helps retain heat, ensuring even baking. If you don’t have a Dutch oven, a baking stone with a steam pan works well too. I’ve experimented with different types of bakeware, and I can confidently say that the Dutch oven gives the best results. It creates a nice, crusty loaf while keeping the inside soft and chewy, which is exactly what we want in a sourdough boule.
Preparing the Sourdough Starter
What is a Sourdough Starter?
A sourdough starter is a living culture of flour and water that contains wild yeast and bacteria. It’s what gives sourdough bread its unique flavor and texture. I started my own starter several years ago, and it has become a part of my baking routine. Feeding and nurturing it regularly allows it to grow stronger, which is crucial for successful baking. I think of my starter as my little pet; it requires care, but the rewards are worth it!
How to Create Your Own Starter
Creating a sourdough starter is an exciting process. I began by mixing equal parts flour and water in a jar and left it at room temperature. Each day, I would “feed” it with more flour and water, discarding some of the mixture to keep it manageable. Within a week, I noticed bubbles forming—an indication that wild yeast was developing. I recommend being patient during this process; it’s a journey of discovery that I truly enjoyed.
Feeding and Maintaining Your Starter
Once your starter is established, feeding it regularly is key. I typically feed mine every day if I’m baking frequently, or I store it in the fridge if I need a break. When it comes time to bake, I take it out a day in advance, feed it, and let it come to room temperature. This ensures it’s active and ready to work its magic in your dough. Keeping a healthy starter is a rewarding commitment, and I’ve learned to appreciate the care it requires.
The Perfect Sourdough Boule Recipe
Ingredients for the Boule
Now that we have our starter ready, it’s time to gather the ingredients for our sourdough boule. I’ve found that using the right ratios can make all the difference in the outcome. For a basic sourdough boule, you will need:
- 500 grams of bread flour
- 350 grams of water (room temperature)
- 100 grams of active sourdough starter
- 10 grams of salt
These ingredients create a dough that’s easy to work with and produces a great flavor. I always make sure to weigh my ingredients for accuracy, which helps ensure consistency in each bake. The quality of the flour also matters—a high-protein bread flour really makes the bread stand out!
Step-by-Step Instructions for Making Sourdough Boule
Mixing the Dough
Start by mixing the flour and water together in a large bowl. I find it’s best to use my hands for this part, as it allows me to feel the texture of the dough. Once the flour is hydrated, add in the active sourdough starter and mix until everything is combined. After that, sprinkle in the salt. Salt is crucial, as it not only adds flavor but also strengthens the gluten structure. I usually fold the dough over itself a few times to incorporate the salt evenly. Let the dough rest for about 30 minutes; this process is called autolyse and helps improve the dough’s strength.
Bulk Fermentation Process
Bulk fermentation is where the magic happens. During this stage, I let the dough rise at room temperature for about four hours. Every 30 minutes during the first two hours, I gently stretch and fold the dough in the bowl. This helps build gluten and adds strength to the dough. After the two hours, I just let it sit undisturbed. I’ll often cover it with a damp cloth to prevent it from drying out. The dough should approximately double in size and feel airy and light by the end of this period.
Shaping the Boule
Once the bulk fermentation is complete, it’s time to shape the dough. I turn the dough out onto a lightly floured surface and gently flatten it into a rectangle. Then, I fold the edges towards the center, creating tension in the dough. Finally, I flip it over and use my hands to shape it into a round boule. I love this part because it transforms the dough into something that looks like a proper loaf! After shaping, I let it rest for about 20-30 minutes to relax the gluten.
Final Proofing Techniques
Next comes the final proofing. I place the shaped boule into a floured proofing basket, seam side up. This helps it hold its shape while it rises. I usually cover it with a cloth and let it proof for about one to two hours at room temperature. If I want to slow down the proofing process, I sometimes place it in the fridge overnight, which adds even more flavor to the bread. I always check for the dough’s readiness by gently poking it with my finger; if the indentation springs back slowly, it’s ready to bake!
Baking the Sourdough Boule
Now, onto the exciting part—baking! I preheat my Dutch oven in the oven at around 450°F (232°C) for about half an hour before baking. This helps create steam, which is essential for a nice crust. Carefully remove the hot Dutch oven and place the boule inside (I usually use parchment paper to make this easier). I cover it with the lid and bake for 30 minutes. After that, I remove the lid and bake for another 15-20 minutes until the crust is golden brown and crispy. The aroma wafting through my kitchen during this time is simply heavenly! Once it’s ready, I let the boule cool on a wire rack for at least an hour before slicing in. Trust me, waiting is tough, but it’s worth it for that perfect texture.
Common Issues and Troubleshooting
Dense or Doughy Texture
Have you ever sliced into your freshly baked sourdough boule only to find a dense or gummy interior? I’ve been there, and it’s frustrating! A doughy texture can happen for a couple of reasons. One common culprit is underproofing. If the dough hasn’t had enough time to rise, it may not develop the structure needed for that light, airy crumb. I’ve learned to trust my instincts during the final proofing; always poke the dough to check if it’s ready. If your finger leaves an indentation that doesn’t spring back, it’s time to bake!
Another factor might be the hydration level of your dough. If you’re using too much water, it can make handling the dough challenging, leading to a dense loaf. I recommend starting with the water measurements in the recipe and adjusting based on your flour type and humidity. If you find the dough too wet, try reducing the water slightly next time. It’s all about finding that perfect balance!
Crust Not Developing Properly
Nothing beats the sight of a beautifully browned crust on a sourdough boule, but sometimes, it doesn’t turn out as expected. I once baked a loaf that looked pale and soft, which left me quite disappointed. The crust may not develop properly for a few reasons. First, ensure your Dutch oven is preheated adequately. I typically preheat it for at least 30 minutes, allowing the pot to get hot enough to create steam when the dough is introduced.
Another reason might be the temperature of your oven. If it’s running cooler than the set temperature, you won’t achieve that golden crust. I’ve invested in an oven thermometer to check this, and it’s been a game-changer! Lastly, make sure to leave the lid on for the first part of the baking process to trap steam, which is essential for achieving that crusty exterior. Don’t be afraid to experiment with baking times as well; sometimes an extra few minutes can make all the difference!
Starter Not Rising
If you’ve been nurturing your sourdough starter but it’s not rising like it should, it can be a source of concern. I’ve experienced this myself and learned that there are a few key factors to consider. First, make sure your starter is being fed regularly. If you’re not feeding it often enough, it may become weak and unable to leaven your dough effectively.
The temperature of your kitchen also plays a vital role. Sourdough starters thrive in warm environments, ideally around 75-80°F (24-27°C). If your kitchen is cooler, try placing the starter in a slightly warmer spot, like near a heater or in an oven with the light on. I’ve found that simply moving my starter can bring it back to life!
Another thing I’ve learned is to be patient. Sometimes starters take a bit longer to get going, especially after a period of refrigeration. If your starter is bubbly and has a pleasant smell, it’s likely still good to use, even if it needs a little extra time to strengthen. Keep feeding it, and it will bounce back!
Storing and Serving Your Sourdough Boule
Best Practices for Storing Sourdough Bread
After all the hard work of baking a sourdough boule, you’ll want to keep it fresh for as long as possible. I’ve tried various methods, and I’ve found that storing it properly is key. The best way to store your boule is at room temperature, wrapped in a clean kitchen towel or placed in a paper bag. This helps maintain the crust’s crispness while allowing the bread to breathe.
Avoid plastic bags, as they trap moisture and can lead to a soggy loaf. If you know you won’t finish the bread within a few days, consider freezing it. I often slice my boule before freezing, so I can pull out just what I need. To freeze, wrap slices tightly in plastic wrap and then place them in an airtight container or freezer bag. When I’m ready to enjoy a slice, I pop it in the toaster straight from the freezer, and it’s almost as good as fresh!
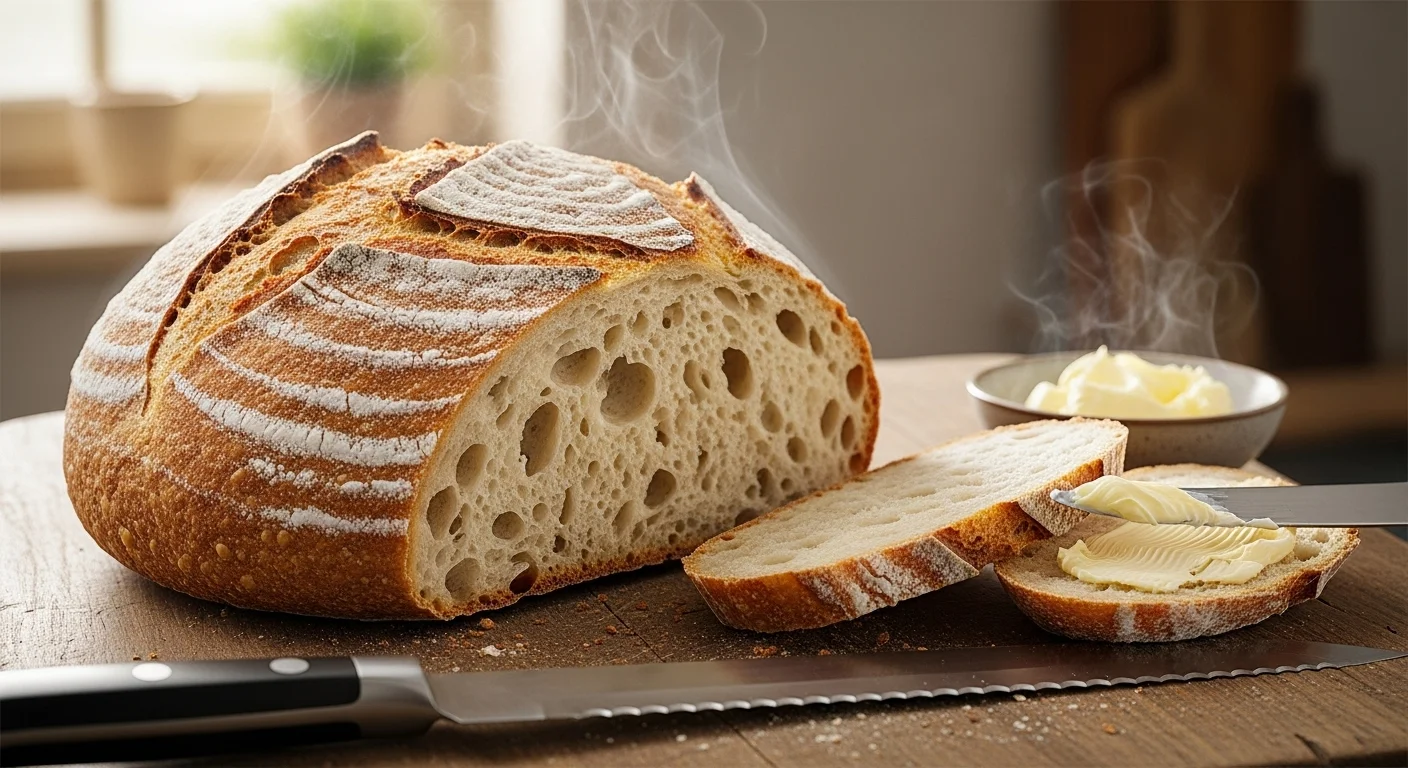
How to Slice and Serve Your Boule
Slicing your sourdough boule can be an art in itself. I’ve learned that using a serrated knife is best for achieving clean cuts without squishing the loaf. When it comes to serving, I love to enjoy my sourdough plain to appreciate its flavor, but it pairs beautifully with various toppings as well. Simple spreads like butter or olive oil are classic choices, but I also enjoy layering on avocado or homemade jams for a delightful twist.
If I’m hosting a gathering, I’ll often serve the bread alongside a cheese platter or a hearty soup. There’s something about a warm bowl of soup with a fresh slice of sourdough that feels so comforting. I encourage everyone to experiment with different pairings—sourdough is such a versatile bread that it complements a variety of dishes! Read Interesting article: Best Mexican appetizers recipes
Variations and Flavor Additions
Herb and Cheese Sourdough Boule
If you’re looking to elevate your sourdough game, I highly recommend trying an herb and cheese variation. I love adding fresh herbs like rosemary or thyme into the dough during mixing. The aroma as it bakes is simply divine! Adding cheese, such as grated parmesan or chunks of sharp cheddar, creates pockets of flavor throughout the loaf. I’ve found that this variation makes for a delightful addition to any meal and is always a hit at gatherings.
Whole Wheat Sourdough Boule
For a heartier option, consider making a whole wheat sourdough boule. I enjoy the nutty flavor that whole wheat brings to the bread. When I first tried this, I substituted part of the bread flour with whole wheat flour, starting with about 25%. This way, I could still achieve a good rise while introducing added nutrition. I find that gradually increasing the whole wheat ratio in my recipes has led to delicious results without sacrificing texture.
Adding Nuts and Dried Fruits
Another lovely way to customize your sourdough is by adding nuts and dried fruits. I often mix in walnuts or pecans for a crunchy texture and flavor. Dried fruits like cranberries or apricots can add a touch of sweetness that balances beautifully with the sour notes of the bread. I like to fold these ingredients into the dough during the bulk fermentation stage, ensuring they’re evenly distributed throughout the loaf. The result is a delightful surprise in each slice!
Frequently Asked Questions (FAQs)
How long does it take to make sourdough boule?
Making sourdough boule is a process that can take anywhere from 12 to 24 hours, depending on your starter’s activity and the fermentation times you choose. I’ve learned to enjoy the slower pace; it gives me time to plan and enjoy the journey of baking!
Can I use all-purpose flour instead of bread flour?
Yes, you can use all-purpose flour, but the texture and structure will differ. I’ve tried it, and while it still produces a nice bread, I find that using bread flour gives the best results in terms of rise and chewiness.
What is the ideal temperature for proofing sourdough?
The ideal proofing temperature is generally between 75-80°F (24-27°C). I often use my kitchen thermometer to check, ensuring my dough is in the perfect environment to thrive.
Frequently Asked Questions
What is sourdough bread?
Sourdough bread is made through a natural fermentation process using wild yeast and lactic acid bacteria, giving it a unique tangy flavor. It relies on a symbiotic relationship between these microorganisms to rise and develop flavor.
What ingredients are needed to make a sourdough boule?
To make a sourdough boule, you need 500 grams of bread flour, 350 grams of water (room temperature), 100 grams of active sourdough starter, and 10 grams of salt.
How do you create your own sourdough starter?
To create a sourdough starter, mix equal parts flour and water in a jar and leave it at room temperature. Feed it daily with more flour and water while discarding some of the mixture until bubbles form, indicating wild yeast development.
What is the bulk fermentation process?
During bulk fermentation, the dough rises at room temperature for about four hours, with gentle stretching and folding every 30 minutes during the first two hours to build gluten and strength.
How should you store a sourdough boule?
The best way to store a sourdough boule is at room temperature, wrapped in a clean kitchen towel or placed in a paper bag to maintain the crust’s crispness. Avoid plastic bags, as they can trap moisture and make the bread soggy.
What should you do if your sourdough starter is not rising?
If your sourdough starter is not rising, ensure it is being fed regularly and kept in a warm environment, ideally around 75-80°F (24-27°C). Patience is key, as it may take extra time to strengthen after refrigeration.
Why might the crust not develop properly on a sourdough boule?
The crust may not develop properly if the Dutch oven is not preheated adequately, the oven temperature is cooler than set, or if the lid is not left on during the initial baking to trap steam.
Can you use all-purpose flour instead of bread flour for sourdough?
Yes, you can use all-purpose flour, but the texture and structure will differ. Bread flour provides the best results in terms of rise and chewiness.
What is the ideal temperature for proofing sourdough?
The ideal proofing temperature is generally between 75-80°F (24-27°C), which helps the dough thrive.
What variations can you make to a sourdough boule?
You can elevate your sourdough by adding fresh herbs and cheese, making a whole wheat version by substituting part of the bread flour, or incorporating nuts and dried fruits for added flavor and texture. Read Interesting article: Authentic Fusion style burger at home