
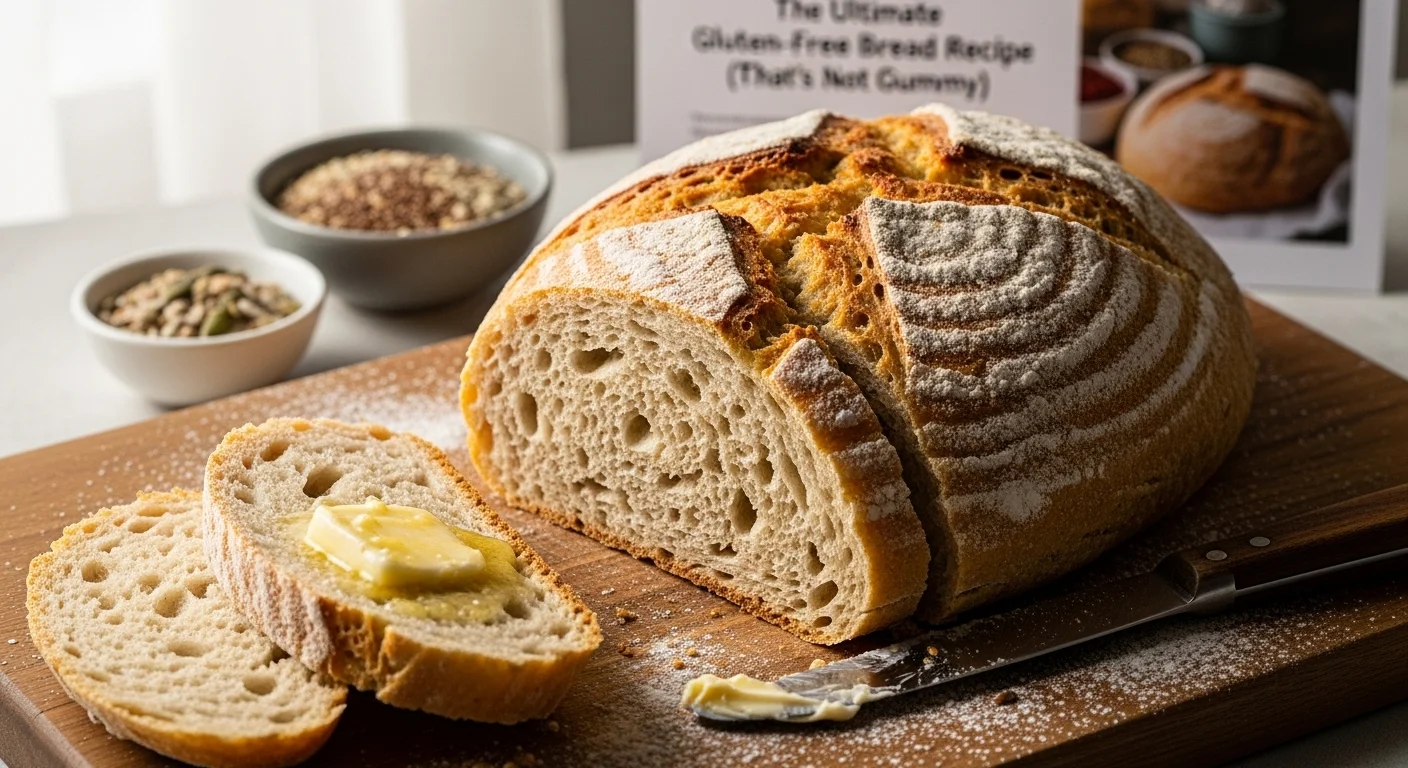
Imagine biting into a slice of bread that’s soft, fluffy, and utterly delicious, all while being completely gluten-free. That’s what I aim to share with you today—my ultimate gluten-free bread recipe that breaks the mold of the often gummy and dense alternatives.
Understanding Gluten-Free Bread
What is Gluten-Free Bread?
Gluten-free bread is made without wheat, rye, or barley, which are the primary sources of gluten. For those of us who are gluten-sensitive or have celiac disease, this means we need to find alternatives that provide the same satisfaction as traditional bread. I’ve spent years experimenting with gluten-free recipes, and believe me, it can be a challenge. But when I finally discovered the right blend of ingredients, it felt like a small victory in my kitchen.
Common Ingredients in Gluten-Free Bread
In my experience, gluten-free bread typically combines various gluten-free flours, binding agents, and moisture-enhancers. Common ingredients include almond flour, coconut flour, and brown rice flour. Each of these brings a unique flavor and texture to the bread. I often mix them to create a well-rounded loaf. Binding agents like xanthan gum or chia seeds help mimic the elasticity that gluten provides, while moisture-enhancers like eggs or applesauce keep the bread from drying out.
Why Do Gluten-Free Breads Often Turn Out Gummy?
One of the biggest hurdles I faced was the gummy texture that too many gluten-free breads have. I quickly learned that this often happens when the recipe doesn’t balance the ingredients properly. Overusing moisture-enhancers or not including enough binding agents can lead to a dense loaf that feels more like a brick than bread. I’ve also noticed that using certain flours without the right combinations can cause the end result to be gummy. It took me a while to figure out the perfect ratios, but once I did, it revolutionized my gluten-free baking.
Key Ingredients for the Perfect Gluten-Free Bread
Gluten-Free Flour Options
Choosing the right flour is crucial for creating a successful gluten-free bread. Here are some of my favorites:
Almond Flour
Almond flour is a great source of moisture and adds a pleasant nuttiness to the bread. I love using it because it brings a light texture and works beautifully in combination with other gluten-free flours.
Coconut Flour
Coconut flour is incredibly absorbent, so it’s essential to use it in moderation. I usually combine it with almond or brown rice flour to prevent my bread from becoming too dry. The subtle sweetness of coconut flour also enhances the flavor profile.
Brown Rice Flour
Brown rice flour is another staple in my gluten-free baking. It provides structure and a slightly chewy texture that mimics traditional bread. I find that it works wonders when blended with nut flours.
Oat Flour
Oat flour is my go-to for adding fiber and a mild flavor. I usually make my own by grinding gluten-free oats in a food processor. It gives the bread a nice, wholesome feel and helps with the overall texture.
Binding Agents
Binding agents are essential in gluten-free baking to help the bread rise and maintain its shape. Here are a few that I always keep on hand:
Xanthan Gum
Xanthan gum is a popular choice that works well to replace gluten. Just a small amount can make a significant difference in the texture of your bread, helping it rise and stay together. I often use it in my recipes to get that perfect loaf.
Chia Seeds
I’ve started incorporating chia seeds as a natural binding agent. When mixed with water, they create a gel-like consistency that can replace eggs in many recipes. I enjoy the added crunch and the nutrition they provide.
Psyllium Husk
Psyllium husk is another binding agent I discovered that helps improve the elasticity of gluten-free bread. It adds fiber and aids in moisture retention, making your bread less likely to dry out.
Moisture-Enhancers
Moisture-enhancers are key to keeping gluten-free bread from becoming dry and crumbly:
Eggs
Eggs are my favorite moisture-enhancer. They provide richness and help bind the ingredients together. Plus, they contribute to a lovely rise and fluffy texture, which is something I always strive for in my gluten-free recipes.
Applesauce
I often use unsweetened applesauce in my gluten-free bread. It not only adds moisture but also a hint of sweetness. It’s a fantastic egg substitute for vegan recipes too!
Greek Yogurt
Greek yogurt is another excellent addition that adds creaminess and moisture. It’s rich in protein and helps create a delightful texture that I can’t resist.
The Ultimate Gluten-Free Bread Recipe
Ingredients List
After years of experimenting, I finally settled on a recipe that yields a soft, flavorful loaf of gluten-free bread. Here’s what you’ll need:
- 2 cups almond flour
- 1 cup brown rice flour
- 1/2 cup oat flour
- 1/4 cup coconut flour
- 1 tablespoon xanthan gum
- 1 teaspoon salt
- 1 tablespoon sugar (or honey for a natural sweetener)
- 1/4 cup chia seeds (or ground flaxseeds)
- 4 large eggs
- 1 cup warm water
- 1/4 cup Greek yogurt
- 1 tablespoon apple cider vinegar
Step-by-Step Instructions
Preparing the Dough
First off, I preheat my oven to 350°F (175°C). Then, I take a large mixing bowl and combine all the dry ingredients: almond flour, brown rice flour, oat flour, coconut flour, xanthan gum, salt, sugar, and chia seeds. I whisk them together to ensure everything is well-blended. Next, I make a little well in the center of the dry ingredients and crack in the eggs. I add the warm water, Greek yogurt, and apple cider vinegar. This is where the magic begins! I mix everything together until it forms a thick batter.
Rising Time
Once the dough is mixed, I transfer it to a greased loaf pan. Covering it with a clean kitchen towel, I let it rise in a warm place for about 30 to 45 minutes. This step is crucial! It helps the yeast develop, making the bread lighter and fluffier. I’ve noticed that if I rush this step, the bread doesn’t rise as nicely, so patience is key.
Baking Process
After the dough has risen, I pop it in the preheated oven. I usually bake it for about 45 minutes or until the top is golden brown and a toothpick comes out clean when inserted into the center. The aroma wafting through my kitchen during this time is heavenly! Once baked, I let it cool in the pan for about 10 minutes before transferring it to a wire rack. This cooling time helps the texture settle, ensuring it slices beautifully later.
Tips for Achieving the Best Texture
Using a Bread Machine vs. Oven Baking
I’ve tried baking my gluten-free bread in both a bread machine and the oven, and I have to say, I prefer the oven method for this particular recipe. While bread machines are convenient, I find that they can create a denser texture, which is not what I’m aiming for. The oven allows for better control over the baking process, and I can keep an eye on the rising and browning.
Temperature and Humidity Considerations
Another factor I’ve learned about is the importance of temperature and humidity in gluten-free baking. If it’s a particularly humid day, I might need to adjust the flour ratios just a bit, as moisture can affect the dough’s consistency. Conversely, in the winter, I sometimes find I need to add a touch more liquid. I always recommend trusting your instincts and adjusting as needed. After all, every kitchen has its own quirks!
Common Mistakes to Avoid
Using the Wrong Flour Blend
One of the biggest mistakes I made early on was using a flour blend that didn’t complement each other. Each flour has its unique properties, and not all combinations will yield great results. I’ve found that mixing nut flours with grain-based flours usually gives the best texture.
Not Measuring Ingredients Accurately
Measuring ingredients accurately is vital in gluten-free baking. I once tried to eyeball the amounts, and let me tell you, the results were far from ideal! I now always use a kitchen scale for precision, which has made a world of difference in my gluten-free bread adventures.
Ignoring Rising Times
Lastly, I’ve learned not to skimp on rising times. It’s tempting to rush through, especially when you’re eager for that first slice. Trust me, allowing the dough to rise fully is critical for achieving that fluffy texture we all crave in a good loaf of bread.
Enhancing Your Gluten-Free Bread Experience
Flavor Variations
Once you’ve mastered the basic gluten-free bread recipe, the fun really begins! I love to experiment with different flavors to keep things interesting. These variations not only enhance the taste but also make the bread feel special. Here are a couple of my favorite ideas:
Herbs and Spices
Adding herbs and spices can truly elevate your gluten-free bread. For instance, I often toss in dried rosemary or thyme for a savory touch. I also enjoy adding garlic powder or onion powder to the mix, which lends a wonderful aroma while baking. If you’re feeling adventurous, a sprinkle of cinnamon or nutmeg can transform the loaf into a delightful breakfast treat. It’s amazing what a little seasoning can do!
Seeds and Nuts
Incorporating seeds and nuts not only adds flavor but also boosts the nutritional profile of your bread. I’ve found that sunflower seeds, pumpkin seeds, and flaxseeds are excellent choices. They add a lovely crunch and texture, which I adore. Sometimes, I even throw in chopped walnuts or pecans for added richness. Just be mindful of how much you add; balance is key to keeping the texture right.
Serving Suggestions
Now that you’ve baked a beautiful loaf of gluten-free bread, how do you enjoy it? I’ve discovered countless ways to serve my creations, and it’s all about pairing it with the right ingredients.
Best Spreads and Toppings
For me, one of the simplest pleasures is slathering my gluten-free bread with butter or olive oil right out of the oven. If I’m looking for something a bit more substantial, I’ll spread on some avocado or hummus, topped with fresh veggies. I’ve also experimented with various nut butters—almond or peanut butter, anyone? And for a sweet twist, a drizzle of honey or maple syrup is divine. The possibilities are endless!
Pairing with Soups and Salads
My favorite way to enjoy gluten-free bread is alongside a warm bowl of soup or a fresh salad. A slice of bread pairs wonderfully with a hearty vegetable soup or a creamy tomato bisque. I remember one chilly evening, I whipped up a zesty butternut squash soup and served it with my gluten-free bread. It was the perfect comfort food! Salads also welcome a slice on the side; a light drizzle of balsamic vinaigrette over a mixed greens salad complements the bread beautifully.
Storing and Freezing Gluten-Free Bread
Best Practices for Storage
One thing I’ve learned throughout my gluten-free baking journey is that proper storage is essential for maintaining freshness. After your bread cools completely, I recommend wrapping it tightly in plastic wrap or placing it in an airtight container. This will help keep it moist and prevent it from drying out. If you’re like me and can’t finish a loaf in a couple of days, storing it in the fridge is a good option, but be aware it may alter the texture slightly.
How to Freeze Gluten-Free Bread
Freezing is a game-changer for those busy weeks when you might not have time to bake. I love to slice my gluten-free bread before freezing it so I can easily grab a piece whenever I want. I wrap each slice individually in plastic wrap and then place them in a zip-top freezer bag. This way, I can take out just what I need without thawing the entire loaf. I’ve found that gluten-free bread can stay fresh in the freezer for up to three months, making it a great option for meal prep.
Reheating Tips for Optimal Freshness
When it comes to reheating gluten-free bread, I have a few tricks up my sleeve. If I’m defrosting a slice, I often let it sit at room temperature for a bit before toasting it. I love using a toaster or a toaster oven to bring back that soft, fluffy texture. If I’m reheating a whole loaf, I wrap it in aluminum foil and place it in a preheated oven at 350°F (175°C) for about 10-15 minutes. This method helps revive the bread, making it taste freshly baked all over again!
Frequently Asked Questions (FAQs)
Can gluten-free bread be used for sandwiches?
Absolutely! I’ve made countless sandwiches with my gluten-free bread. It holds up well with various fillings, from classic peanut butter and jelly to hearty turkey and cheese. Just make sure to slice the bread evenly to ensure the best structure for your sandwich. I’ve found that toasting the bread slightly can also enhance the overall experience!
How long does gluten-free bread last?
When stored properly, gluten-free bread typically lasts about 3-5 days at room temperature. If you choose to store it in the fridge, you can extend its life a bit, but it might dry out faster. Freezing is definitely the best option for long-term storage, as I mentioned before—it can last up to three months without losing too much of its original texture!
Is gluten-free bread healthier than regular bread?
This is a common question I’ve encountered. The healthiness of gluten-free bread depends on the ingredients used. While it can be made with wholesome ingredients, some gluten-free breads can also be high in sugars and low in fiber. I always recommend checking the labels and opting for a homemade version where you can control the ingredients. From my perspective, if you use quality ingredients and balance your diet, gluten-free bread can absolutely be a healthy choice!
Final Thoughts
As I reflect on my journey with gluten-free bread, I can’t help but feel a sense of accomplishment. What started as a quest to find a suitable alternative to traditional bread has transformed into a passion for creating delicious, fluffy loaves that anyone can enjoy. I’ve learned that gluten-free baking doesn’t have to be intimidating; it’s all about understanding the ingredients and experimenting to find what works best for you.
Every loaf I bake tells a story, from the trials of gummy textures to the joy of a perfectly risen bread. I believe that baking gluten-free bread is not just about dietary restrictions; it’s about embracing creativity and making something that everyone can enjoy, regardless of their dietary needs. It brings me joy to see friends and family gather around my kitchen, sharing laughs and devouring slices of warm, homemade bread.
So, if you’re just starting your gluten-free baking journey, I encourage you to dive in. Don’t be afraid to tweak recipes, try new ingredients, and make it your own. Whether you’re adding herbs, seeds, or spices, let your creativity shine through. Remember, each baking session is a chance to learn and grow, and every loaf will taste better than the last.
In the end, gluten-free bread is about more than just the ingredients; it’s about connection, comfort, and the simple pleasure of sharing food with loved ones. I hope this guide has inspired you to create your own beautiful loaves and to enjoy the process as much as the end result. Happy baking!
Read Interesting article: Cheesy Delight: Easy Brazilian Cheese Bread (Pão de Queijo) Recipe
Frequently Asked Questions
What is gluten-free bread?
Gluten-free bread is made without wheat, rye, or barley, which are the primary sources of gluten. It provides an alternative for those who are gluten-sensitive or have celiac disease.
What common ingredients are used in gluten-free bread?
Common ingredients in gluten-free bread include various gluten-free flours such as almond flour, coconut flour, and brown rice flour, along with binding agents like xanthan gum or chia seeds, and moisture-enhancers like eggs or applesauce.
Why do gluten-free breads often turn out gummy?
Gluten-free breads can become gummy when the recipe doesn’t balance the ingredients properly, such as overusing moisture-enhancers or not including enough binding agents, which can lead to a dense loaf.
What are some key gluten-free flour options?
Key gluten-free flour options include almond flour for moisture and nuttiness, coconut flour for absorbency, brown rice flour for structure, and oat flour for fiber and mild flavor.
What are some effective moisture-enhancers for gluten-free bread?
Effective moisture-enhancers include eggs for richness, unsweetened applesauce for moisture and sweetness, and Greek yogurt for creaminess and texture.
How long should gluten-free bread rise?
Gluten-free bread dough should rise for about 30 to 45 minutes in a warm place to help the yeast develop, making the bread lighter and fluffier.
What are common mistakes to avoid when making gluten-free bread?
Common mistakes include using the wrong flour blend, not measuring ingredients accurately, and ignoring rising times, all of which can negatively impact the final product.
How can I enhance the flavor of gluten-free bread?
You can enhance the flavor of gluten-free bread by adding herbs and spices, such as dried rosemary or garlic powder, and incorporating seeds and nuts for added texture and nutrition.
How should gluten-free bread be stored?
Gluten-free bread should be wrapped tightly in plastic wrap or placed in an airtight container to maintain freshness. It can be stored at room temperature for about 3-5 days or in the fridge, but the freezer is recommended for long-term storage.
Can gluten-free bread be used for sandwiches?
Yes, gluten-free bread can be used for sandwiches and holds up well with various fillings. Slicing the bread evenly and toasting it slightly can enhance the overall experience. I’ve made countless sandwiches with my gluten-free bread.
“`