
Have you heard about the vegetarian crunchwrap hack that took the internet by storm? It’s not just a meal; it’s a game changer for busy people craving something delicious, filling, and easy to make at home! Read Interesting article: Festive Wild Rice Salad with Cranberries and Apples
The Rise of the Crunchwrap
My journey with the crunchwrap began on a casual Tuesday evening when I was scrolling through my social media feeds. I stumbled upon a video showing this layered, handheld meal that looked like a taco but had so much more going for it. I was instantly intrigued. The idea of combining various textures and flavors in a convenient wrap captivated me. I realized this was not just a food item; it was a canvas for creativity.
As I learned more about the crunchwrap, I discovered its origins. First introduced by Taco Bell in 2005, this iconic creation has evolved over the years. With its crispy outside and gooey inside, it quickly became a favorite for many, including me. However, I noticed that most recipes featured meat, which posed a challenge for those of us who prefer vegetarian options. That’s when I decided to embark on a mission to create my own vegetarian version, and let me tell you, it was worth every bit of effort!
Gathering the Ingredients
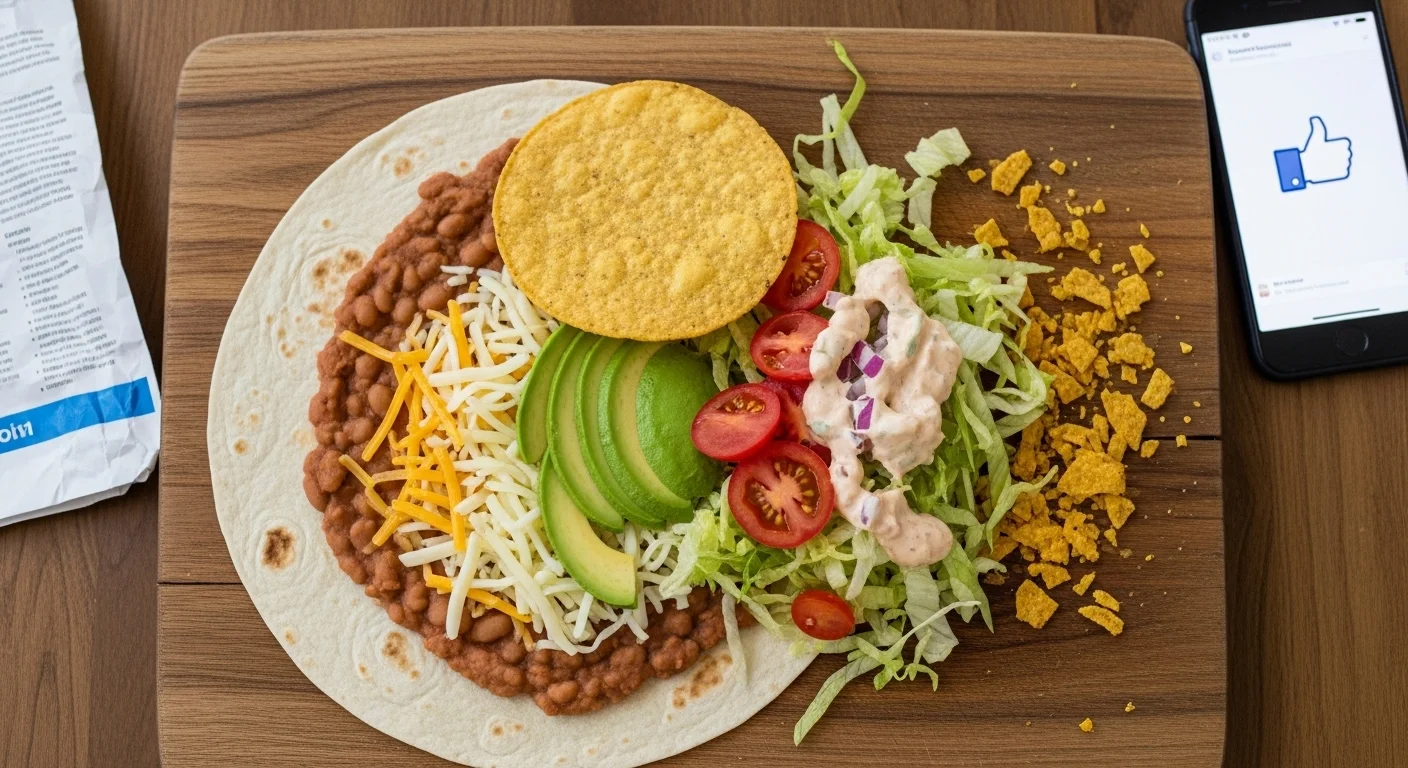
Before diving into the cooking process, I took stock of what I had in my pantry. I found that making a vegetarian crunchwrap was not only easy but also a great way to use up leftover ingredients. Here’s what I included in my version:
- Large flour tortillas
- Smaller corn tortillas or crispy taco shells
- Black beans (or any beans of your choice)
- Shredded cheese (cheddar and pepper jack are my favorites)
- Fresh veggies (like lettuce, tomatoes, and avocados)
- Sour cream or Greek yogurt
- Hot sauce or salsa for a kick
I love how flexible this recipe is. You can easily swap ingredients based on what you have. For instance, if you have bell peppers lying around, chop them up and toss them in! I’ve found that getting creative with what’s already in my kitchen makes the whole experience more fun. If you’re looking for other healthy options, you might enjoy Vietnamese-Style Meatballs with a Sweet Chili Sauce as well!
Layering the Crunchwrap
Now comes the fun part: assembling the crunchwrap! I remember the first time I tried to layer my ingredients, I was a bit nervous about getting it right. But after a couple of attempts, I found my rhythm. Here’s how I do it:
- Start with a large flour tortilla as your base.
- Place a small corn tortilla or crisp taco shell in the center. This adds an extra crunch that I absolutely love.
- Spread a generous layer of black beans on top of the corn tortilla. If you want to spice things up, you can mash the beans with some cumin and lime juice for added flavor.
- Add a sprinkle of cheese. The cheese acts as glue, keeping everything together.
- Next, pile on your fresh veggies. I usually go for lettuce, diced tomatoes, and slices of avocado. The freshness adds a nice contrast to the rich flavors.
- Top it off with sour cream and a drizzle of hot sauce or salsa. I typically go for a little extra heat, but it’s all about personal preference!
- Finally, fold the edges of the tortilla towards the center to create a hexagon shape, tucking in the fillings as you go. This part takes a little practice, but don’t worry if it’s not perfect!
Once I got my first crunchwrap folded, I felt a sense of accomplishment. It’s like creating your own little masterpiece that’s ready to be devoured. I often think about how rewarding it is to make something from scratch, and this was no exception.
Cooking the Crunchwrap
After layering, it was time to cook! I heated a non-stick skillet over medium heat. The goal here is to achieve that crispy texture without burning the tortilla. I remember the first time I flipped my crunchwrap; my heart raced with anticipation. To cook it perfectly, I followed these steps:
- Carefully place the crunchwrap seam-side down in the skillet. Cook for about 3-4 minutes until golden brown.
- Flip it over gently using a spatula. The smell wafting through my kitchen was mouthwatering.
- Cook the other side for another 3-4 minutes until it’s crispy and the cheese has melted.
When I finally removed my crunchwrap from the skillet, I felt proud of what I had created. The golden-brown exterior looked inviting, and I could hardly wait to take a bite. I learned that patience pays off, especially when it comes to cooking.
Enjoying the Crunchwrap
Finally, it was time to dig in! I sat down with my homemade crunchwrap, and I was instantly transported to a delicious world of flavors. The crispy edges contrasted beautifully with the creamy and spicy filling. I couldn’t believe how simple it was to whip up something so tasty.
Sharing this experience with friends or family makes it even more enjoyable. I remember the smiles on their faces as they took their first bites, and suddenly, I felt like a culinary hero! It’s moments like these that I cherish, where food brings us together, creating memories that last a lifetime.
This vegetarian crunchwrap hack has not only satisfied my cravings but also ignited my passion for cooking and experimenting with ingredients. I can’t wait to share more about this amazing journey in the next part! Read Interesting article: 6 Dreamy Lemon Desserts You Absolutely Need to Try
The Versatility of the Crunchwrap
One of the things I absolutely love about the vegetarian crunchwrap is its versatility. Once I got the hang of the basic recipe, I found myself experimenting with different ingredients and flavors. It’s like having a blank canvas that I can paint with whatever I have on hand. I discovered that this simple recipe could be transformed in so many ways, making it perfect for any occasion.
Exploring Flavor Combinations
One night, I decided to kick things up a notch and try a Mediterranean twist. I replaced the black beans with chickpeas, added some feta cheese, and included a handful of spinach. I also drizzled a bit of tzatziki sauce inside. The result was a crunchwrap that transported me straight to the shores of Greece! I felt like a culinary explorer, discovering new territories of flavor right in my own kitchen.
Another fantastic combination I tried was a Mexican-inspired version with roasted sweet potatoes. I cubed the sweet potatoes, seasoned them with chili powder and garlic, and roasted them until they were crispy. The sweetness of the potatoes paired perfectly with the spicy black beans and fresh pico de gallo I added. I remember savoring each bite and thinking about how different ingredients could completely change the vibe of a dish. It was like a party for my taste buds!
Crunchwraps for Every Meal
What’s even better is that crunchwraps aren’t just for dinner. I’ve even made breakfast crunchwraps that have become a weekend staple in my house. Picture this: scrambled eggs, cheddar cheese, a sprinkle of salsa, and fresh spinach all tucked into a crunchy wrap. It’s a complete meal that’s easy to eat on the go, especially when I need something quick before heading out the door. I would even prepare these the night before, pop them in the fridge, and just heat them up in the morning. Talk about a lifesaver!
Then there are the sweet crunchwraps. Yes, you heard that right! I decided to get a little adventurous and created a dessert version. I used a large flour tortilla as the base and spread a layer of Nutella, topped with sliced bananas and a sprinkle of cinnamon. After folding it up and cooking it in a skillet, I had a warm, gooey treat that felt indulgent but was super easy to make. It reminded me of being a kid again, enjoying simple pleasures in life.
Making It a Family Affair
Cooking is an experience that I believe should be shared, and making crunchwraps has become a fun family activity for us. I remember one weekend, I invited my siblings over for a “build-your-own-crunchwrap” night. I laid out all the ingredients—different proteins, veggies, sauces, and cheeses—and let everyone get creative. It was hilarious to see everyone’s unique combinations, and the competition to create the “best” crunchwrap led to a lot of laughter and good-natured teasing.
As we sat around the table, each person taking their first bite, I could see the joy on their faces. It was a reminder of how food can evoke feelings of happiness and togetherness. I realized that every crunchwrap we made was not just a meal; it was an experience and a memory in the making.
Storing and Reheating Leftovers
Sometimes, I make extra crunchwraps to have on hand for busy days. If I find myself with leftovers, I’ve learned a few tricks for storing and reheating to keep them fresh. I wrap them tightly in foil or parchment paper and place them in the fridge. When I’m ready to eat, I pop them in the oven at a low temperature (around 350°F) for about 10-15 minutes. This way, they warm up nicely, and I can enjoy that crispy texture all over again. I also find that the flavors tend to meld together overnight, making them even more delicious the next day!
For me, the crunchwrap is more than just a meal; it’s a versatile dish that reflects my creativity in the kitchen. Each time I make one, I feel like I’m embarking on a culinary adventure, trying to discover new flavors and combinations. The best part? It’s a meal that can bring people together, whether it’s for a casual family dinner or a fun gathering with friends. I can’t wait to share even more stories and tips about my crunchwrap journey in the next part!
The Health Benefits of Crunchwraps
As I delved deeper into my crunchwrap journey, I started to think about the health aspects of the ingredients I was using. I find that cooking at home gives me total control over what goes into my meals, and the crunchwrap is no exception. With a few simple swaps and thoughtful additions, I realized that this delightful dish can be packed with nutrients and flavor!
Choosing Wholesome Ingredients
When I first began making my vegetarian crunchwraps, I was excited to fill them with fresh produce. I started incorporating a variety of colorful vegetables, like bell peppers and spinach, which not only boosted the nutrition but also made my meals visually appealing. I remember the first time I sliced open a crunchwrap to reveal a rainbow of ingredients inside—it was like opening a present! Not only did it look good, but I felt good knowing I was fueling my body with wholesome foods.
One of my favorite additions has become quinoa. It’s a great source of protein and fiber, and it complements the other ingredients perfectly. I often prepare a batch at the beginning of the week, and then I can easily throw a scoop into my crunchwraps. It adds a nice texture and makes every bite feel hearty.
Mindful Portion Control
Another benefit of making my own crunchwraps is that I can control the portion sizes. I tend to make them just the right size for me, which helps me avoid overeating. I remember one time I made them smaller for a gathering, and it turned into a fun appetizer rather than a full meal. It was great to see everyone enjoying them in bite-sized portions, and it encouraged us to try different flavor combinations throughout the evening.
Healthy Cooking Methods
When it comes to cooking the crunchwrap, I often opt for healthier methods. Instead of deep-frying, I stick to pan-searing with just a bit of olive oil or cooking spray. This not only keeps the crunchwrap crispy but also reduces the amount of added fat. I’ve found that a little goes a long way when it comes to flavor, and I love how the oil crisps up the tortilla without overwhelming the dish.
Sometimes, I even skip the skillet and toss my assembled crunchwrap in the oven. I simply place it on a baking sheet and let it bake until golden brown. It’s a hands-off approach that allows me to prep other dishes or relax while my crunchwrap cooks to perfection. I remember the first time I did this; I was amazed at how easy it was to achieve that delightful crunch without much effort!
Balancing Flavor and Nutrition
While I want to keep my crunchwraps healthy, I also believe in enjoying the flavors. I’ve learned to balance nutrition with taste. For instance, I might go heavy on the veggies but still add my favorite cheese for that creamy goodness. I try to use lower-fat options like part-skim mozzarella or even vegan cheese alternatives, and they melt beautifully without compromising on flavor. It’s all about finding that sweet spot where health and taste meet.
Gathering Inspiration from Others
As I continued to explore the health benefits of my crunchwraps, I found myself looking for inspiration from others who are passionate about healthy cooking. I followed food bloggers and chefs who specialize in wholesome, plant-based meals. Their creative takes on traditional recipes opened my eyes to new ingredient combinations. I remember stumbling upon a recipe for a crunchwrap filled with roasted vegetables and hummus, which I had never thought of before. I tried it, and it became one of my go-to options!
Incorporating new ideas has become a joy rather than a chore. I find myself excited to experiment with seasonal ingredients. For example, in the fall, I love adding roasted butternut squash and kale to my crunchwraps. It’s amazing how the flavors change with the seasons, and I truly appreciate the variety it brings to my meals.
Creating a Family-Friendly Meal
When I make crunchwraps, I often consider how to make them family-friendly. I’ve learned that including nutritious ingredients is key, especially when I want my kids to enjoy them. I remember one evening when I made a batch, filled with colorful veggies and a touch of melted cheese. My kids were skeptical at first, but once they took a bite, they were hooked! The crunch and the gooey cheese were a hit, and they didn’t even realize how many healthy ingredients they were consuming.
Now, I involve them in the process, letting them pick out their favorite veggies or toppings. It’s a great way to teach them about healthy eating while also making it fun. I feel that these moments in the kitchen not only create delicious meals but also instill a love for cooking and trying new foods in them.
Overall, I’ve found that my vegetarian crunchwrap journey has transformed into something more than just a meal. It’s a chance for me to embrace health, creativity, and family togetherness, all while enjoying a delicious dish. I can’t wait to delve into more tips and experiences in the next part!
Frequently Asked Questions
What is the vegetarian crunchwrap hack?
The vegetarian crunchwrap hack is a meal that combines various textures and flavors in a convenient wrap, making it delicious, filling, and easy to prepare at home.
When was the crunchwrap first introduced?
The crunchwrap was first introduced by Taco Bell in 2005 and has since evolved into a popular dish.
What ingredients are typically used in a vegetarian crunchwrap?
A vegetarian crunchwrap typically includes large flour tortillas, smaller corn tortillas or crispy taco shells, black beans, shredded cheese, fresh veggies, sour cream or Greek yogurt, and hot sauce or salsa.
Can the ingredients of the crunchwrap be substituted?
Yes, the ingredients in a crunchwrap can be easily swapped based on what you have on hand, allowing for creativity in the recipe.
How do you layer the ingredients in a crunchwrap?
To layer the ingredients, start with a large flour tortilla, add a small corn tortilla or taco shell in the center, spread black beans, sprinkle cheese, pile on fresh veggies, add sour cream and hot sauce, then fold the edges towards the center to form a hexagon shape.
What cooking method is recommended for making the crunchwrap crispy?
To achieve a crispy texture, the crunchwrap should be cooked in a non-stick skillet over medium heat for about 3-4 minutes on each side until golden brown.
What are some flavor combinations for crunchwraps?
Some flavor combinations for crunchwraps include a Mediterranean twist with chickpeas and feta, a Mexican-inspired version with roasted sweet potatoes, or even breakfast crunchwraps with scrambled eggs and spinach.
How can leftovers of crunchwraps be stored and reheated?
Leftover crunchwraps can be wrapped tightly in foil or parchment paper and stored in the fridge. To reheat, place them in the oven at a low temperature (around 350°F) for about 10-15 minutes to maintain their crispy texture.
What health benefits can be associated with making homemade crunchwraps?
Making homemade crunchwraps allows for control over ingredients, enabling the inclusion of fresh produce, protein-rich items like quinoa, and healthier cooking methods, which can enhance the nutritional value of the meal.
How can making crunchwraps be a family-friendly activity?
Making crunchwraps can be family-friendly by involving kids in the process, letting them choose their favorite veggies and toppings, which can teach them about healthy eating while making it a fun experience.